Category Archives: Interests

Old Salem, North Carolina

We went to Greensboro, North Carolina to visit my wife’s folks for Christmas. It is about 30-45 minutes from Winston-Salem, NC and we went to Old Salem the day after Christmas to look around the old town that dates back to colonial times, the mid 1700’s, before we were even a country! It is similar to Colonial Williamsburg in that there are people in period dress working various shops. I’m born and raised in Oregon, so the oldest buildings around my area, Jacksonville, OR are from the mid to late 1800’s so this was a special treat for me.

When we arrived in town you could clearly see the R.J. Reynolds tobacco plants right next to the edge of downtown. Just a stones throw away is the old town.
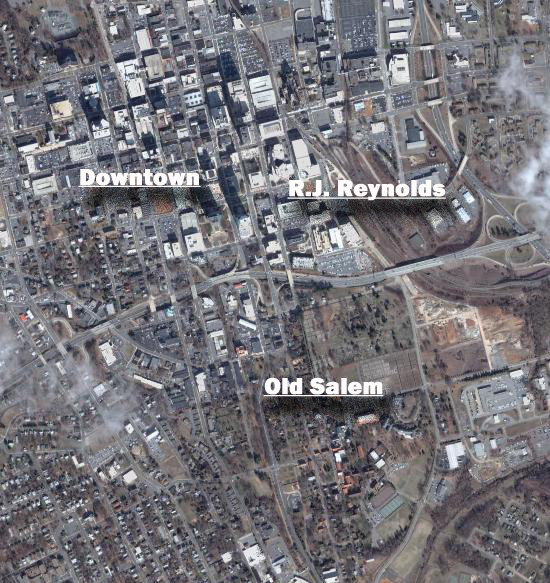
w-s_n-c.jpg (click map)

There is a parking area and a main entry area with lunch bar, gift shops and tickets. You go over a modern but old looking covered bridge into old town.

salem_01.jpg salem_06.jpg salem_09.jpg
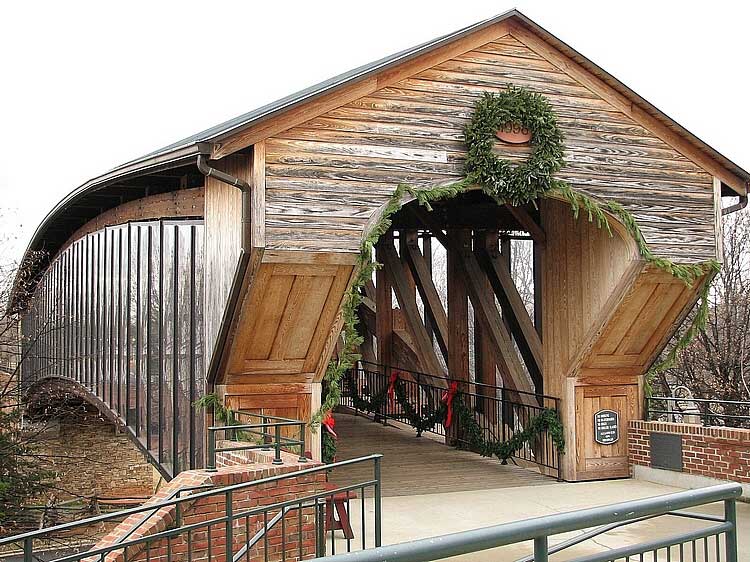
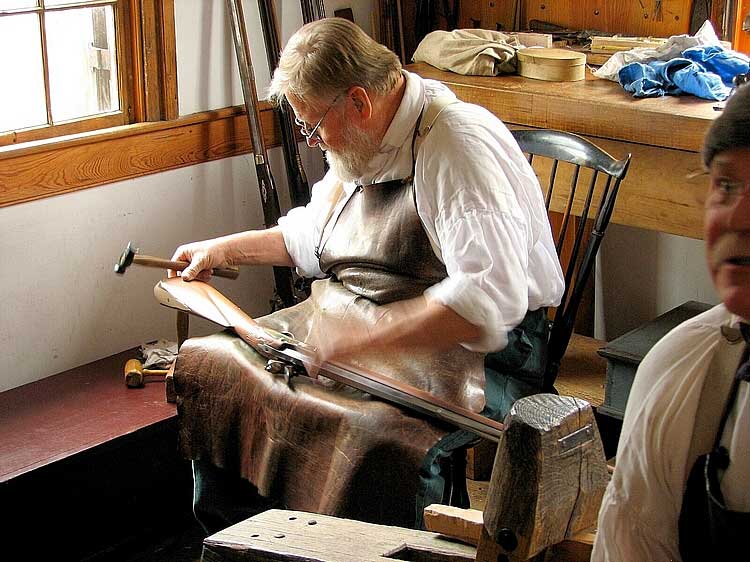
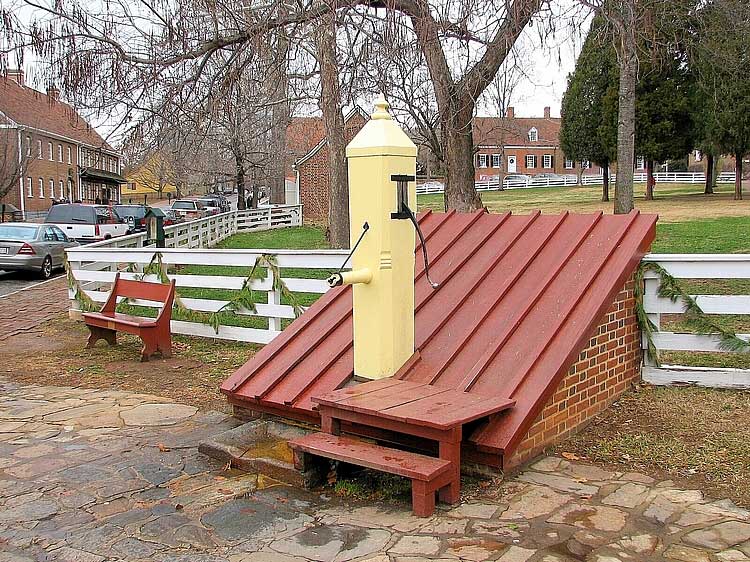
Bridge into town………………. Gunsmith …………………..Public well

speaking of public well, we learned that Old Salem had one of the first public water complete with under ground plumbing, Water came to strategic spots around town like above, and to some kitchens!

salem_11.jpg salem_12.jpg salem_20.jpg
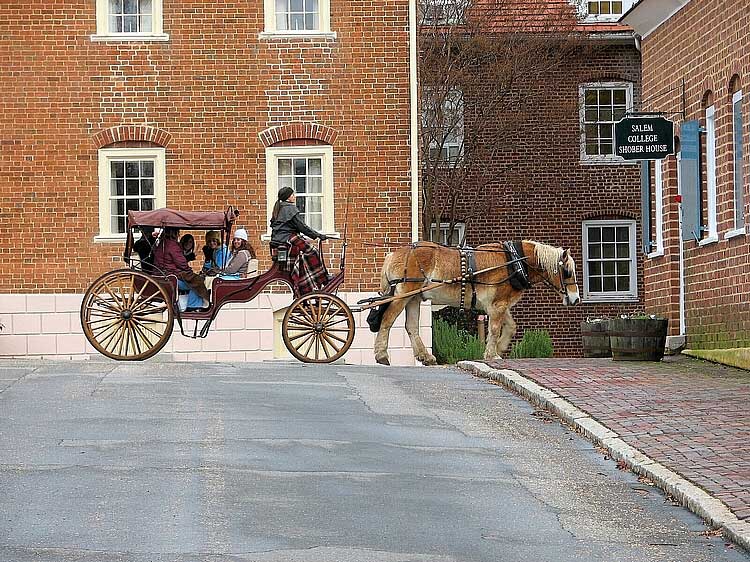
Horse drawn carriage ………. old watering trough …..”Single Brothers House”

The town was founded by people of the “Moravian” religion. Young boys lived at home and went to school, young girls were schooled at home. Older boys 14 yrs and up lived at the “Single Brothers House” and schooled and learned a trade there until old enough to marry. Older girls lived in the “Single Sisters House” until old enough to marry. The horse drawn carriage above is right in front of the Single Sisters House.

salem_21.jpg  salem_27.jpg  salem_28.jpg
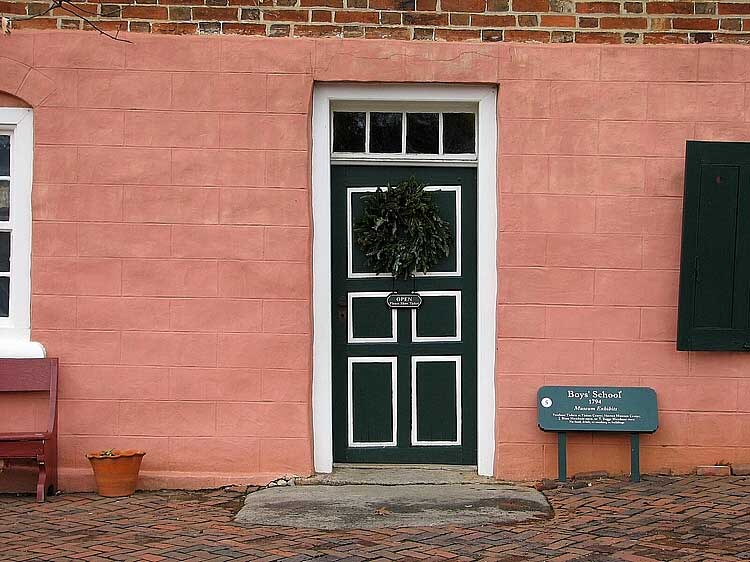
neat old doorway …………….Old walls and walks ………bakers

The neat crooked old doorway goes into the young boys school. There are neat walls and walkways every where. We went into the old bakery and watched them make bread. The special of the day was the most incredible loaf of onion bread I’ve ever eaten, and only $4.50 for a 1 lb. loaf! After it cooled slightly, she slopped on some melted butter all over the loaf then bagged it up to sell. my reaction was OMG!!! when we tried a sample, and we bought a loaf for dinner.

salem_07.jpg salem_14.jpg salem_16.jpg
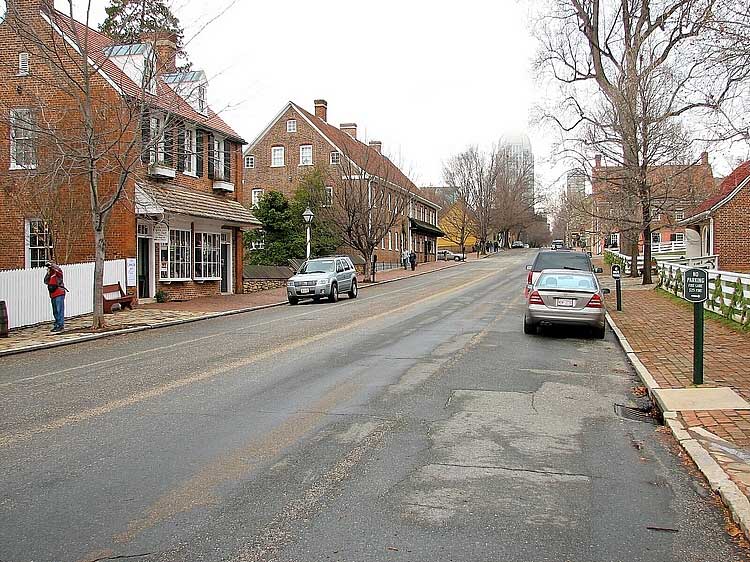
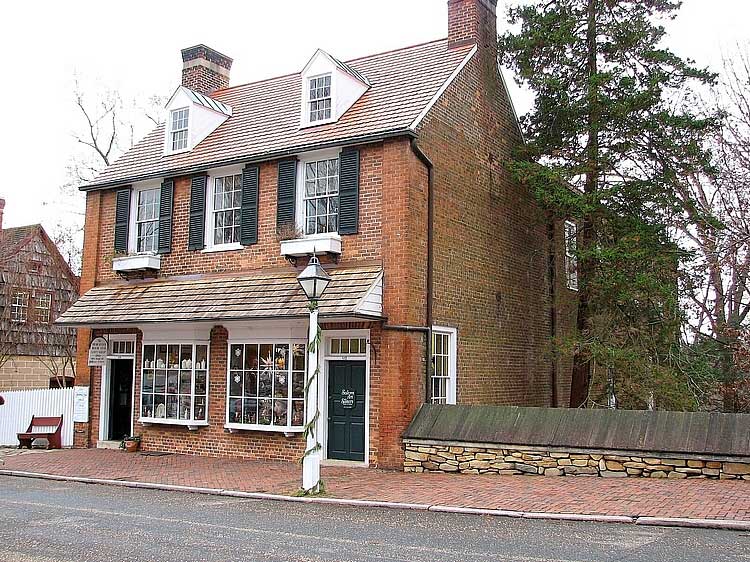
some old buildings…….. Notice there are cars? yes you can drive through town and there are people living in most of the homes along the streets.

All in all it was a pretty good day trip. I have never seen stuff that old (except for when I was stationed in Germany) and still standing and people living and working there. Nothing was “re-constructed” only, originals were remodeled.

Back Yard Landscape Facelift

I have finally finished the landscaping project that connects the new patio and the new deck that was built over the old patio coming off of the kitchen.

patio-007.jpg Before… bakyard-007.jpg After

We used some of the old bricks left over from the patio project and made a border along the wider flower beds we created using fill that came out of the patio excavation.

patio-008.jpg Before… bakyard-011.jpg After

We used composite “bender board” and composite stakes between the granite/rock path and the grass. It won’t rot like redwood or cedar and is stronger too. I had many tree roots to deal with and had to rip the bender board to about 1-1/2″ along the half towards the deck. Buried only about 1/2 to 1 inch deep in places, yet is strong enough to withstand the occasional big foot or lawn mower wheel. Impossible to do with redwood bender board.

bakyard-002.jpg bakyard-005.jpg bakyard-009.jpg

That’s an antique milk tank used as a pedestal for a sun dial

bakyard-013.jpg bakyard-016.jpg bakyard-019.jpg

I used bark dust for the mulch and “decomposed” granite for the pathway, with stones collected around our mountain cabin mixed in.

Build a Deck Project, Phase II

Ok, first some revisions to “phase I”. I went ahead and extended the deck 1 foot out the other side after all, so it is a full 16 ft deck. I had to remove the old awning before I could go any further…

patio-184.jpg The awning was on a hinge like mounting so we just removed the bolts holding the support posts to the top and swung it down. It was even lighter than I thought it would be, being aluminum but fairly large. Then we supported it with scrap blocks of wood because it was narrower (7′) than the height of the over-hang (7′-8″) from the top of the patio to ease in removing the screws holding it to the fascia.

patio-187.jpg patio-182.jpg Now I could lay down the deck joists, but first I had to attach the ledger board I talked about in the last blog. First I marked where the joists would be on the ledger so I didn’t have a bolt right on a spot where the joist went. I also marked the joist positions on the outer rim board, opposite of the ledger board at the same time so they line up well. Then attach to wall with bolts. Then, since I am using the “Deck2Wall” spacer, you must remove the ledger, then screw the spacer right over the holes using 1 screw to hold it. Then put a dab of silicone on the holes in the siding and re-attach the ledger.

patio-189.jpg patio-183.jpg Now I could attach the joists to the ledger. I laid down the two outer joists, attached the rim board, then laid the rest of the joists on their marks. Since it was resting the right on the patio slab, I simply “toe-nailed” them to the ledger using 3″ screws. The outer 4×4 posts used a saddle bracket to mount them to the ledger. As a precaution, since it is only a 2×4 ledger, I dug out a small area under the ledger and braced it with a pier block, just for added support. If I had been thinking, I would have put one more post brace on the outer 4×4 joist right near the ledger.

Build a Deck Project, Phase I

Now that the new patio is done, for the most part, (there are still some fence boards to mend, stain and gravel edging etc) I have started on the new deck that will be placed over the existing (older) patio coming off of the kitchen. Fortunately, the patio slab couldn’t be in better condition. It looks only a few years old, (although it isn’t by any means) and it has good slope away from the house for drainage. It is only 9-feet by 12-feet (9’x12′) and isn’t big enough for my new Bar-B-Q and the Cheminea, and a nice table.

I am going to once again use some rather unorthodox methods to increase the size of the deck to 9.5’x15′. I know, weird size but tree roots and sloping ground around the deck prevented me from going through with my original 10’x16′ deck. It still will be an improvement, especially with room for me to put my bar-b-q.

Unorthodox you say? yes, I am putting down Evergrain composite decking right over the slab. This may not sound too bad except the new composite decking’s out there want plenty of air circulation underneath. I am going to gap it between the boards 3/16″, not just the 1/8″ as prescribed by the manufacturer.

patio-176.jpg I am drilling 1-1/2″ holes (3) in each pressure treated 2×4 to aid in air flow. Since it is sitting on a solid concrete slab, the structural integrity won’t be effected. More holes with cute little louvered vents in them will be on the end board, one for each “cavity” created between the joists. They won’t be visible unless you get your face down there and look.

patio-174.jpg I also had to dig up some of the area where the extension will be. This was not easy because of a large tree less than 8 feet away has shallow roots every where. I had to shorten up my original 4 feet to 3 feet because a huge root just was too big to cut.

patio-175.jpg patio-177.jpg (here, I’m using scrap 4×4 and a straight 2×4 to get the saddles the same height as the patio slab) I’m using pressure treated 4×4’s as the last two outside joists, resting in a Simpson EPB44HG post saddle. A trick I picked from one of my customers who builds decks for a living. This helps get the deck right down to ground level, rising up just enough to not touch the ground. With the air holes I drilled there should be plenty of air to prevent rotting too.

Attaching the deck to the house won’t be a big thing either. I’m using a fairly new product called “Deck2Wall” spacers. A hockey puck-looking disc that goes between the siding or foundation wall and the ledger board, creating an air space to prevent rotting.

deck-002.jpg deck-007.jpg A dab of silicone at the bolt hole is added prevention. I learned these methods because I work as Asst. Mgr at a local retail lumber and building supply store.

In years past, I wasn’t able to add a deck unless I tore out the patio, or ripped each joist down. Standard lumber decking is 1-1/2″ thick and would have been too high above my doorway. The newer composite decking is only 1″ thick, putting it just at level with the doorway. A larger than normal gap between the deck and the wall should help prevent water from getting in, because the deck-to-wall spacers also help in drainage, eliminating the need for flashing.

Block patio project, Phase IV

After getting the block down, you must go over it with a plate tamper, the same one I used to pack the 3/4 minus gravel earlier. I’ve heard different ways it should be done, like spread the sand over it first then tamp it, or even leave it thick over the block while going over it with the tamper. I opted to use the method I read in the booklet that the manufacturer of our block put out… (click thumbs)

tamping the block First, I tamped the block before sweeping the sand into the cracks. I went around and back and forth several times. They suggest this so the sand will fill the cracks from the bottom up. Perhaps if you fill the cracks with sand prior to tamping it won’t come up as far from the bottom?

sweeping sand sand in cracks Then I swept the sand into the cracks real good, first at 90 deg. to the cracks, then at 45 deg. angles to the cracks, then I went over it with the tamper again as before, making several passes in both directions.

brick path Here is the brick path between the garden and patio, we did the tamping the same way.

Finished patio finished patio Here is the finished patio! We are very pleased with how it turned out.

tuckers portrait Here is a little old window we found at Morrow’s antiques and Nick knacks we placed on the back of the shed. Cheryl did a “reverse painting” of her cat Tucker peering out on the panes of glass.

fountain This is a fountain we found at Lowe’s. We looked all over and this was the nicest looking one for under $300 we could find. It’s fully contained for the most part, just add water!

This concludes the block patio project. We are still not done though with the back yard. We need the new deck over the old existing patio and the pathway between the two, plus misc. landscaping.

Block patio project, Phase III

Now the fun begins! After packing the gravel comes the time to lay some block. First I made a bed of sand 1″ (inch) thick by laying 3/4″ PVC pipe (3/4 is the inner diameter, 1″ is the outer diameter) and using a straight 2×4 to “screed” the sand.

screeding sand (click thumbs)

Then, following the edging we laid down earlier, we started making our rows of block following the pattern we liked. Our is called an “I” pattern. After carefully laying the blocks, make sure the edges are tight and square and gently thump the block into the sand if need be.

patio-087.jpg patio-099.jpg patio-104.jpg

Using cuts of plywood helps in not disturbing the block until it can be tamped.

Here I am kissing the final stone after several hours just of laying block and 5 weeks total, mostly after work and weekends digging and scrapping.

patio-113.jpg

The next day you can hardly move but we wanted the get the antique brick path between the new patio and the garden finished sooo…

patio-118.jpg

My wife Cheryl laid most of the path bricks.

Block patio project, Phase II

Now that the pad for the patio and pathway between the garden and patio have been cleaned and prepared by removing all dirt and tree roots, it’s time for the gravel.

(click thumbnails to enlarge image)

The gravel gets delivered by a local rental place.

Chris and I get to work spreading the ‘3/4″ minus’ gravel. Most tutorials and how-to’s say to use 4 inches of gravel, but I have asked around and some “experts” have told me that 2-3 inches is fine.


Now I am using a plate tamper to pack the gravel. I first hosed it down lightly and this helps it to stay packed when finished. I made two passes going opposite directions, making sure it was just damp but not soaking wet.

Just in time, our block is delivered and set right where we wanted it.

After packing the gravel down we are making ore starting corner. It must be a perfect 90 deg. angle so the block stays true throughout the laying process. We used a “3-4-5” method using our string line (measure up one side 3 feet, up the other side 4 feet, then measure across the two points you made and it should be exactly 5 feet) we were extremely lucky and it was perfect the first time! (my great eyeballing)


Block patio project, Phase I

Ok, as if the kitchen remodel wasn’t enough, now we are tearing out the back yard and making it a more inviting and livable space. We are putting in a block patio with a small tiered fountain on one corner and we also decided to improve the flower beds and convert our existing patio into a deck.

Here are some “before” shots of the patio area at the far end of our yard, the flower beds along the house, and the existing patio that we are going to convert into a deck.

(click thumbnails to enlarge image)

First off we had to remove the dilapidated old flower bed in the corner and remove the old dirt.

Then we cut the grass with a rented sod cutter. This was used to cut down below the grass and easily remove the grass in big 12″ to 18″ pieces. We did this for the patio area and the extended flower beds as well.


After removing the sod we had to remove the small tree roots and layers of dirt to get down to the final depth. I opted to use the sod cutter twice again as it cuts a uniform 2″ depth on each pass, then all you do is scoop out the loose dirt. We used the loose dirt from the patio excavation to fill in the widened flower beds.

The sod cutter only get so close to the fence, shed, etc.  so we had to go around with a pick to remove dirt to the level of the rest of the pad

Moving the flower beds out also meant we had to move the sprinkler heads out to the new edge of the grass


Burnin’ up the slash

Today we went up to our cabin in the mountains to close it down for the winter and got to watch the logger, who cleared some timber for us two years ago, burn the “slash” piles that were left as a result of the logging. I had been wanting not to miss this because the piles were huge! We’re talkin’ a pile the size of a house with huge logs in it.


It started out slow, mainly because the loggers must wait until this time of year, after a few good rains to light the piles. It is good and dry, having sat for two summers but the rains do moisten it up a bit. once it got going we had to get back 100 feet and could still feel the heat.

That’s my son Chris standing there to show how large the pile was.

The Jeep is seen far back from the fire. He did get to play some today. We found a logging road left over that was cleared of major debris and we rode around the property, definitely a 4-wheel road.

Cranberry Harvest!

This last weekend we went to Bandon Oregon to see if we could catch some of the harvest. Two years ago we were there in the late summer and took a tour of a “Bog” and learned that they can be harvested different ways. One way is with a “scoop”, a device that runs along the vines and brushes the berries into the collecting end. Then there is the flooding method. This is the preferred method for many reasons, one of which is that only the “good” berries float, the bad ones sink and are not harvested. Harvest time is throughout October. Watching some videos of the local harvest was intriguing enough to make us want to go back in October sometime and watch. We were probably a week late as most of the bogs we saw were already harvested, so we didn’t get to see the actual harvest but did see a flooded bog and a fellow churning the vines with a machine that knocks the berries off of the vines and then they float.

Then the workers “round them up” and either use a conveyor belt or a vacuum type hose to load them into the trucks. We couldn’t stay long enough to see that part of the harvest but I was excited enough just to find a bog that was right next to the road and could reach down and grab the berries.

The berries are sorted and shipped to many places such as “Ocean Spray” for use in juice, canned berries, fresh berries etc. Reading up on cranberry facts you will find that they are one of the few truly native fruits of North America. Bandon has the perfect climate for them. Berries grown in the east coast and other places on the west coast are mostly white or pink in color, claiming about 80% of the juice we drink. The Bandon berries are prized for their rich red color. Yes those bright red berries you buy for Thanksgiving most likely came from Bandon!