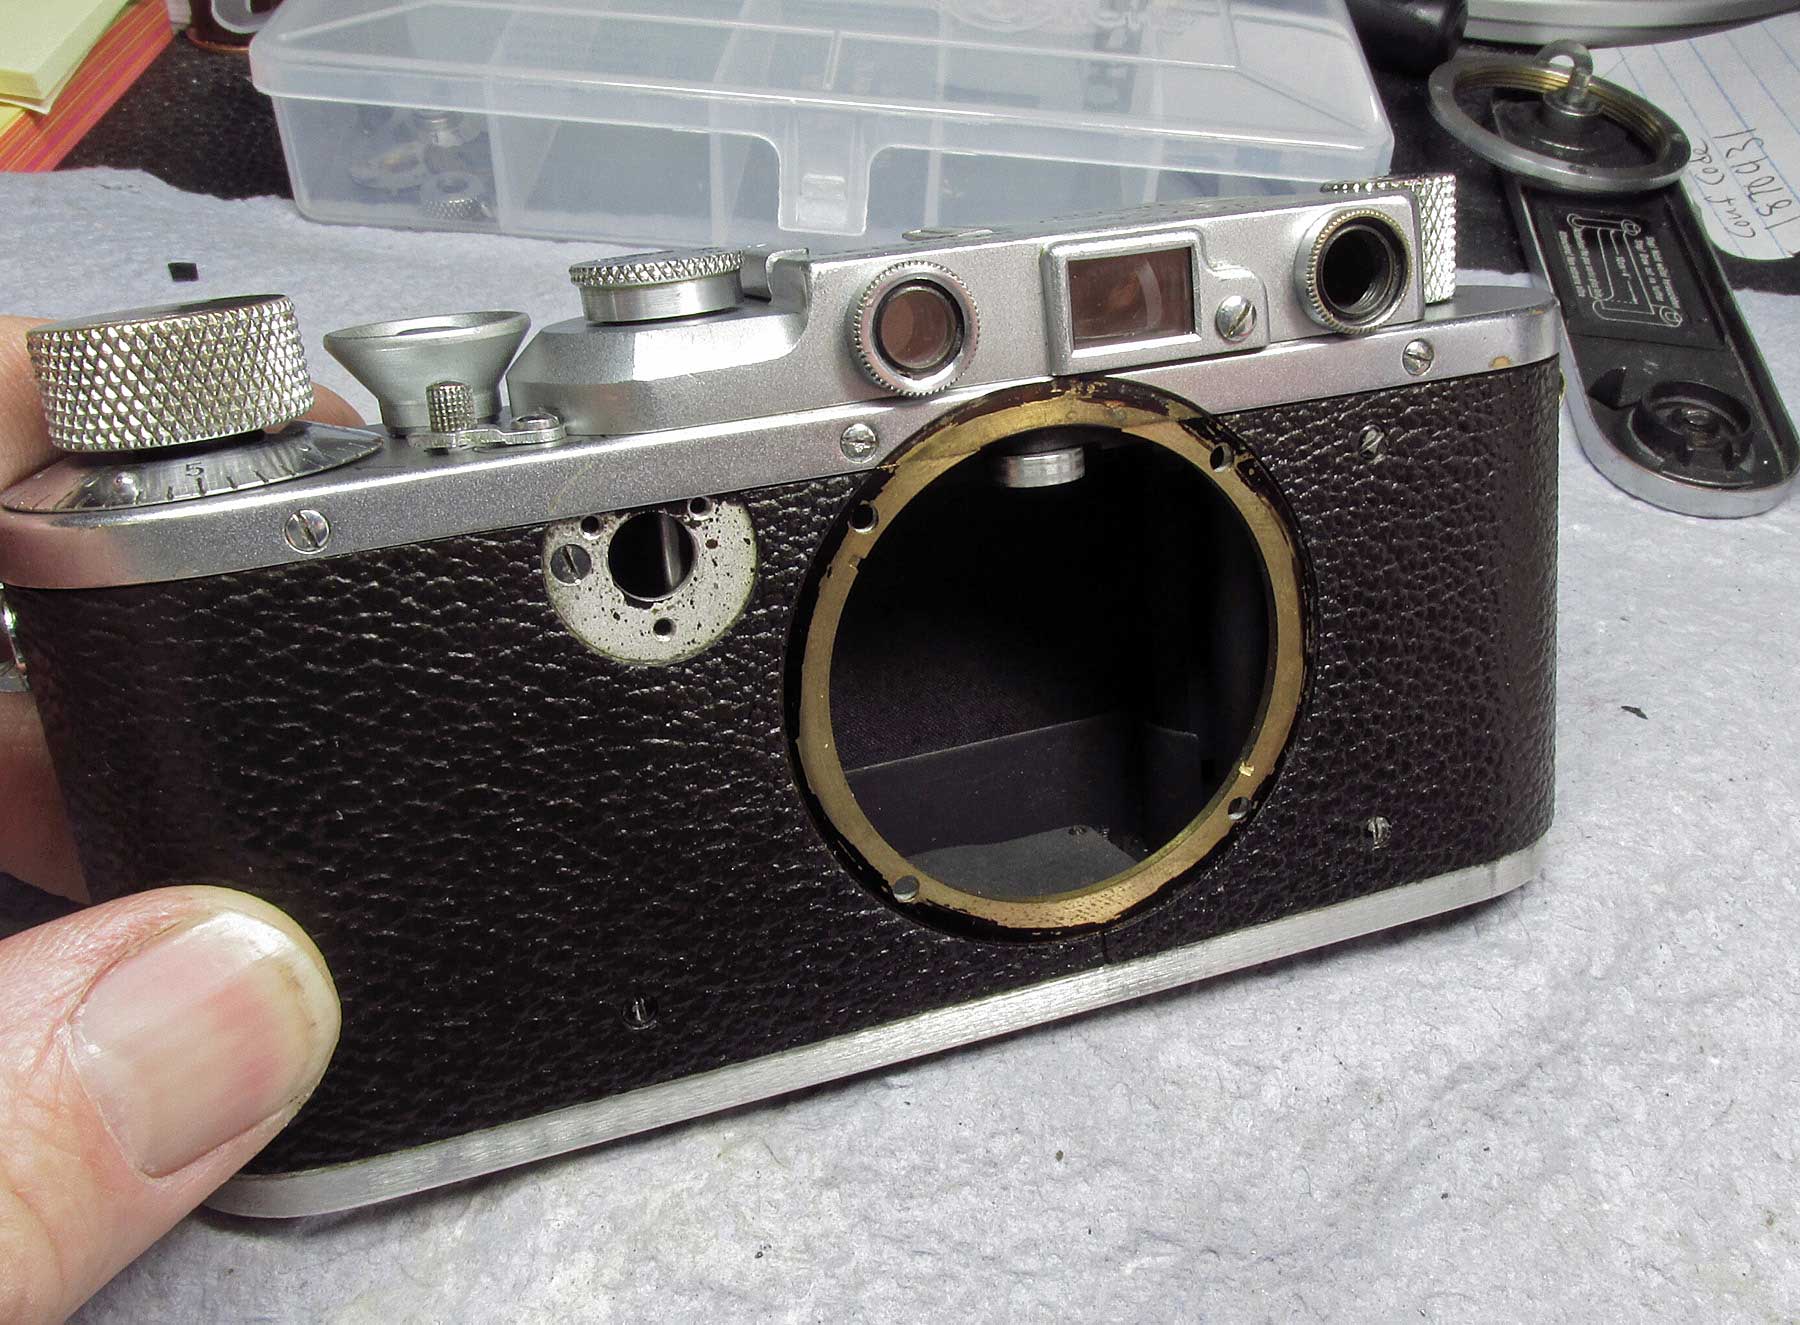
Giving my 1936 Leica IIIa a CLA. It basically works fine, the shutter fires on all speeds but the slow speeds are sluggish. The curtains have previously been changed, maybe even twice in it’s 78 year history and look good. Overall there is brassing on the top and bottom plates but from normal heavy usage telling me it was well loved. From what I can see, the inside looks clean-ish, no major rust or anything like that.
overall ‘before’ shot
dirty vulcanite
filthy around hard-to-clean places
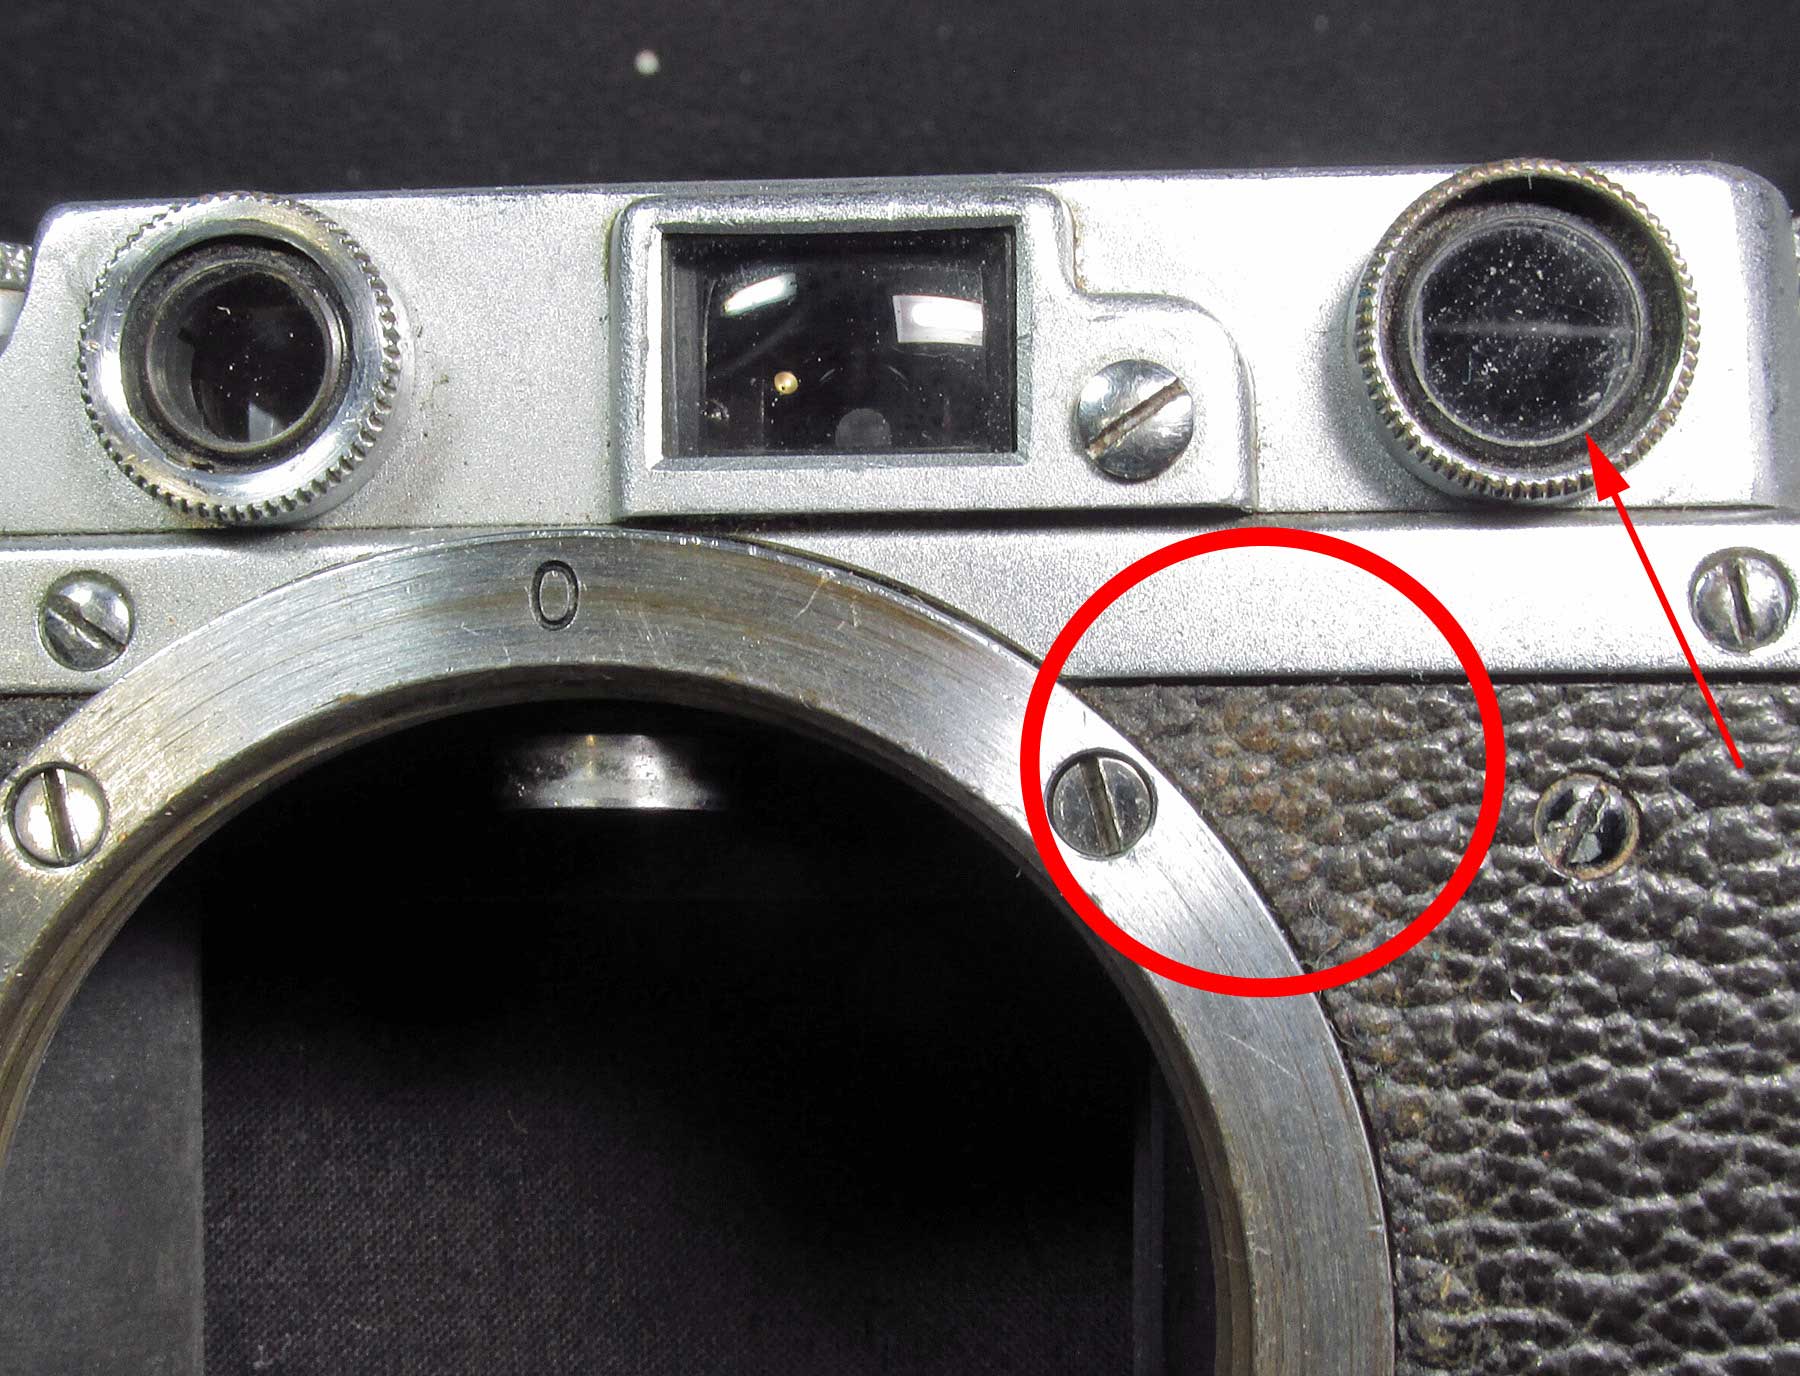
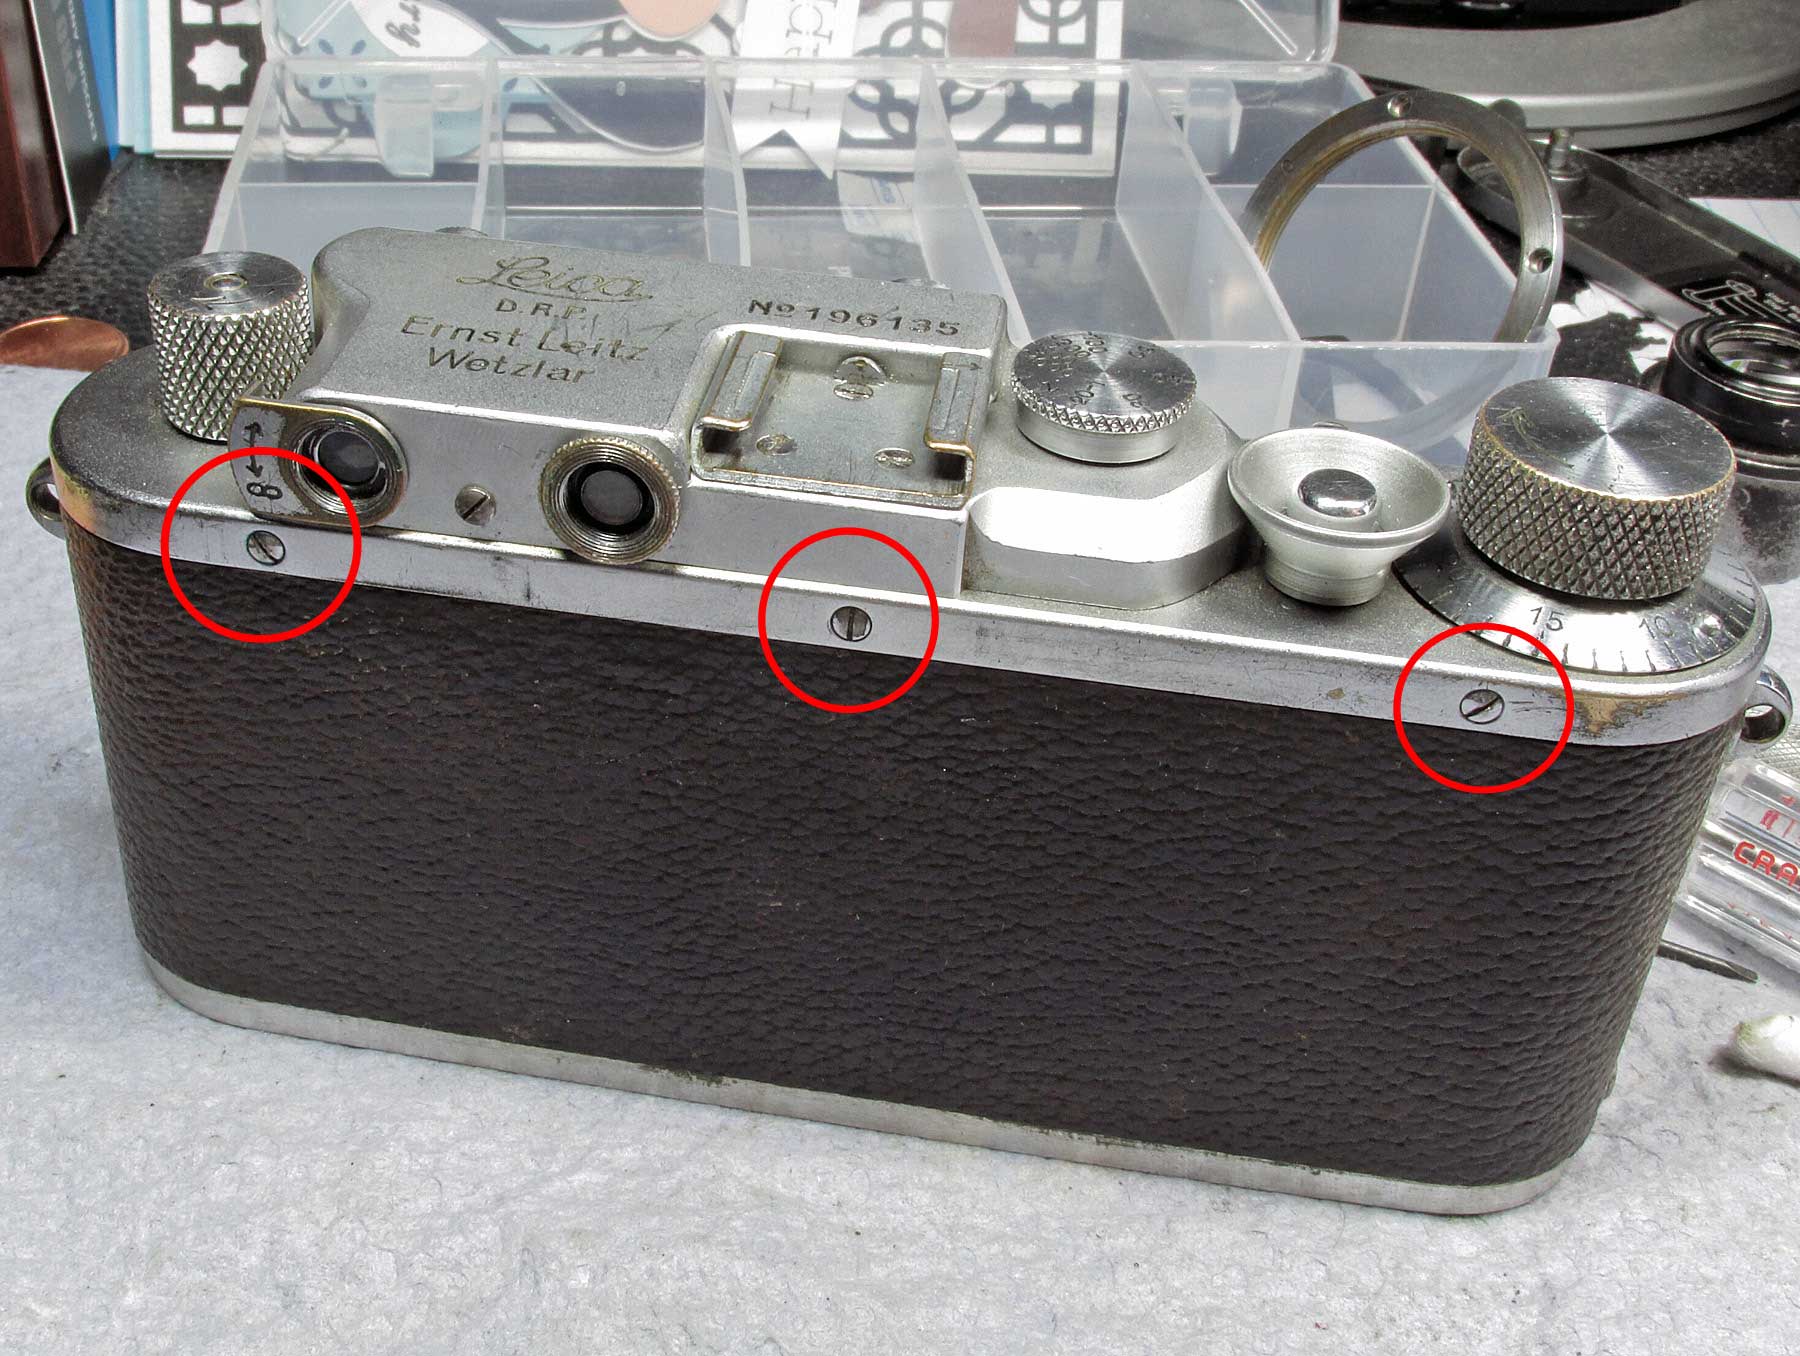
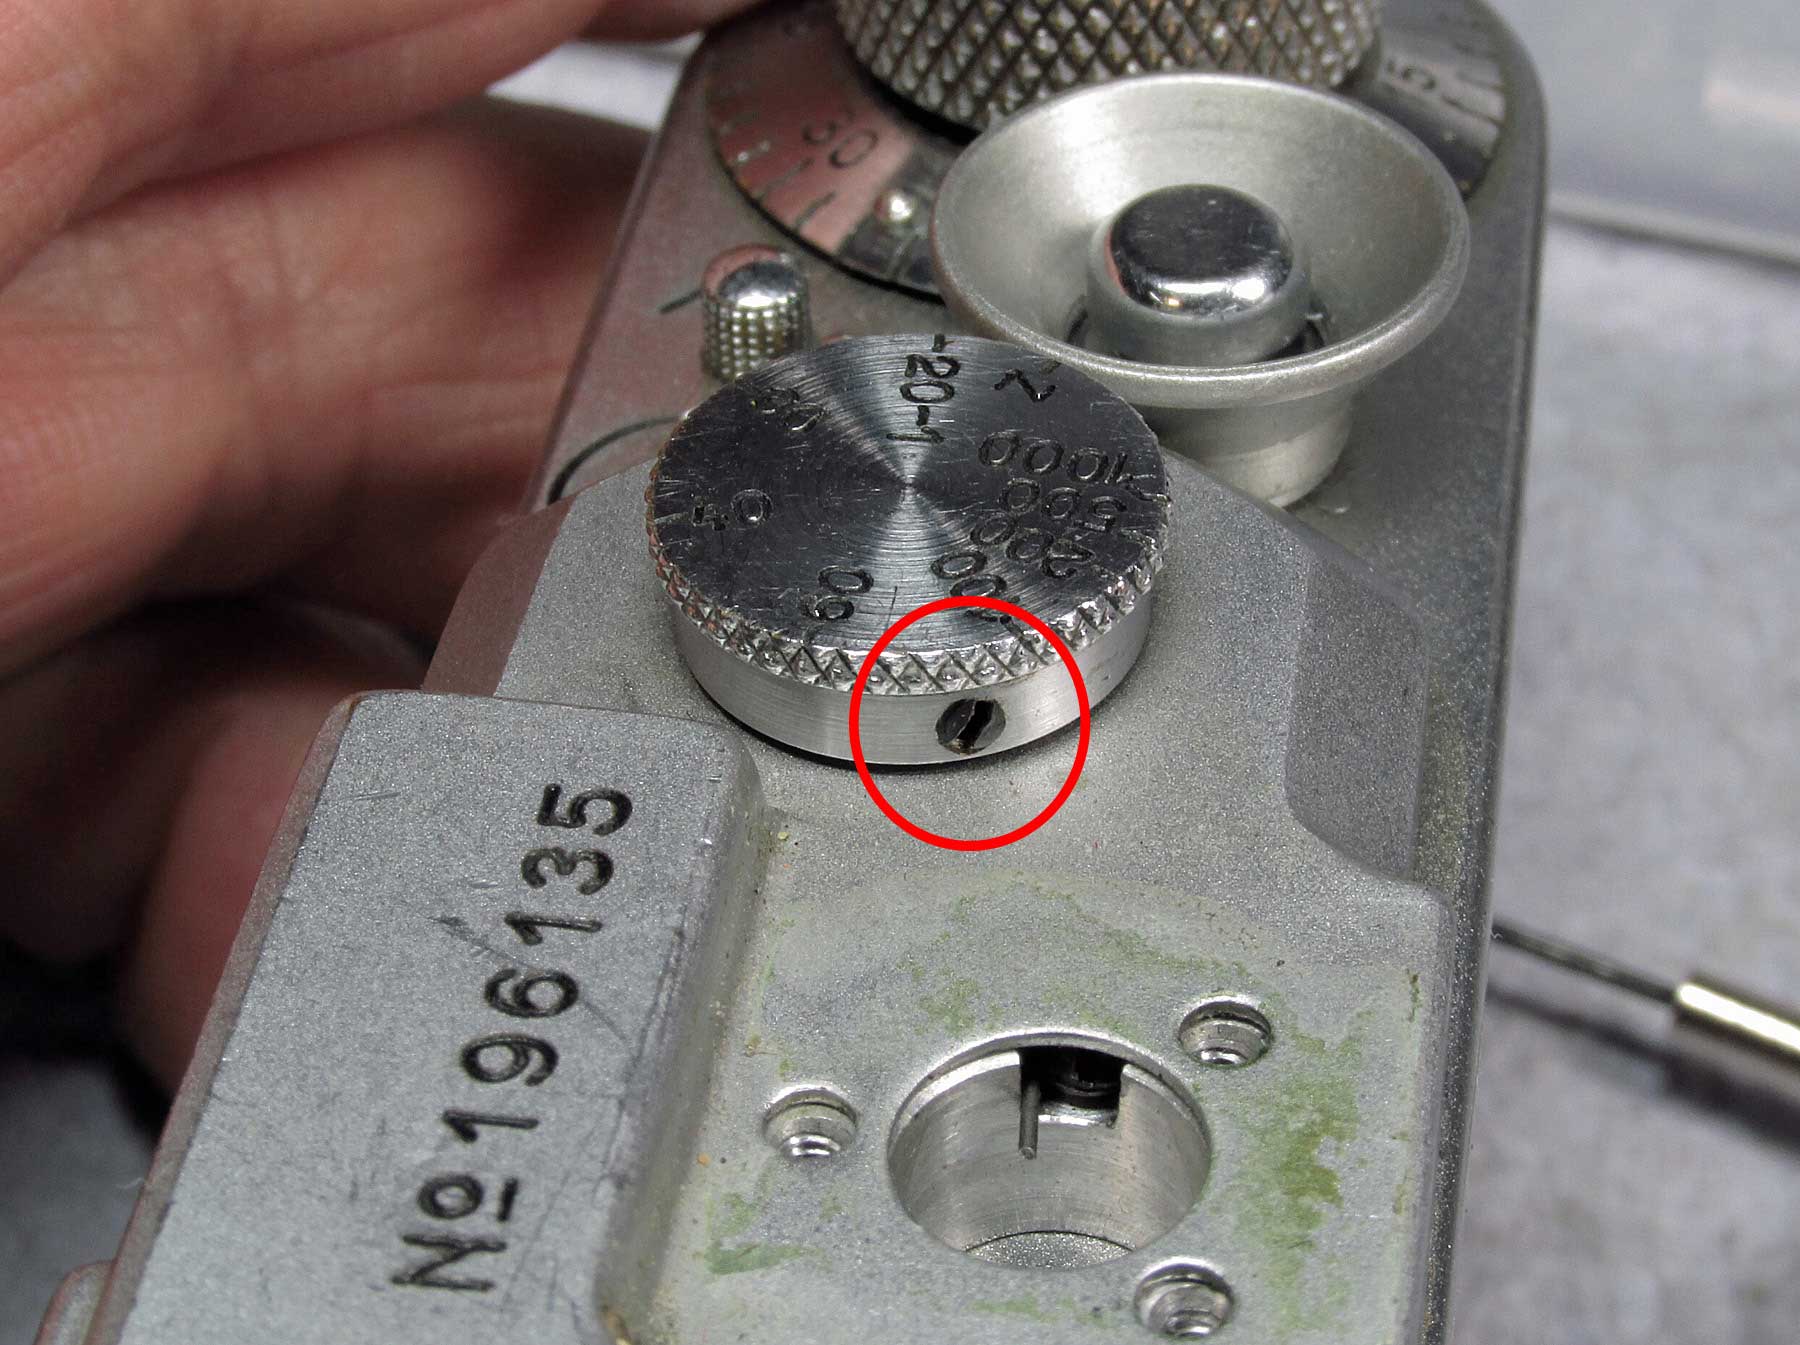
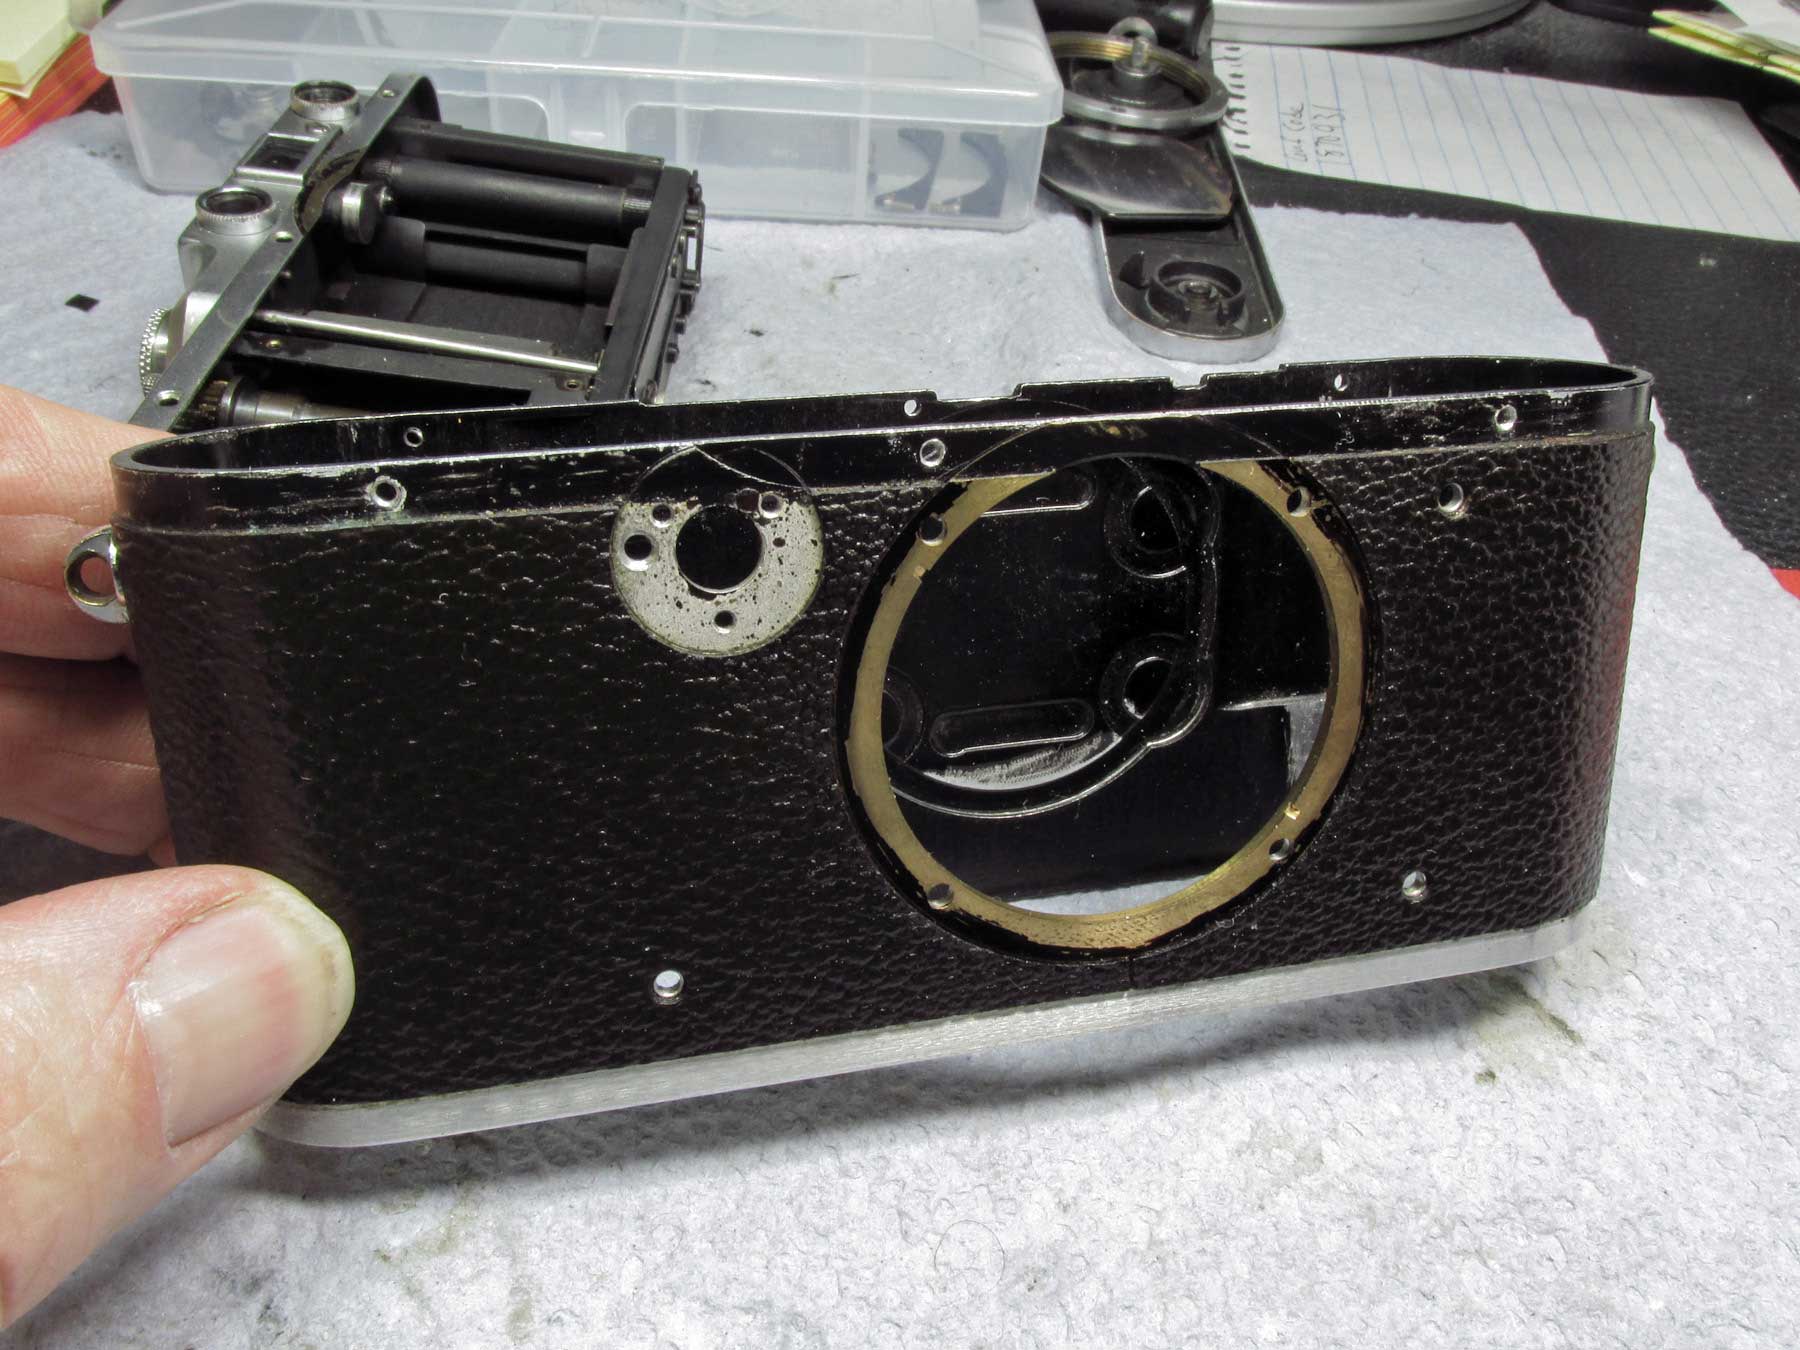
Above, showing the external condition, dirt and a reddish oxidation to the Vulcanite (red circle) and dirty internal glass.
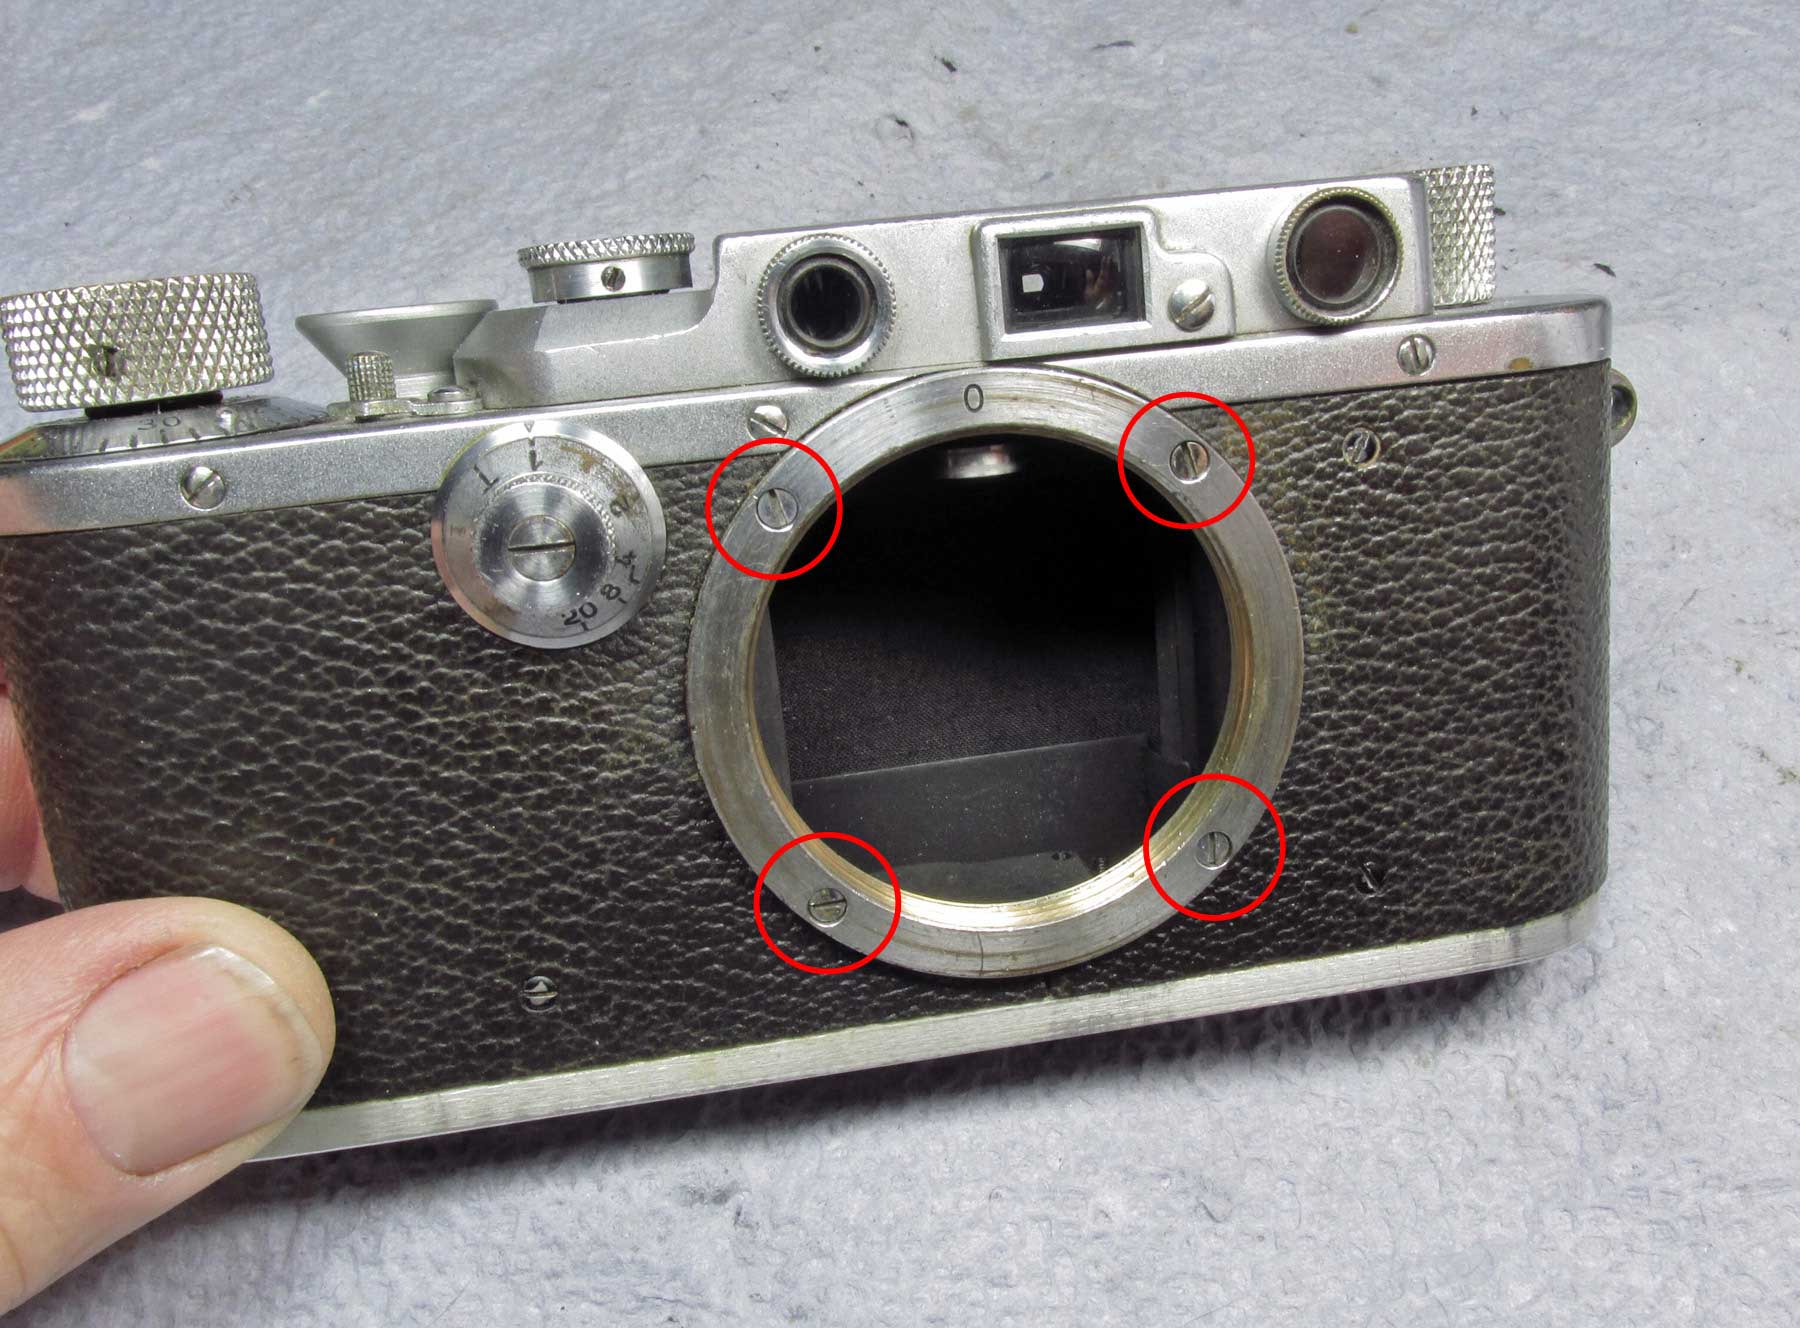
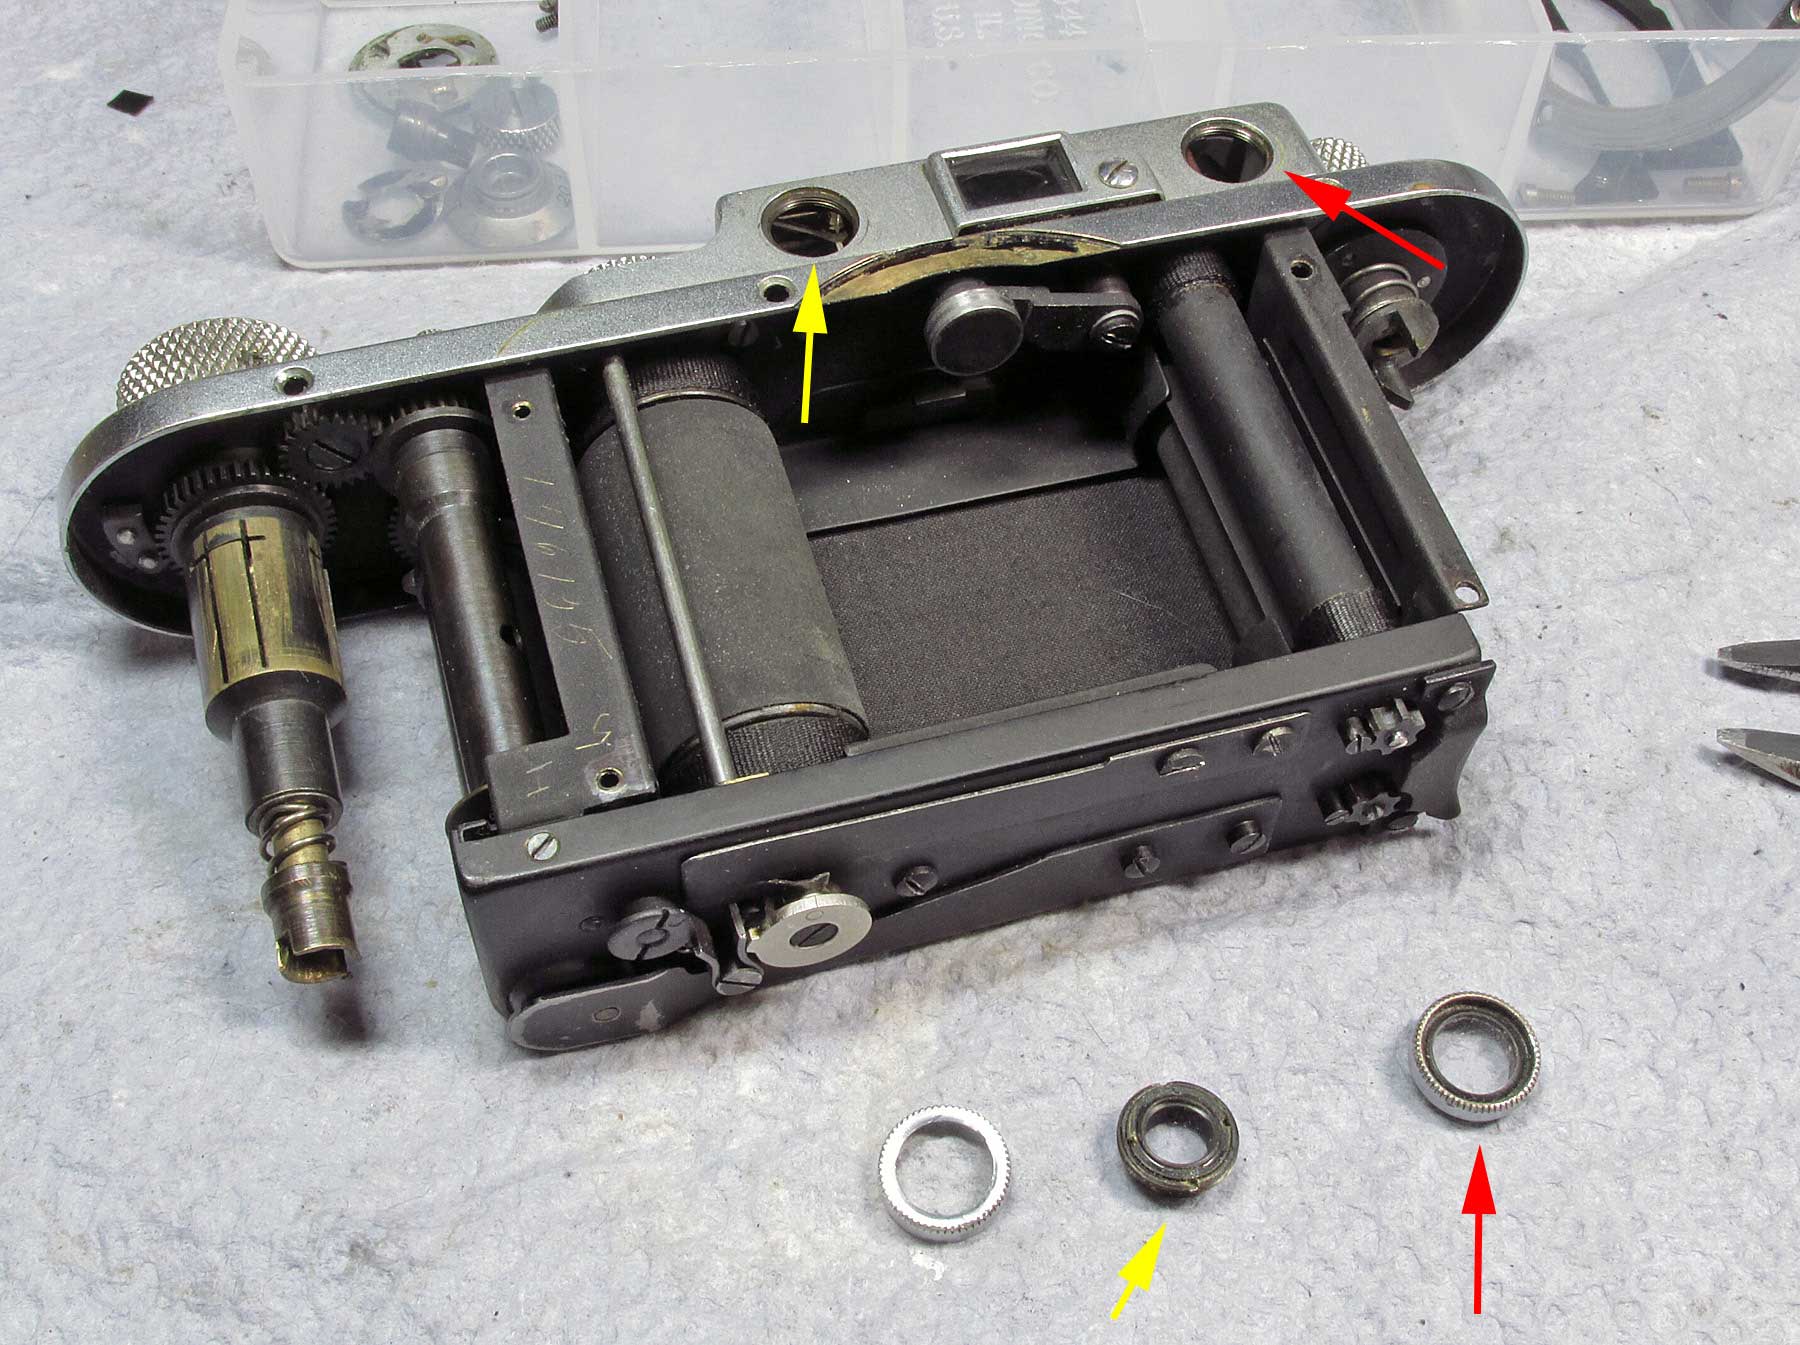
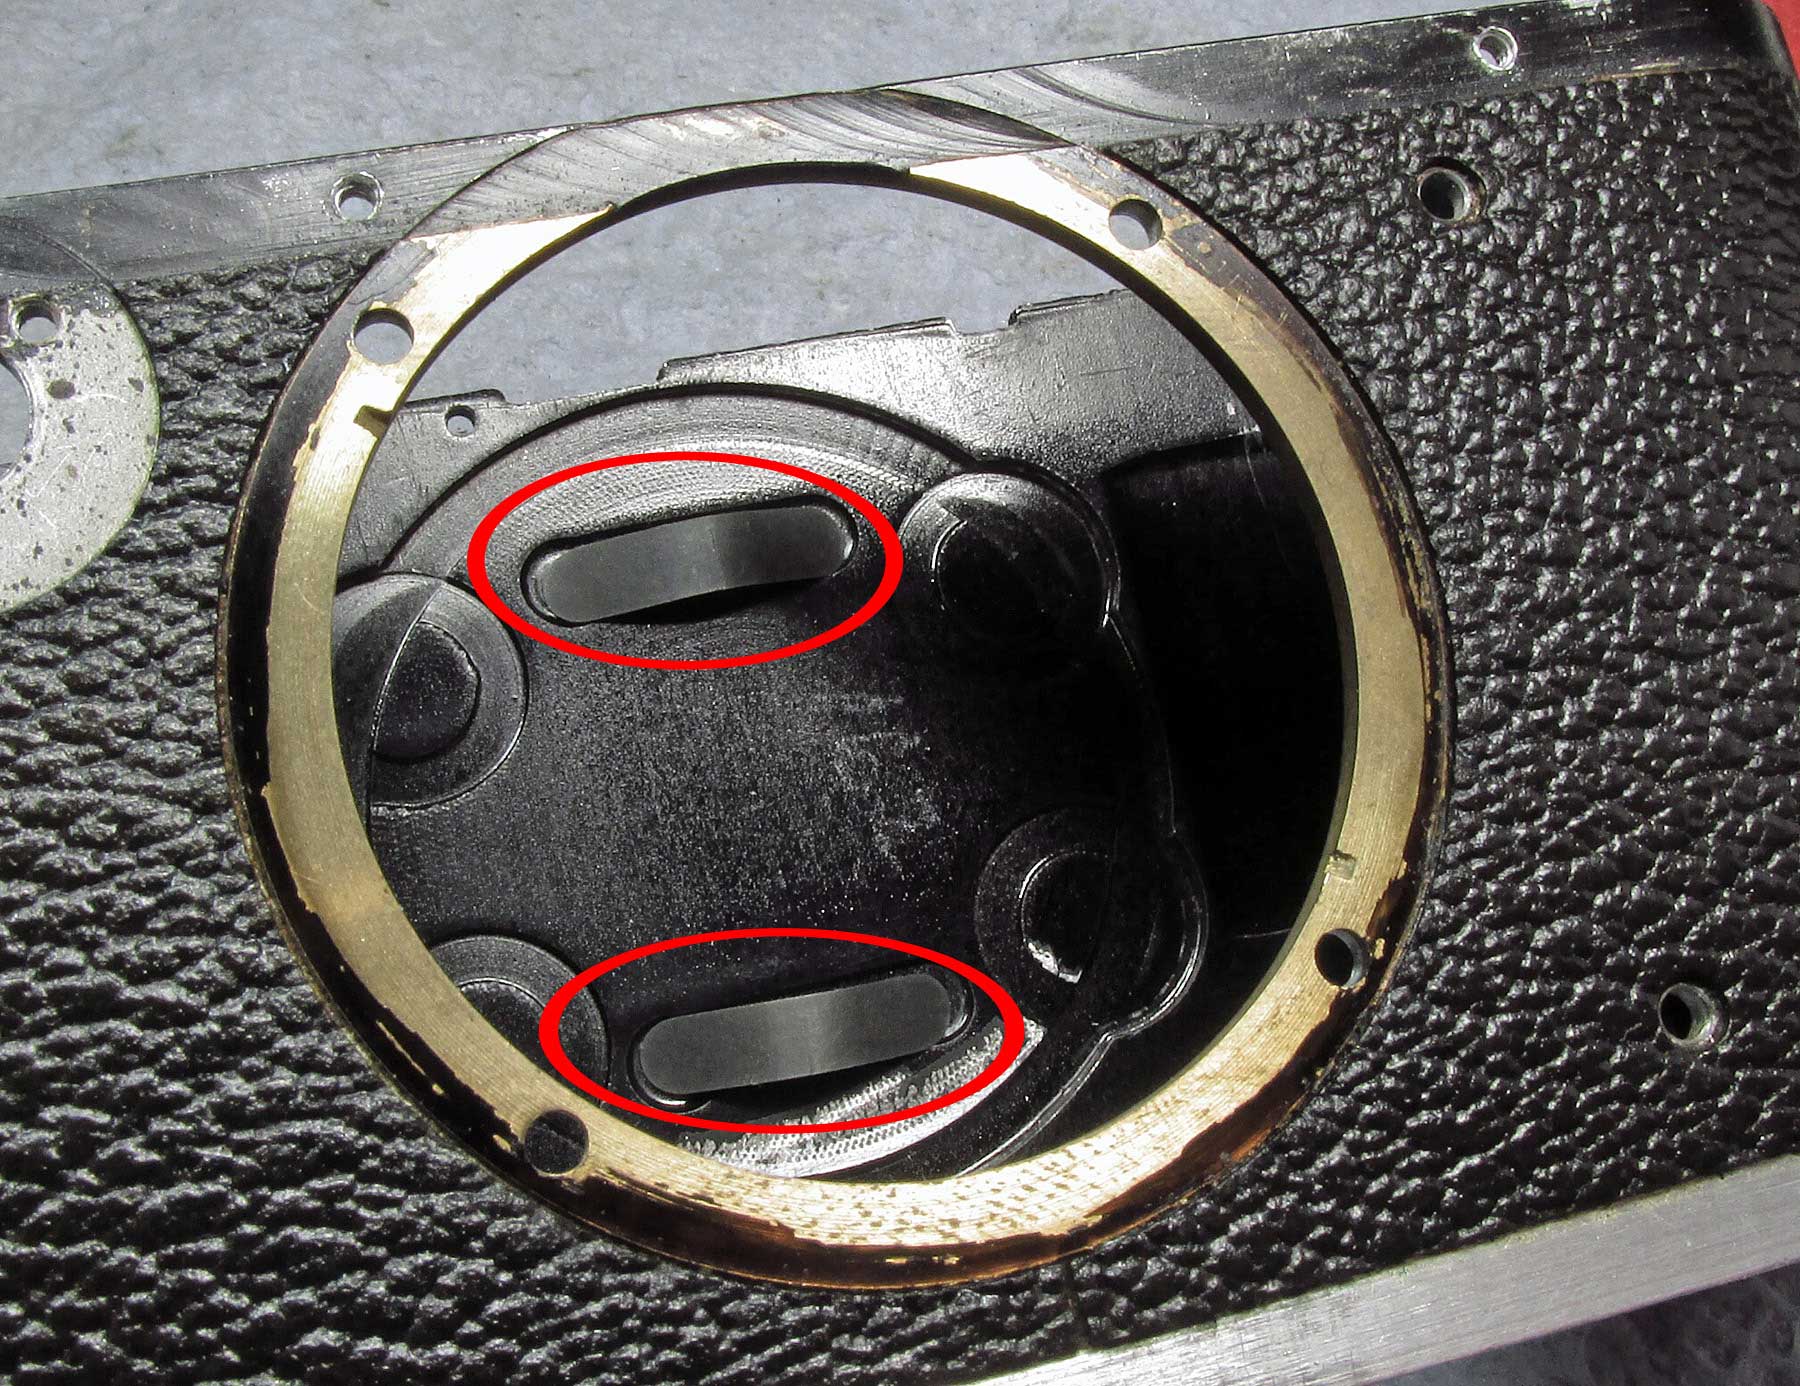
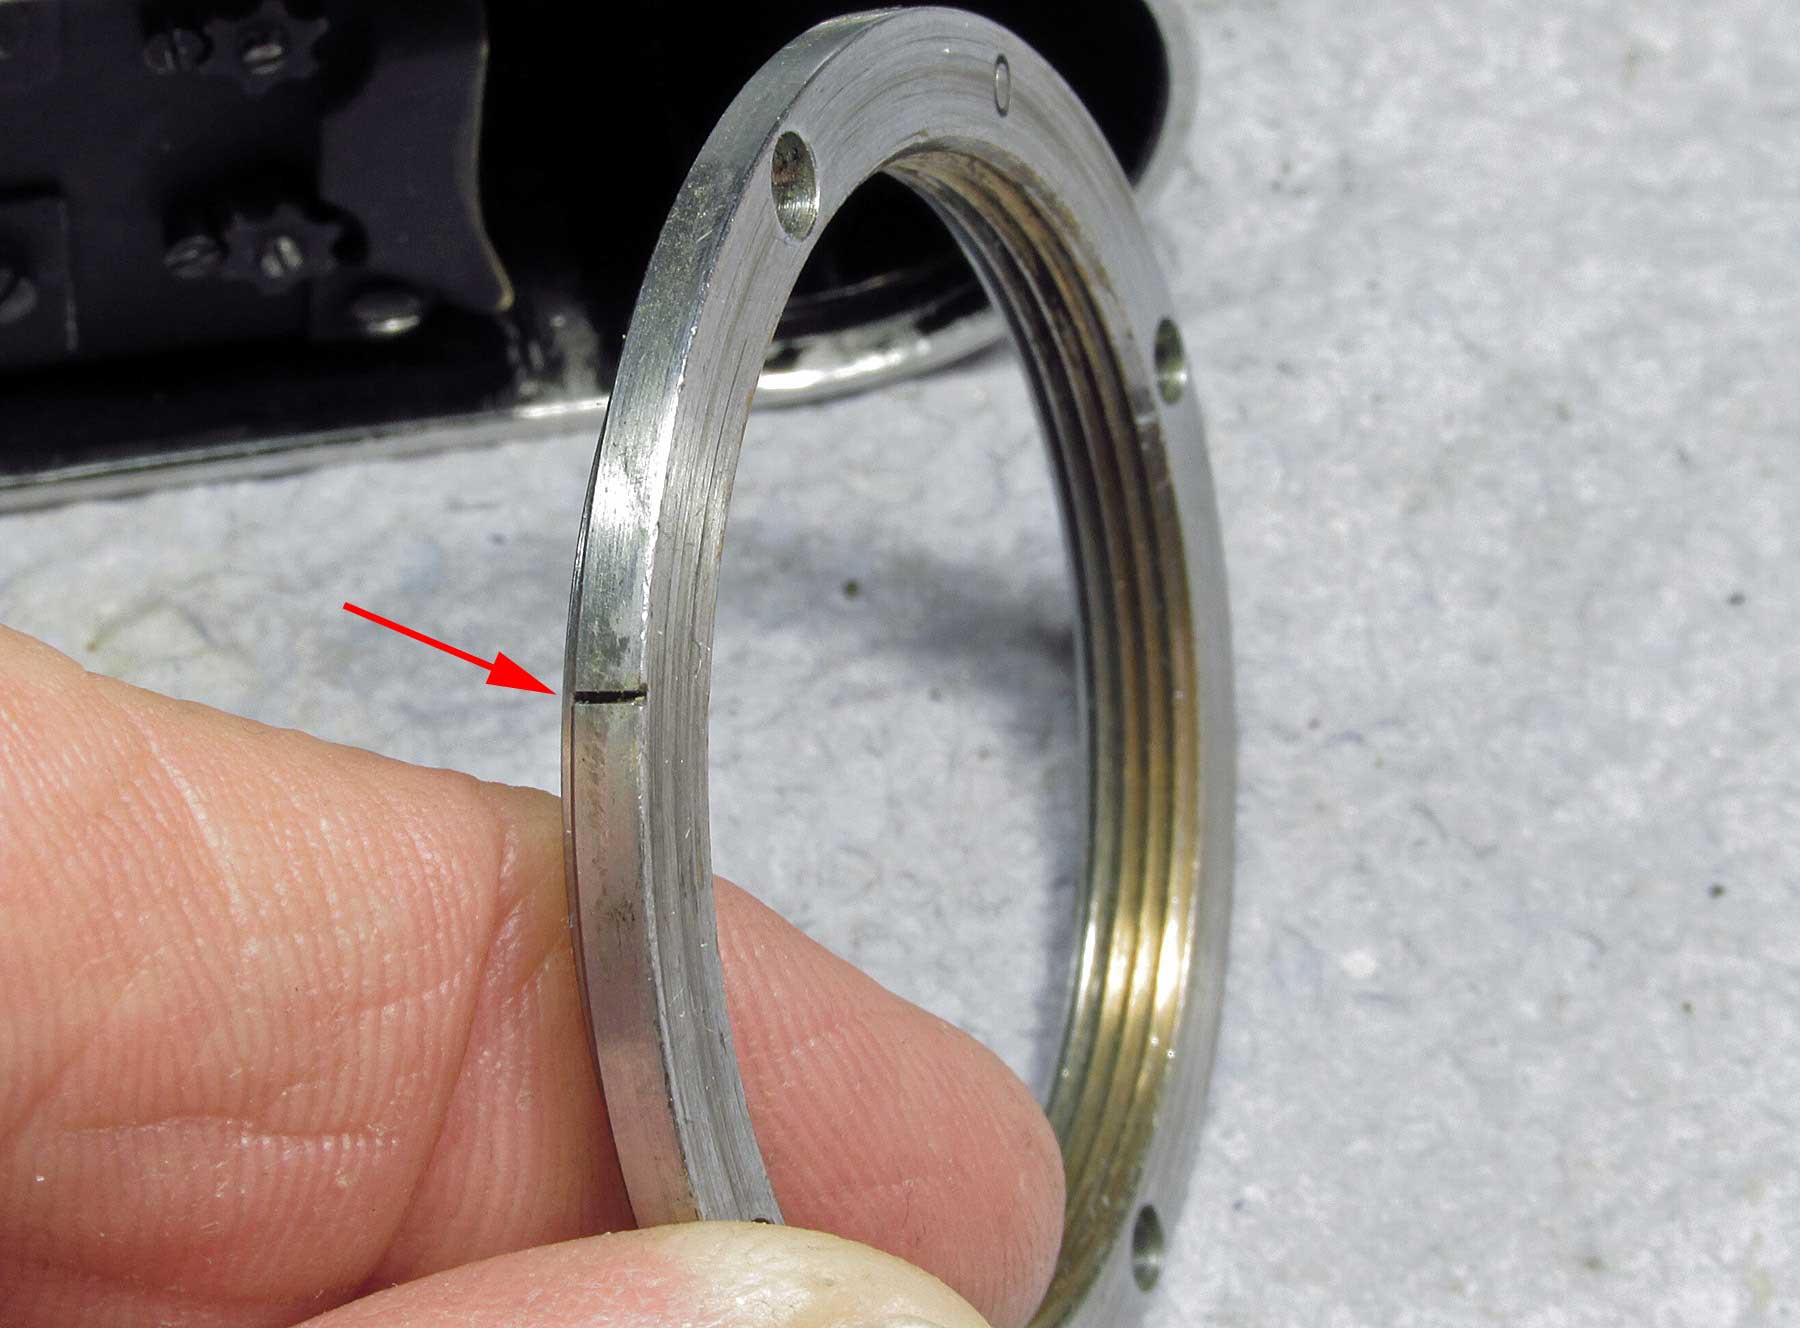
remove these 4 screws (red circles), carefully remove the lens flange as there may be shims between it and the camera body. Mine had none but there were several on my Nicca when I worked on it.
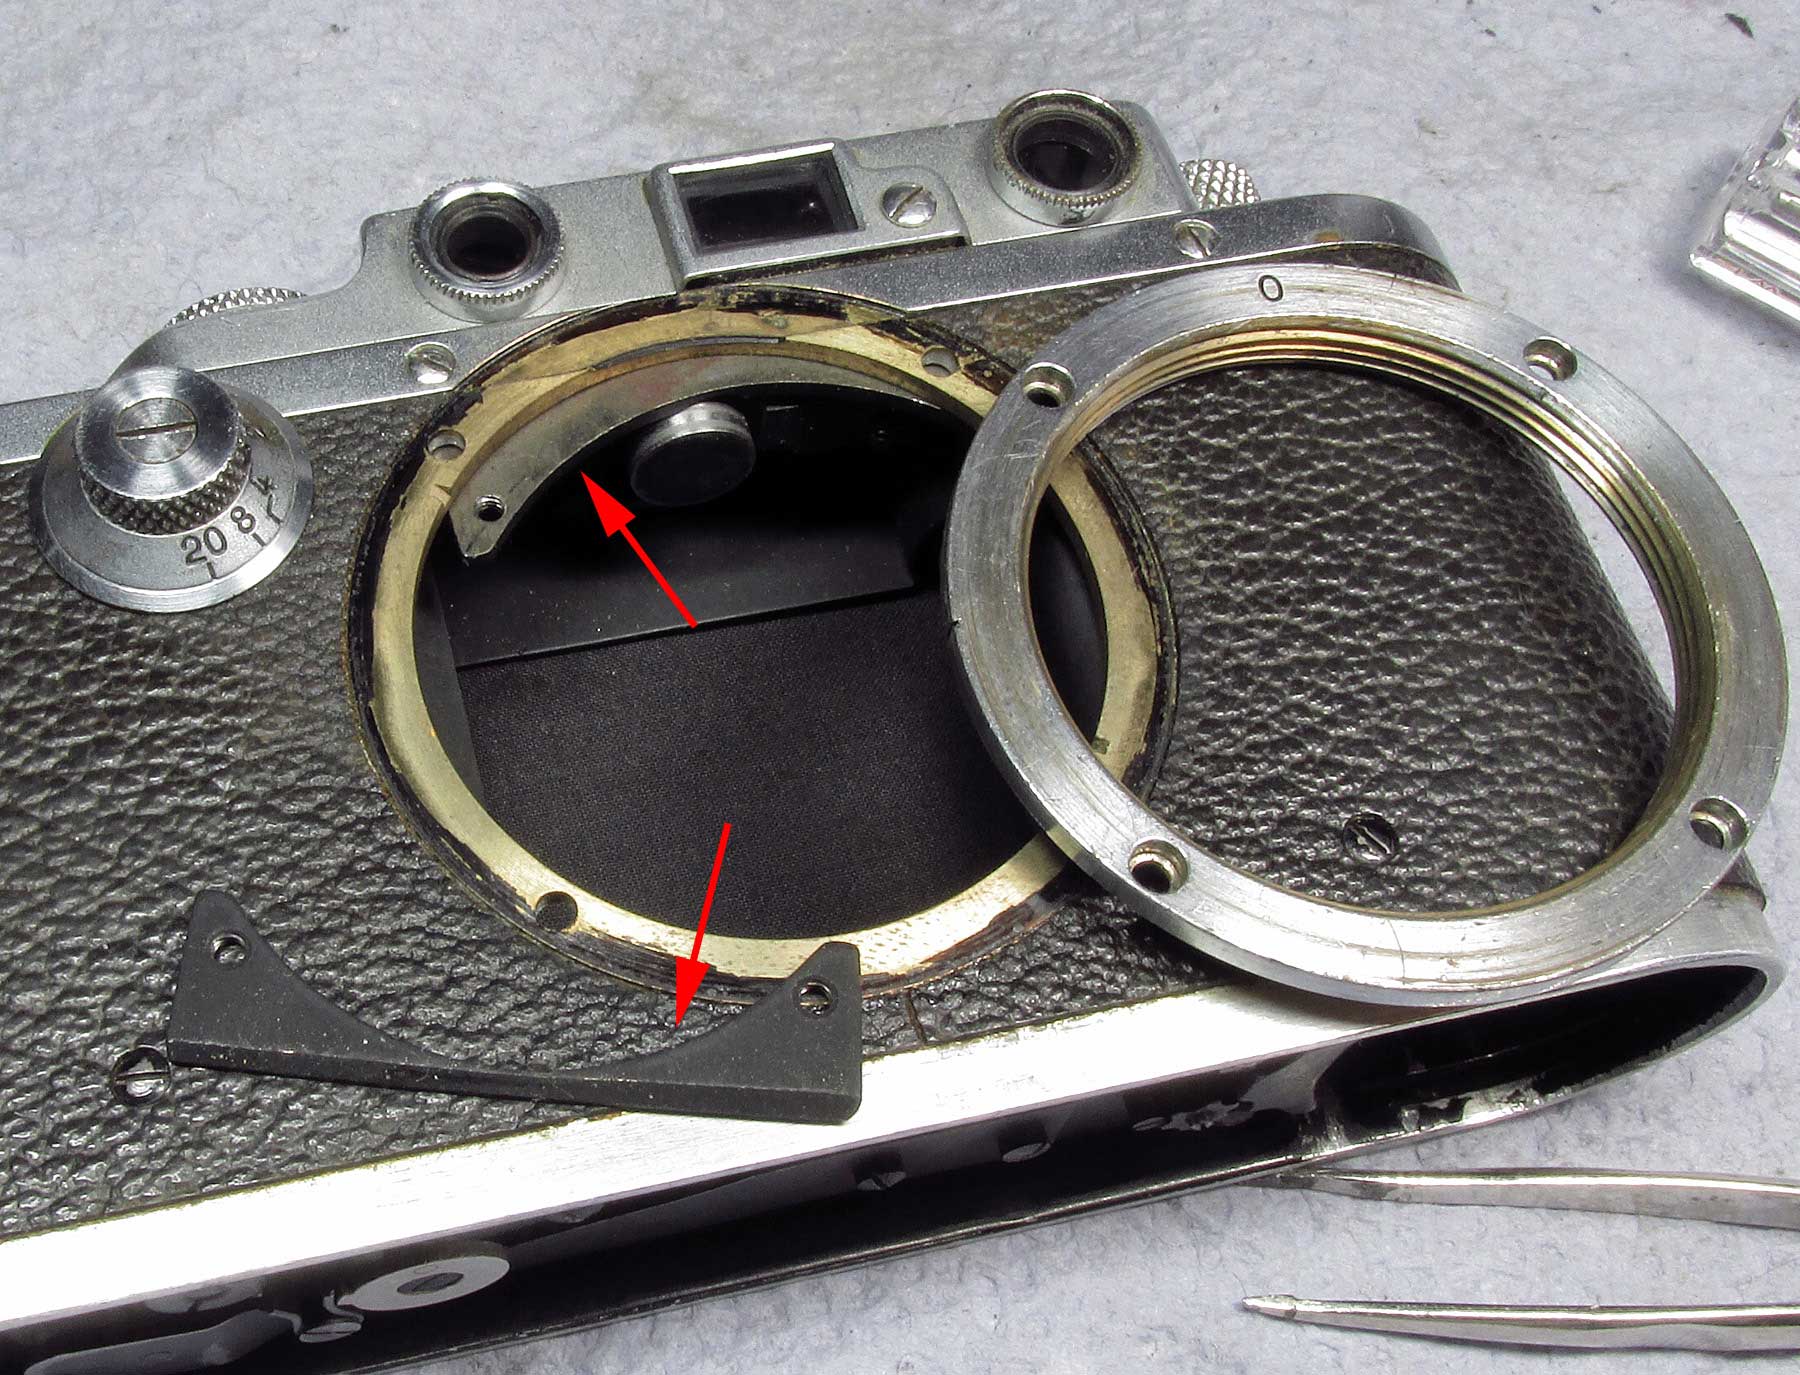
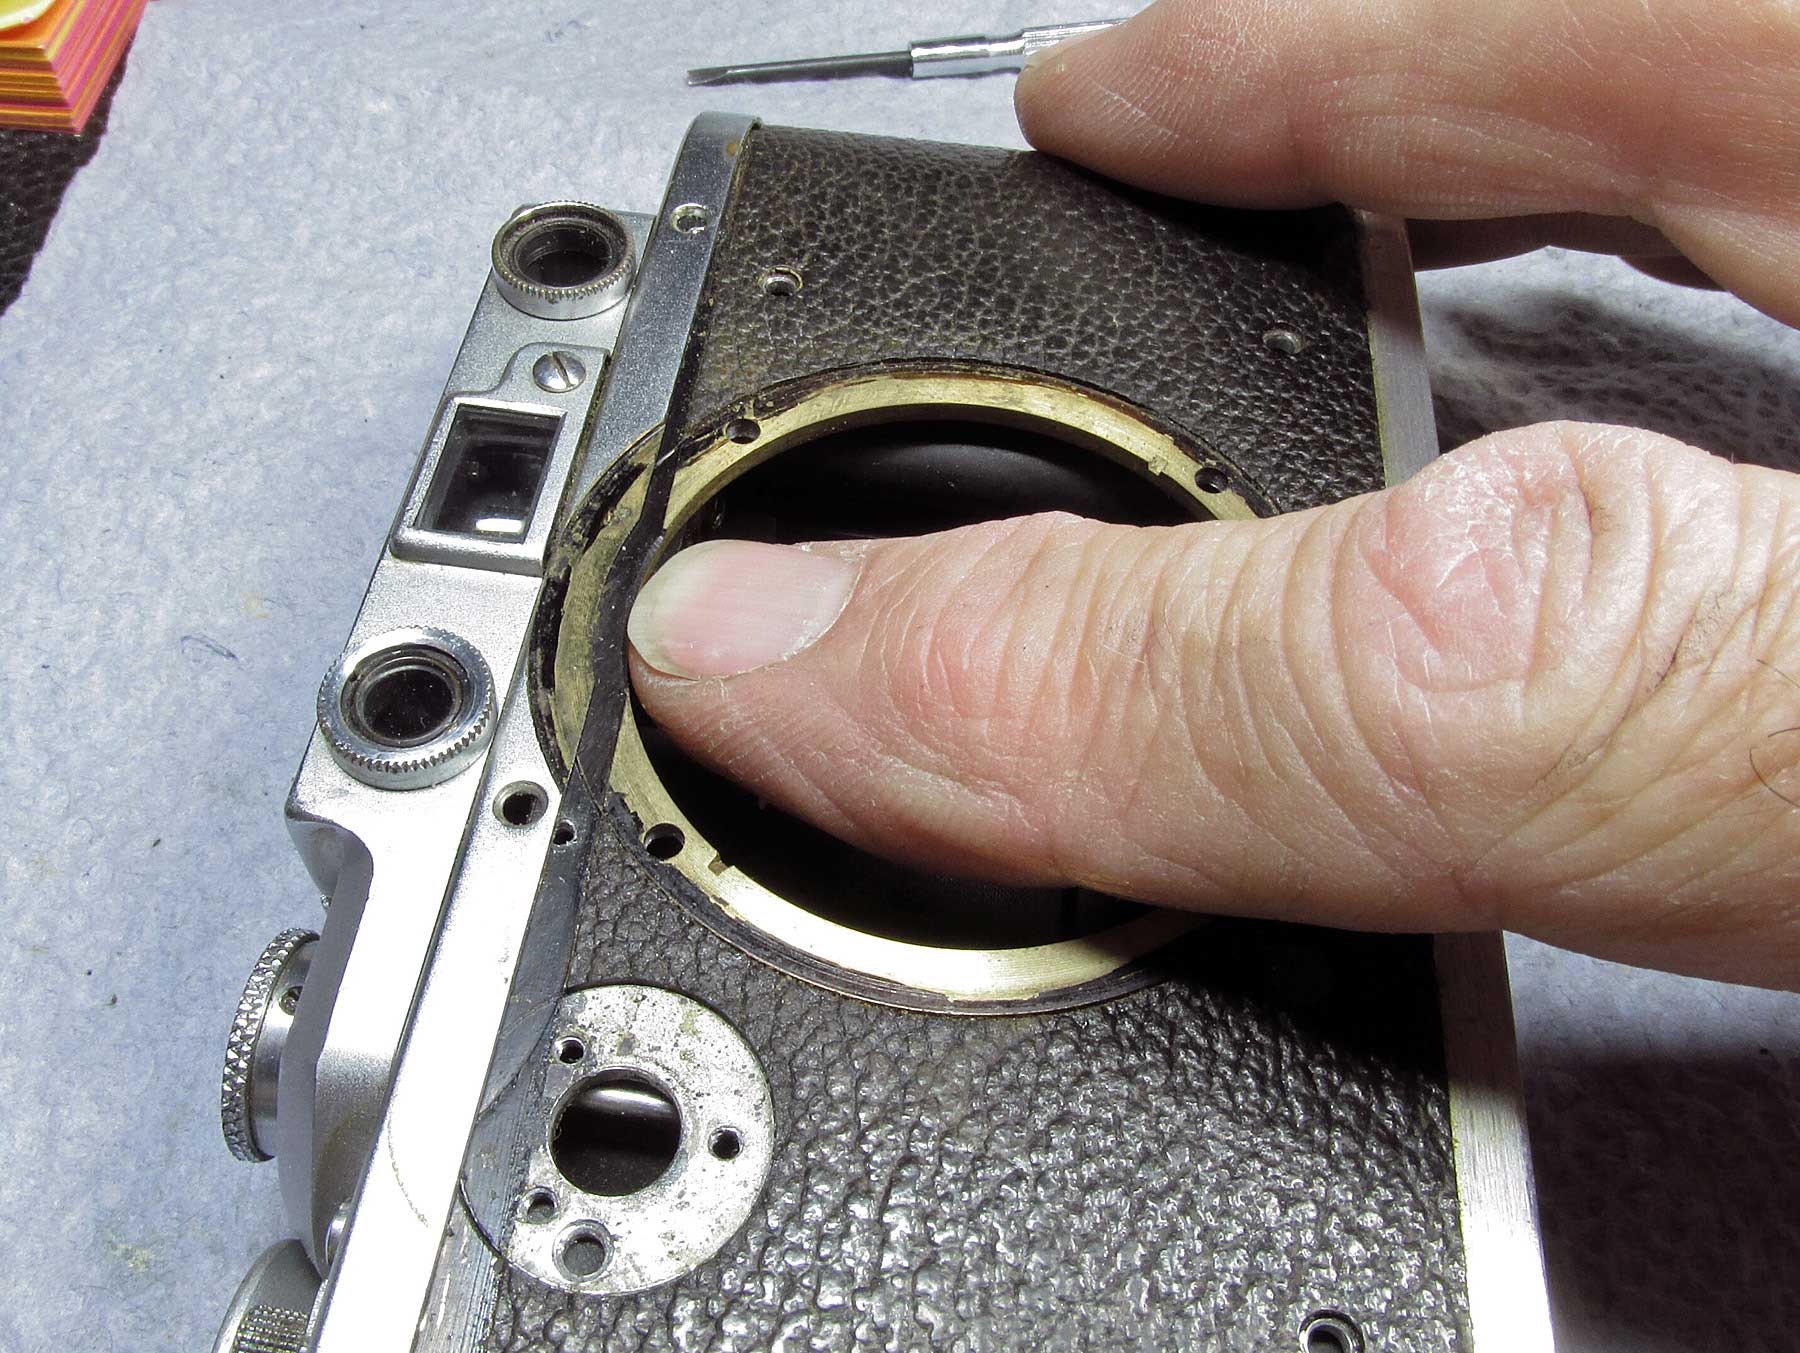
when you remove the 4 screws, these brackets come loose. The upper one is held by the RF coupling arm, that comes in handy when putting it back on.
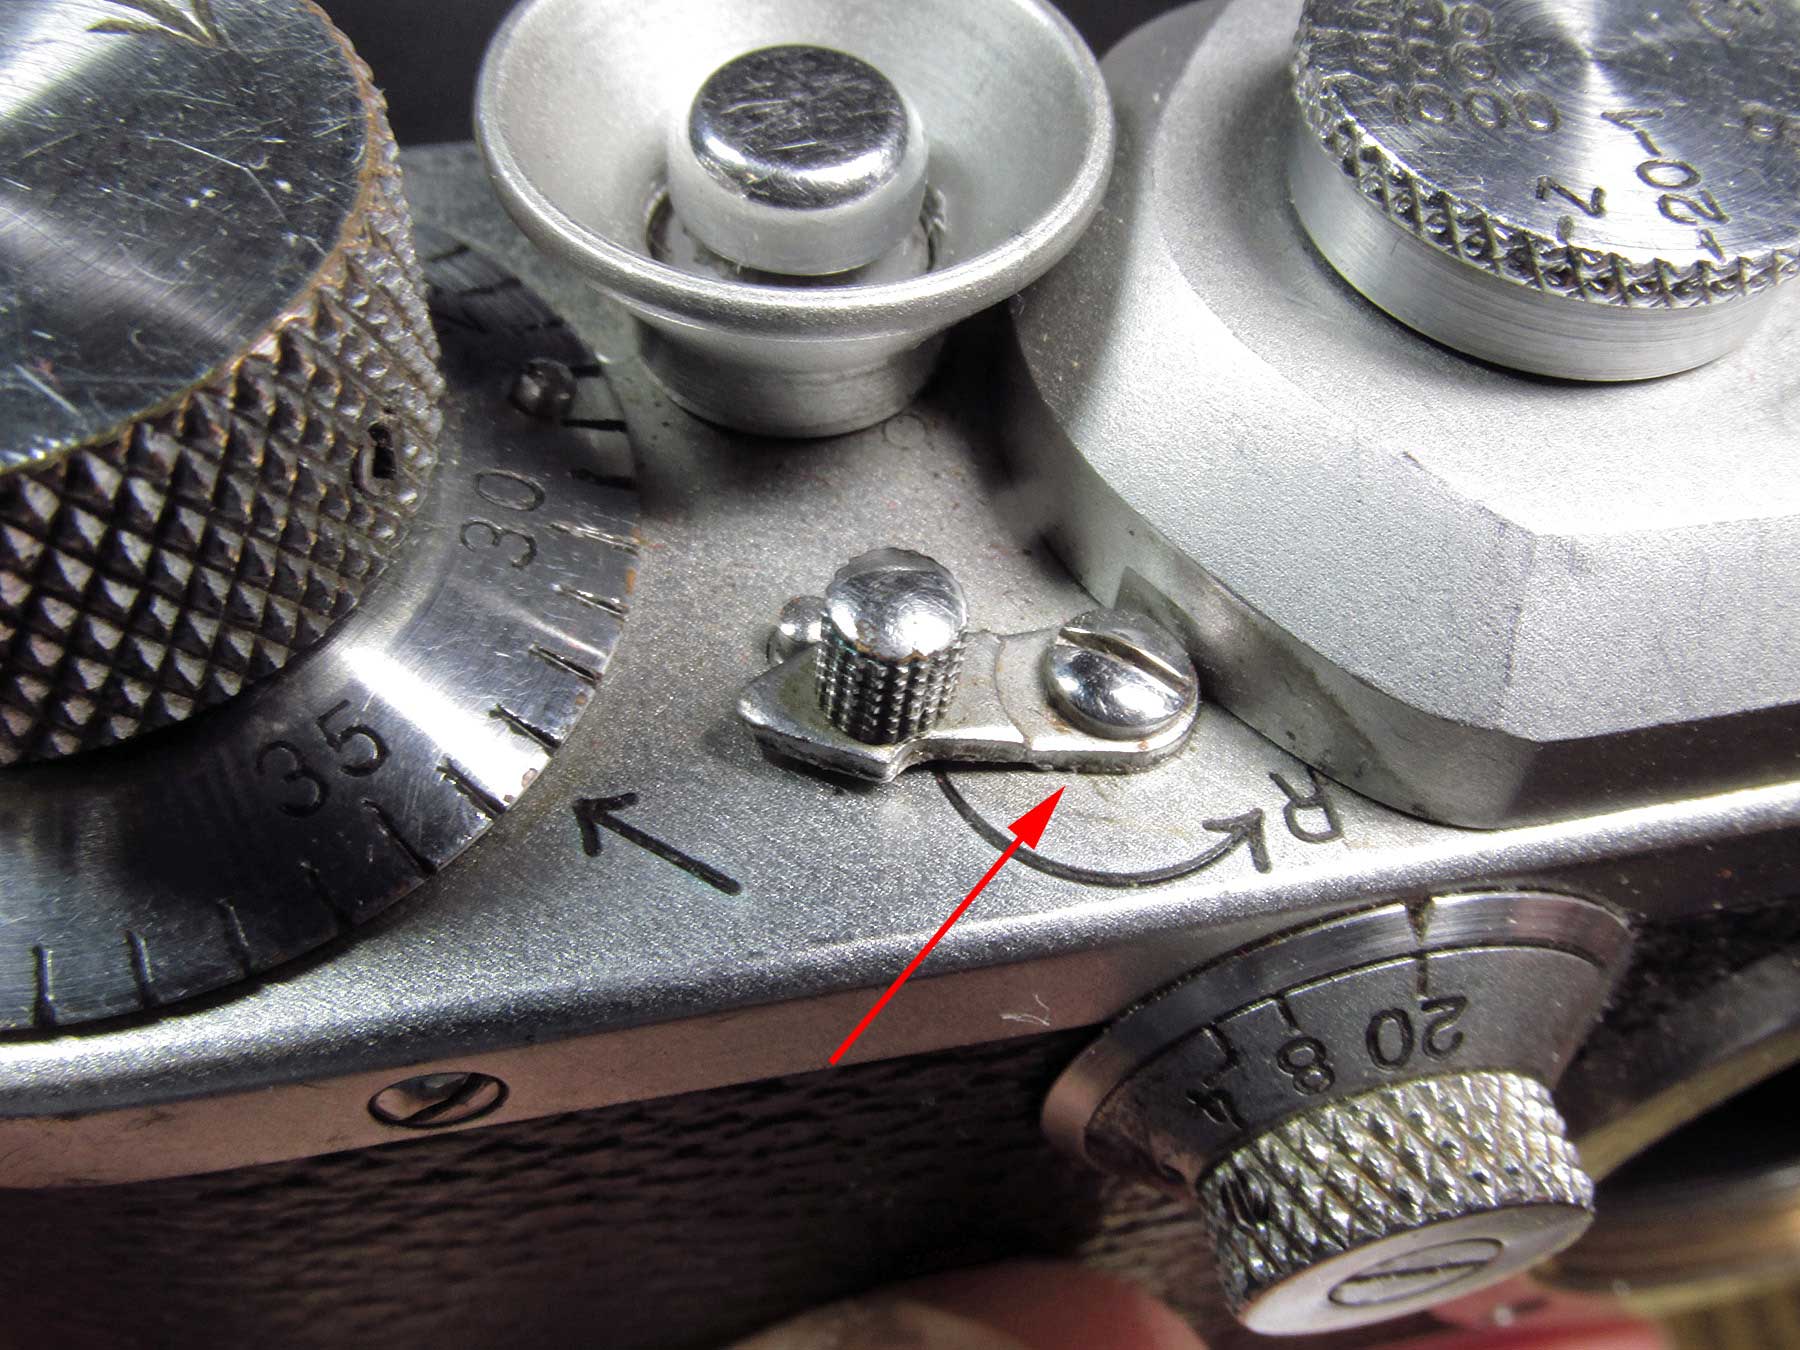
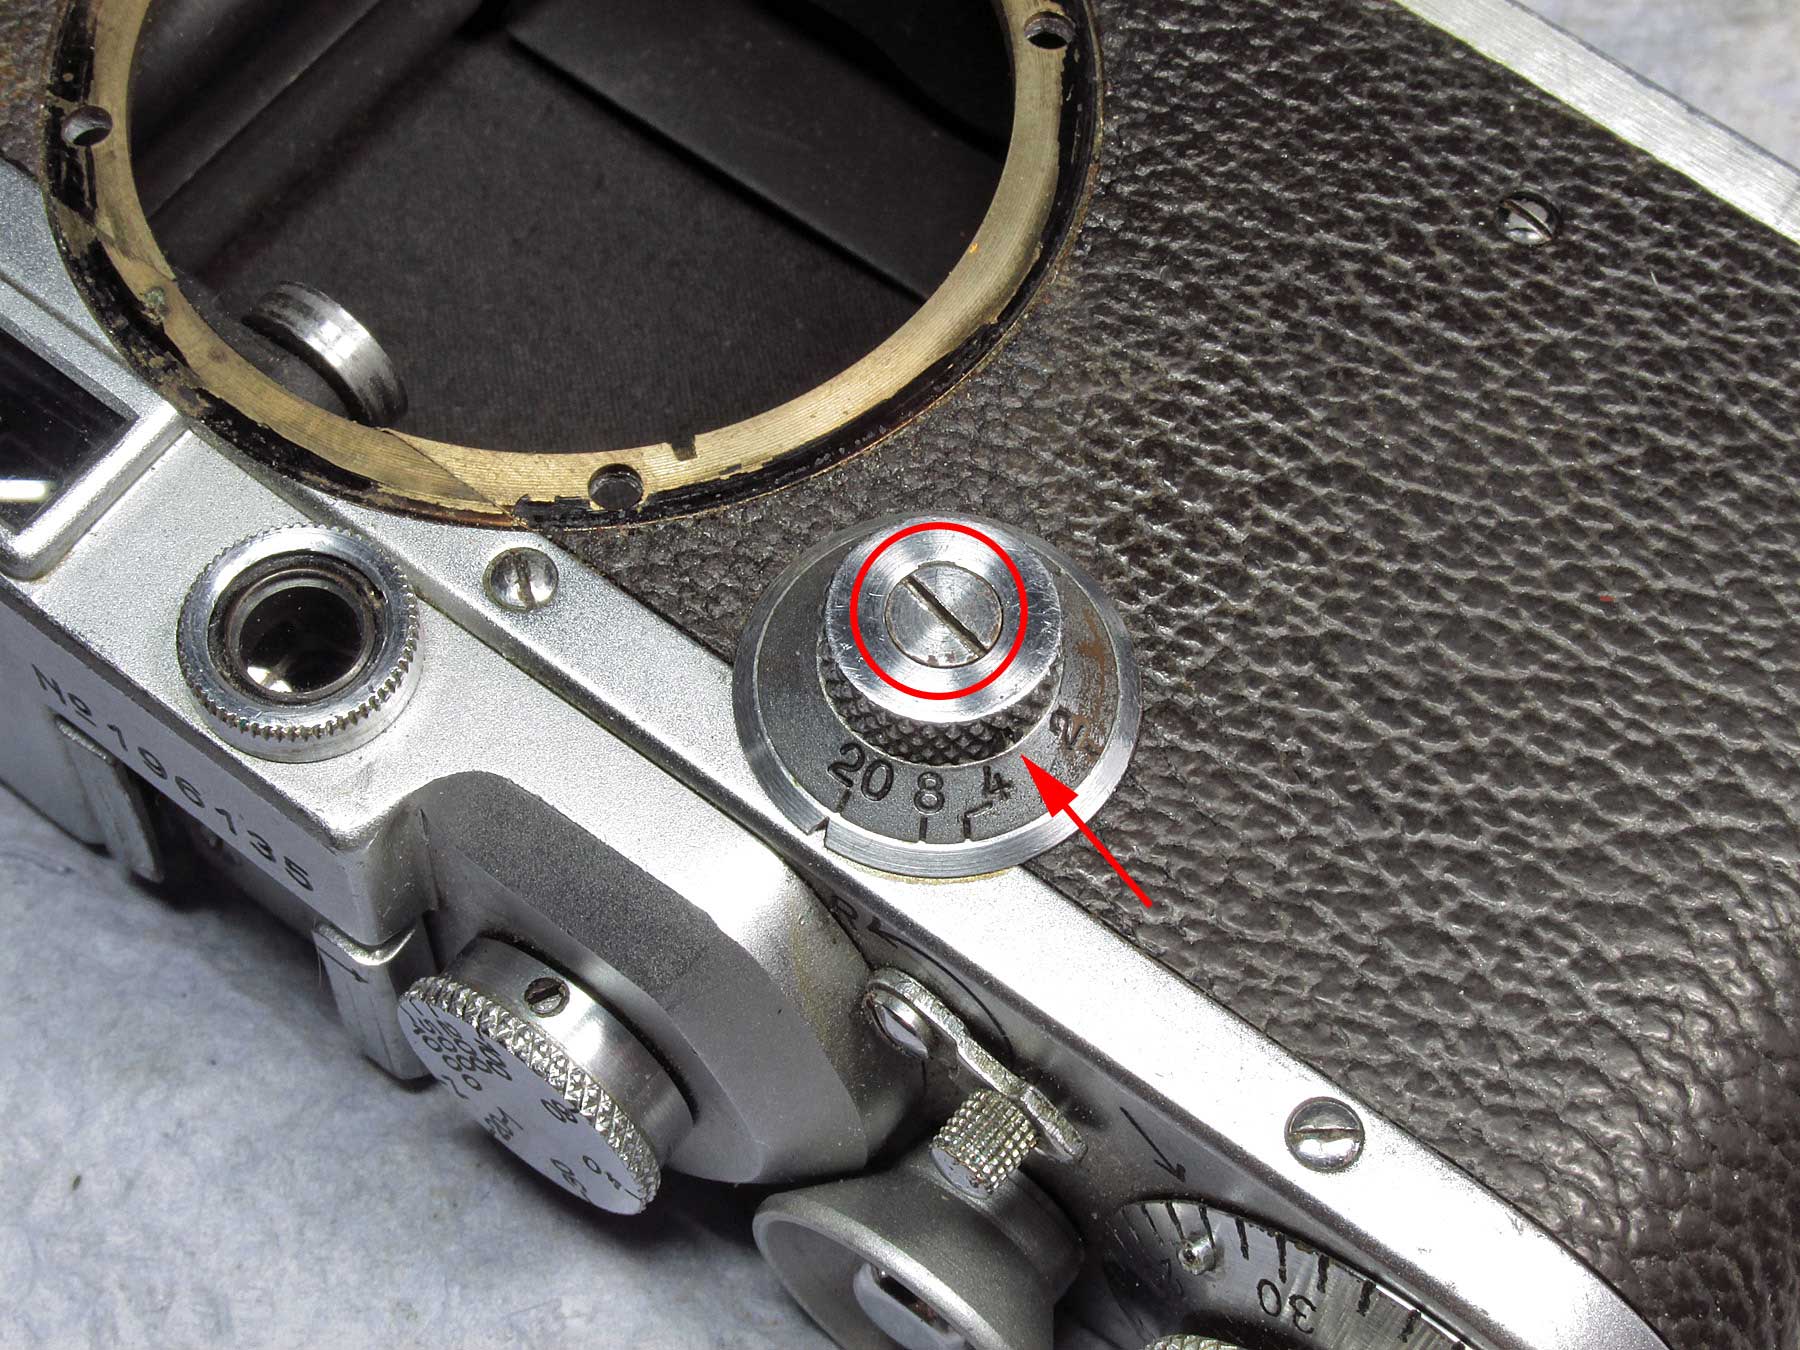
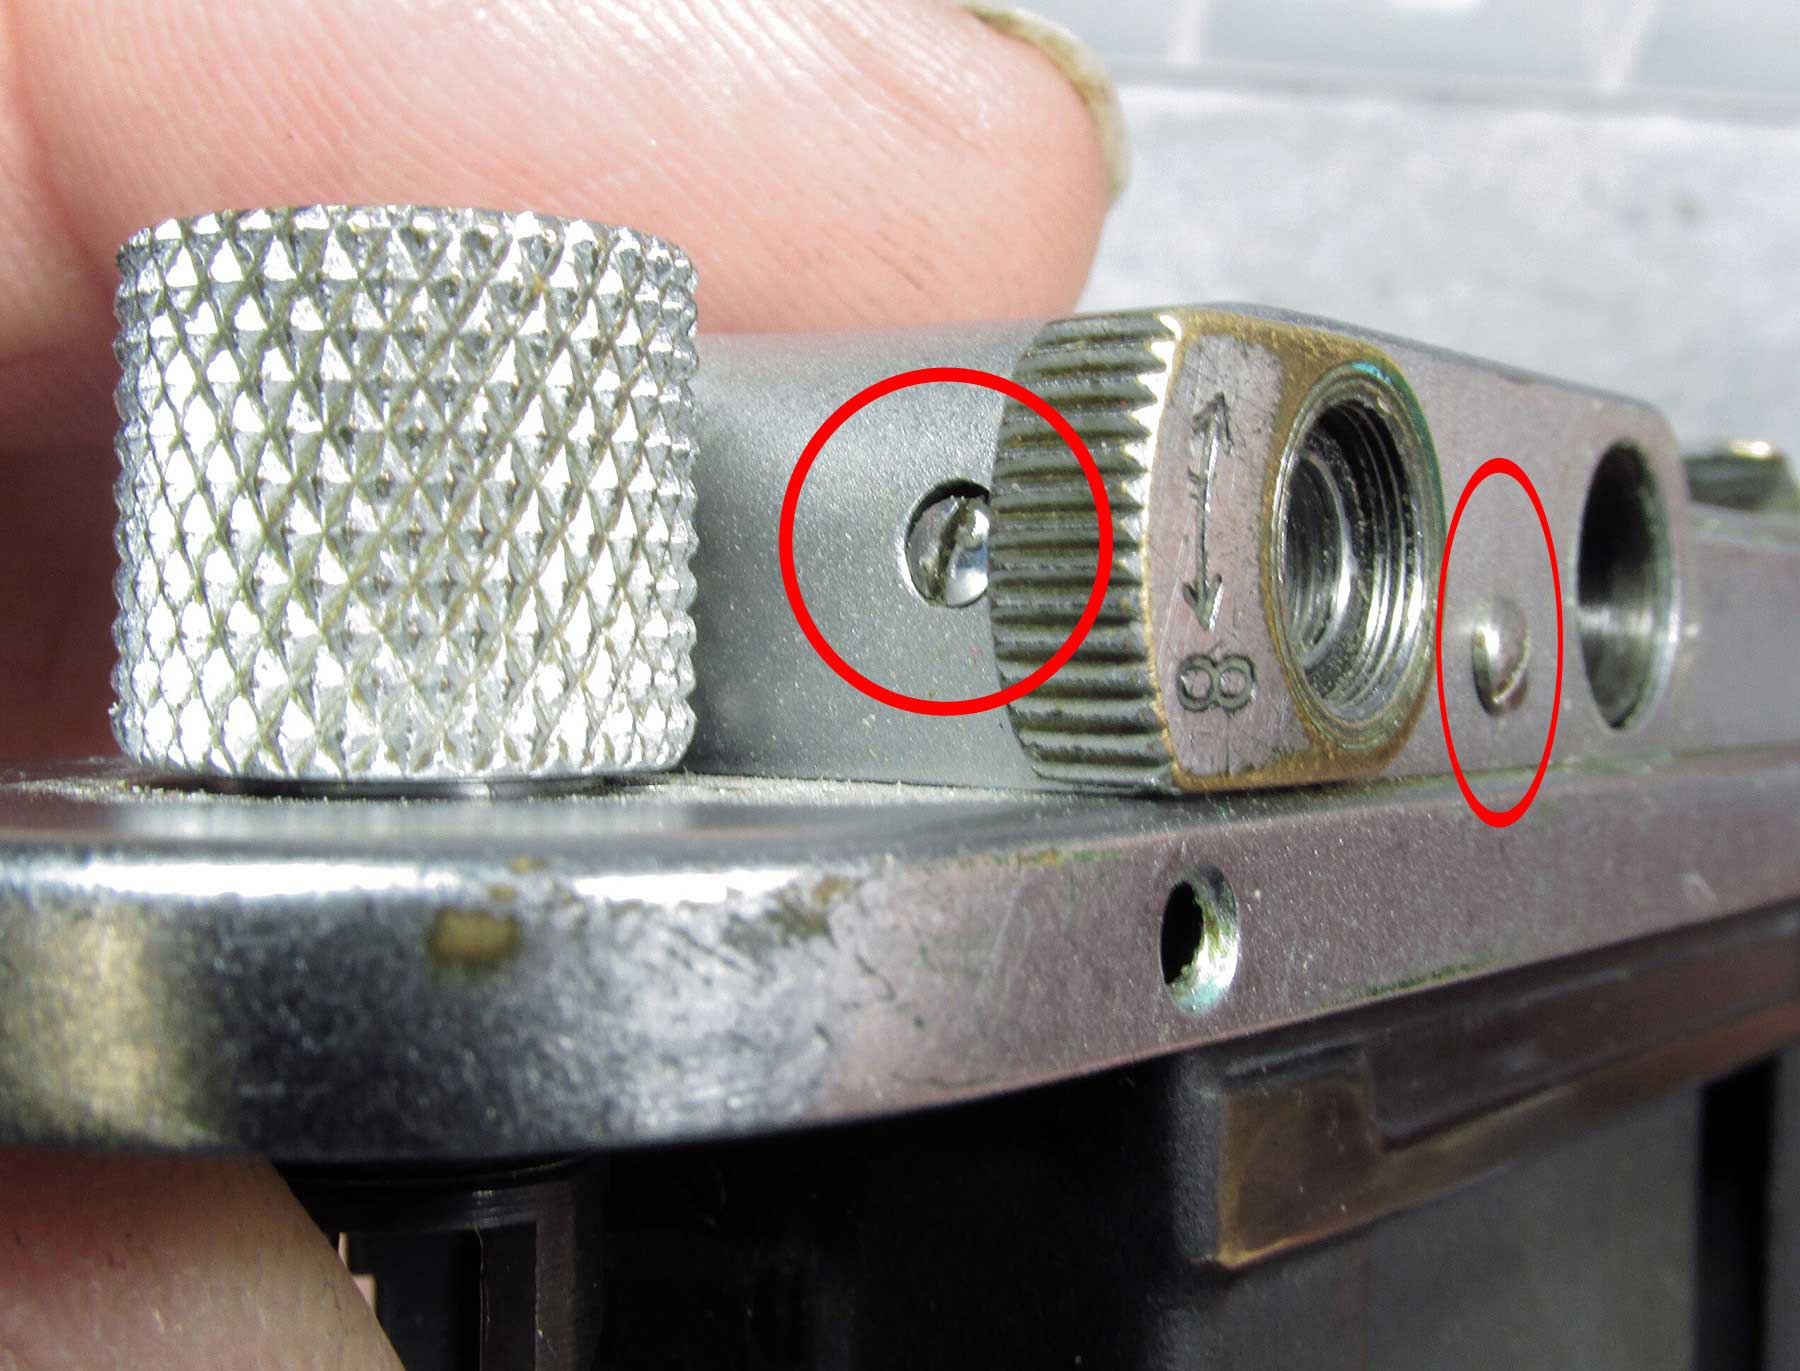
remove the slow speed dial by removing the screw (red circle) but ignore the small set screw (red arrow), it is not necessary to loosen this, it will come off with the speed scale disc, making adjustment later unnecessary, but before lifting the dial off, make some kind of mark on the square shaft to indicate which edge is up for reassembly.
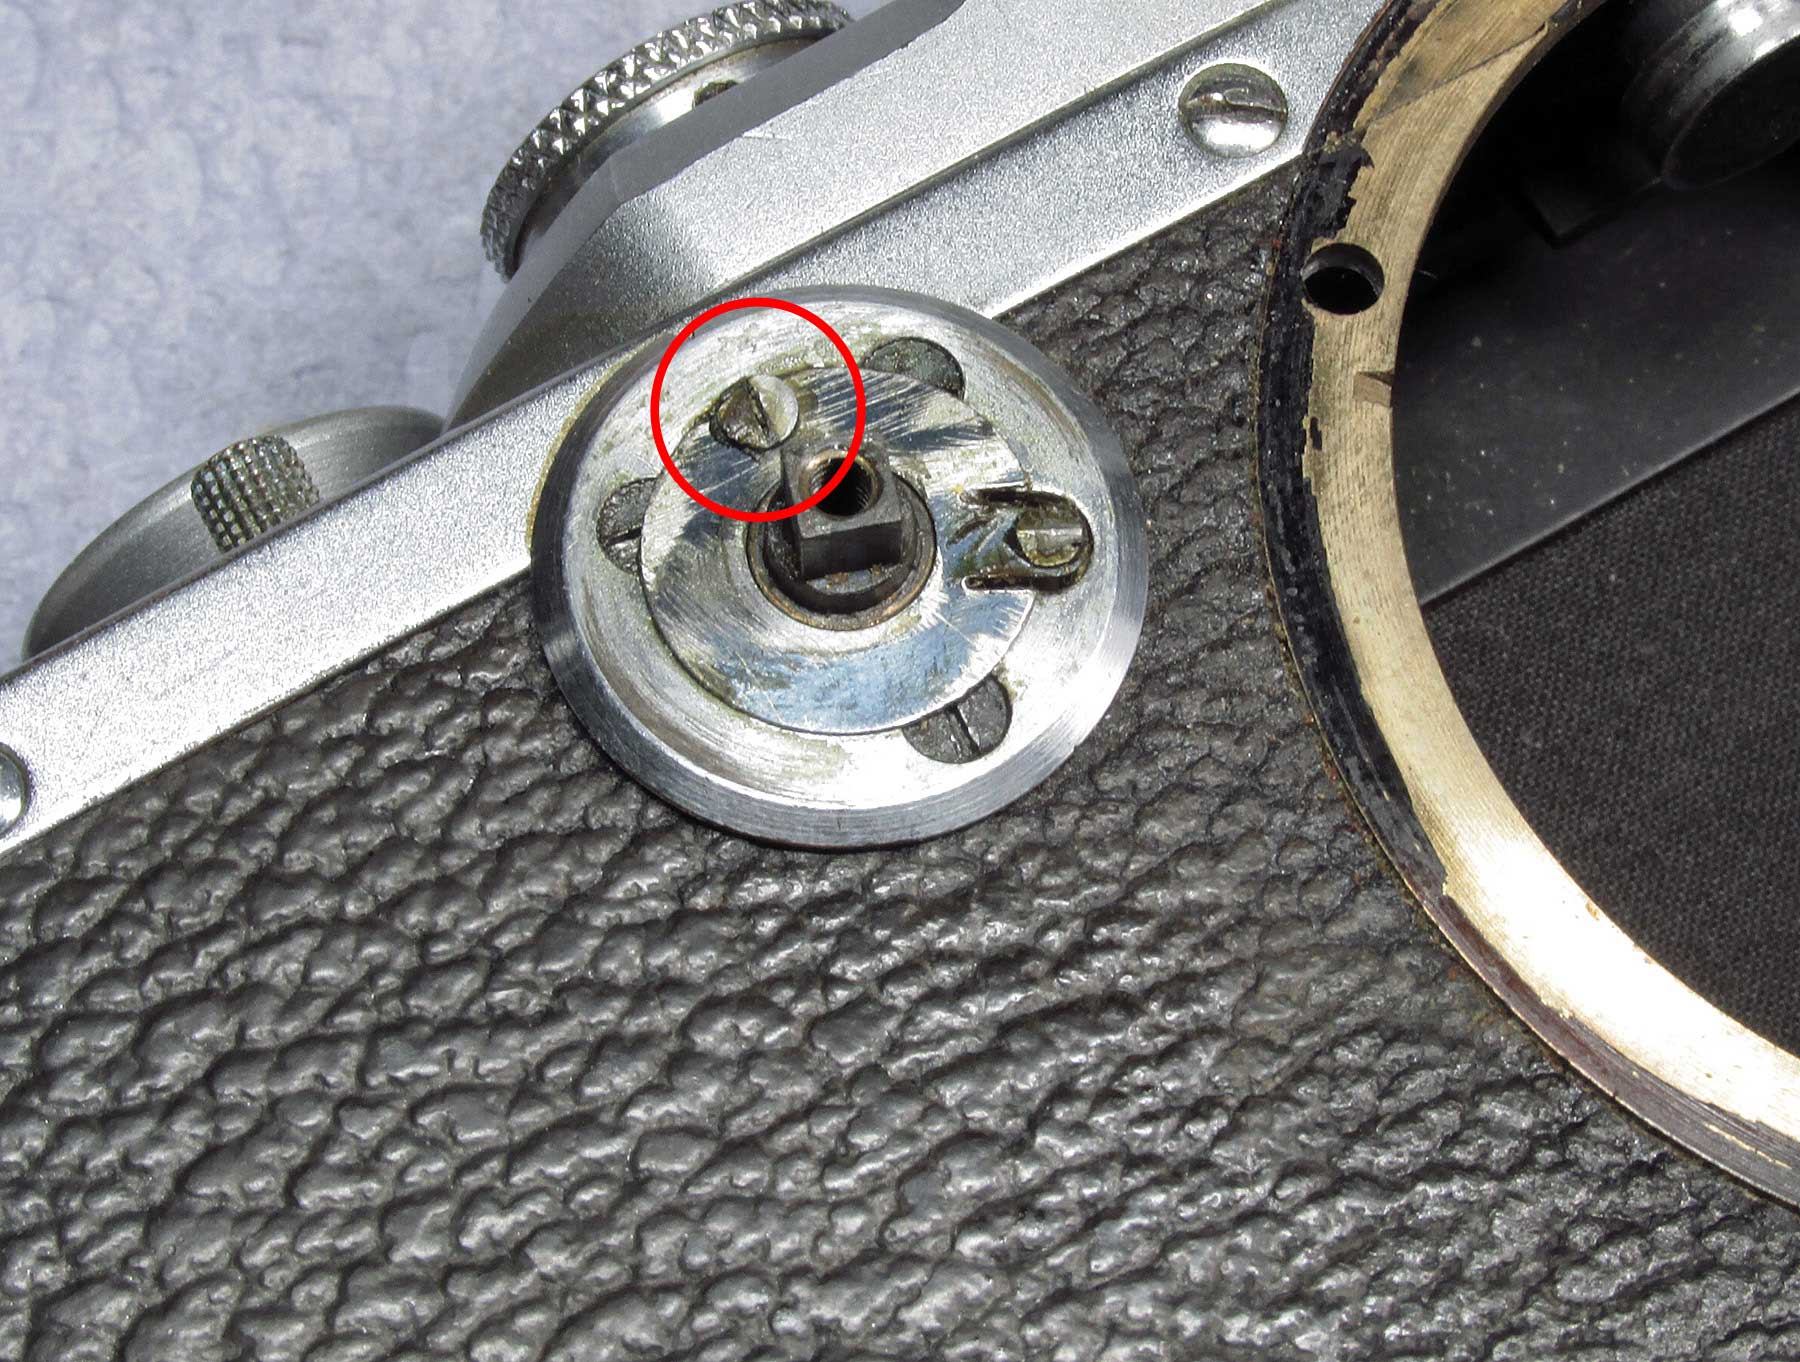
I found it helpful to just loosen this screw rather than remove it. It’s got a very short shaft so only 1/2 to 3/4 turn and the clicker disc will be loose enough to remove
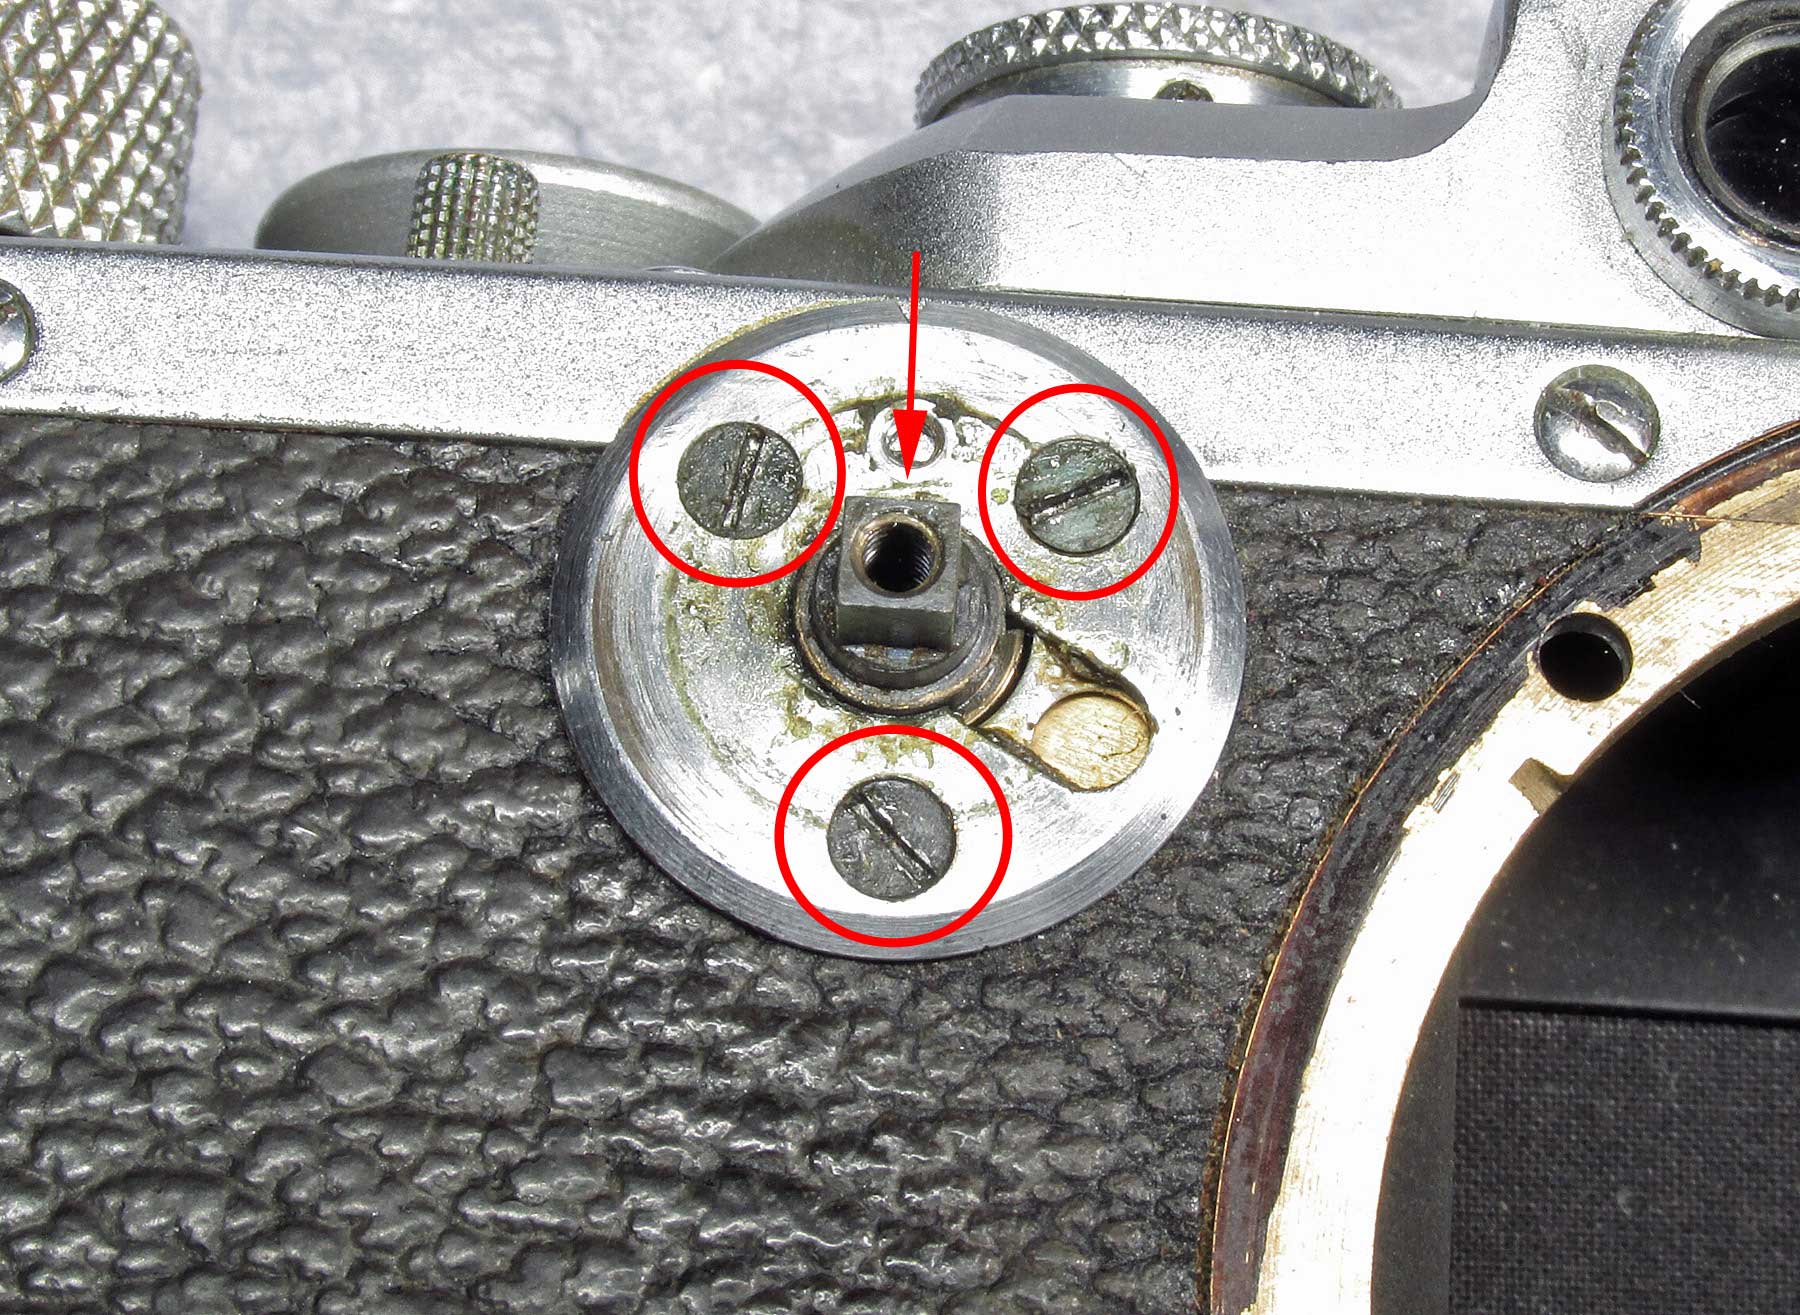
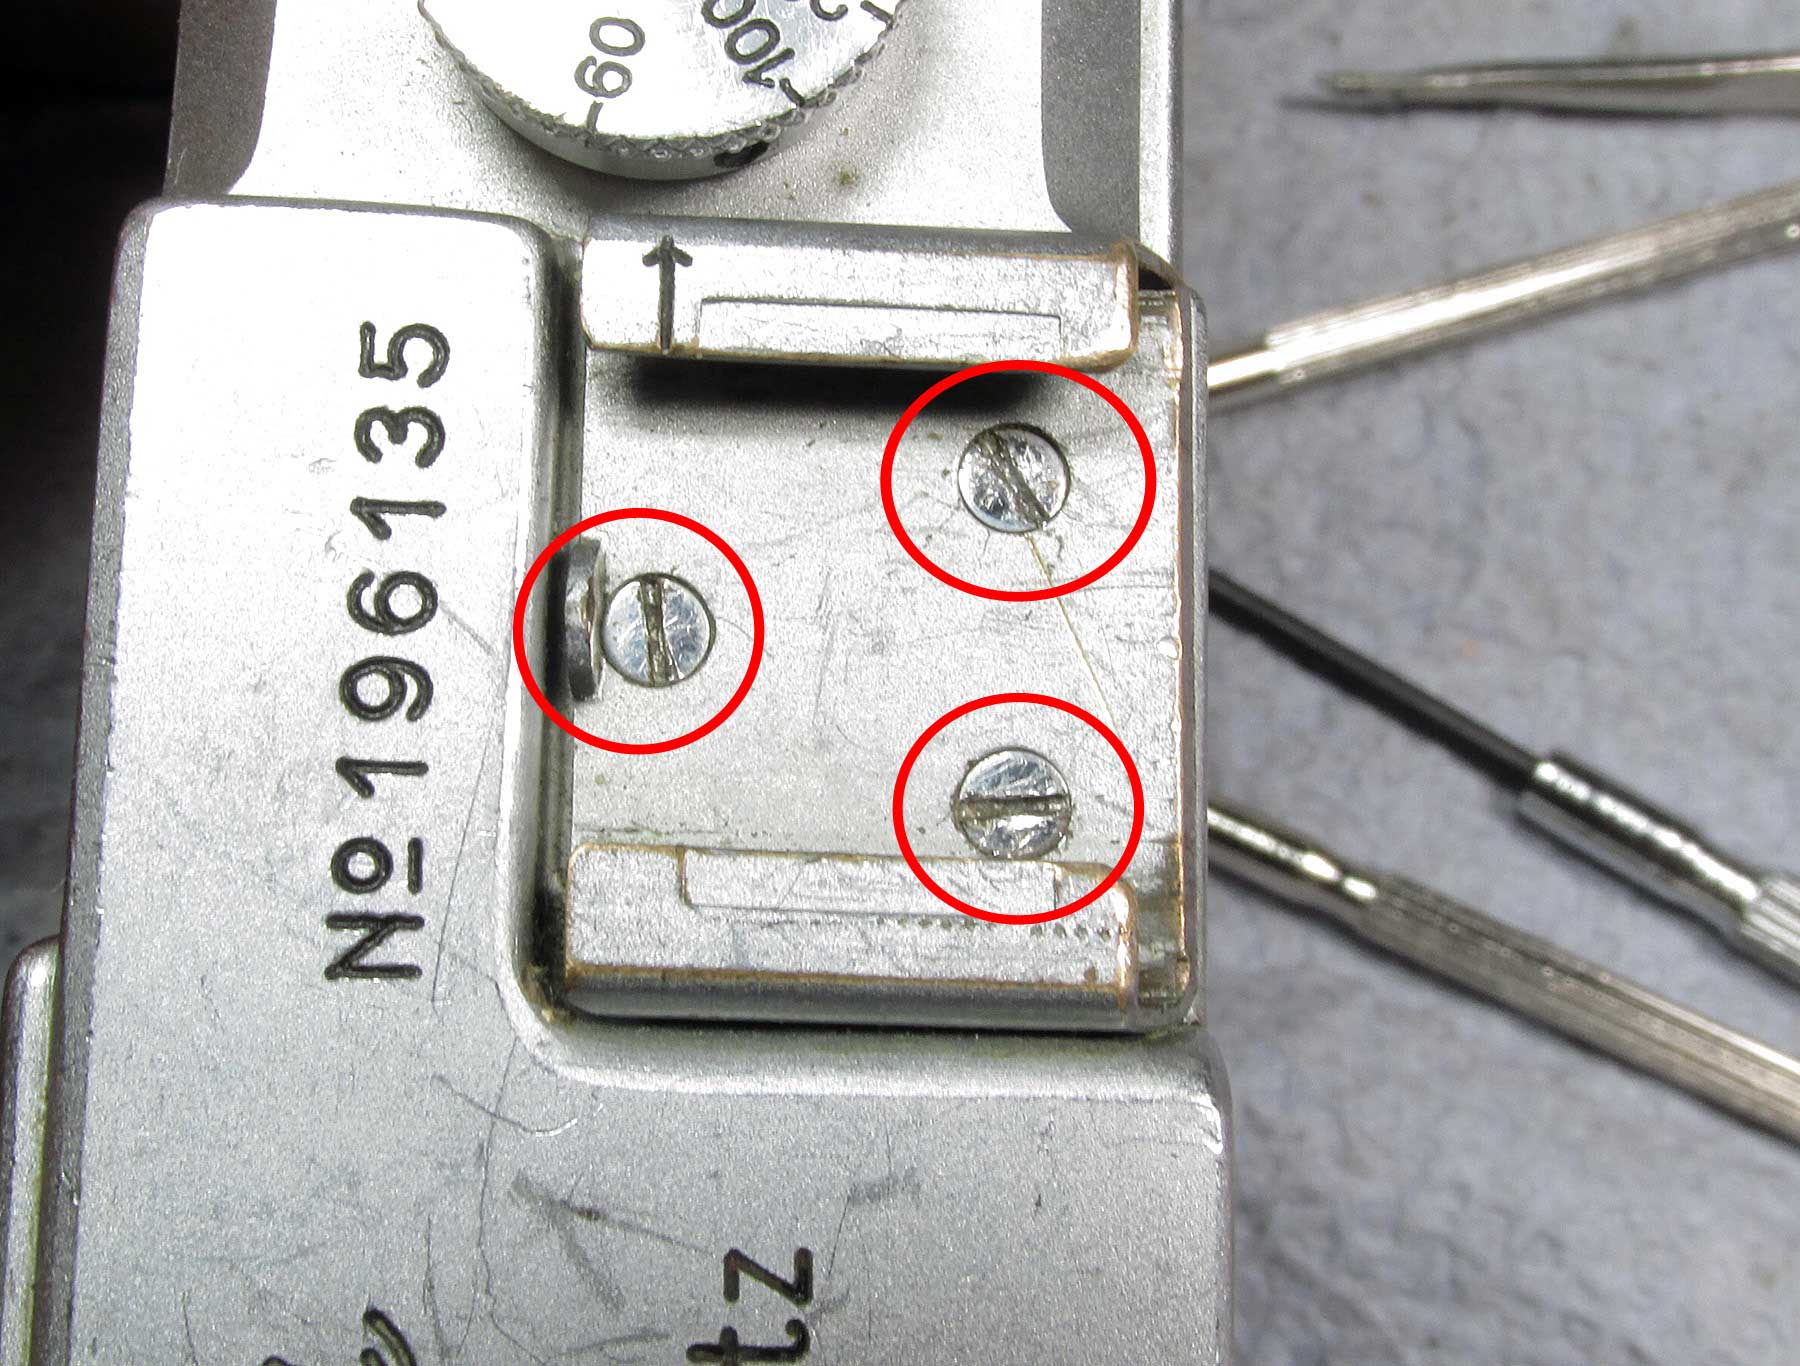
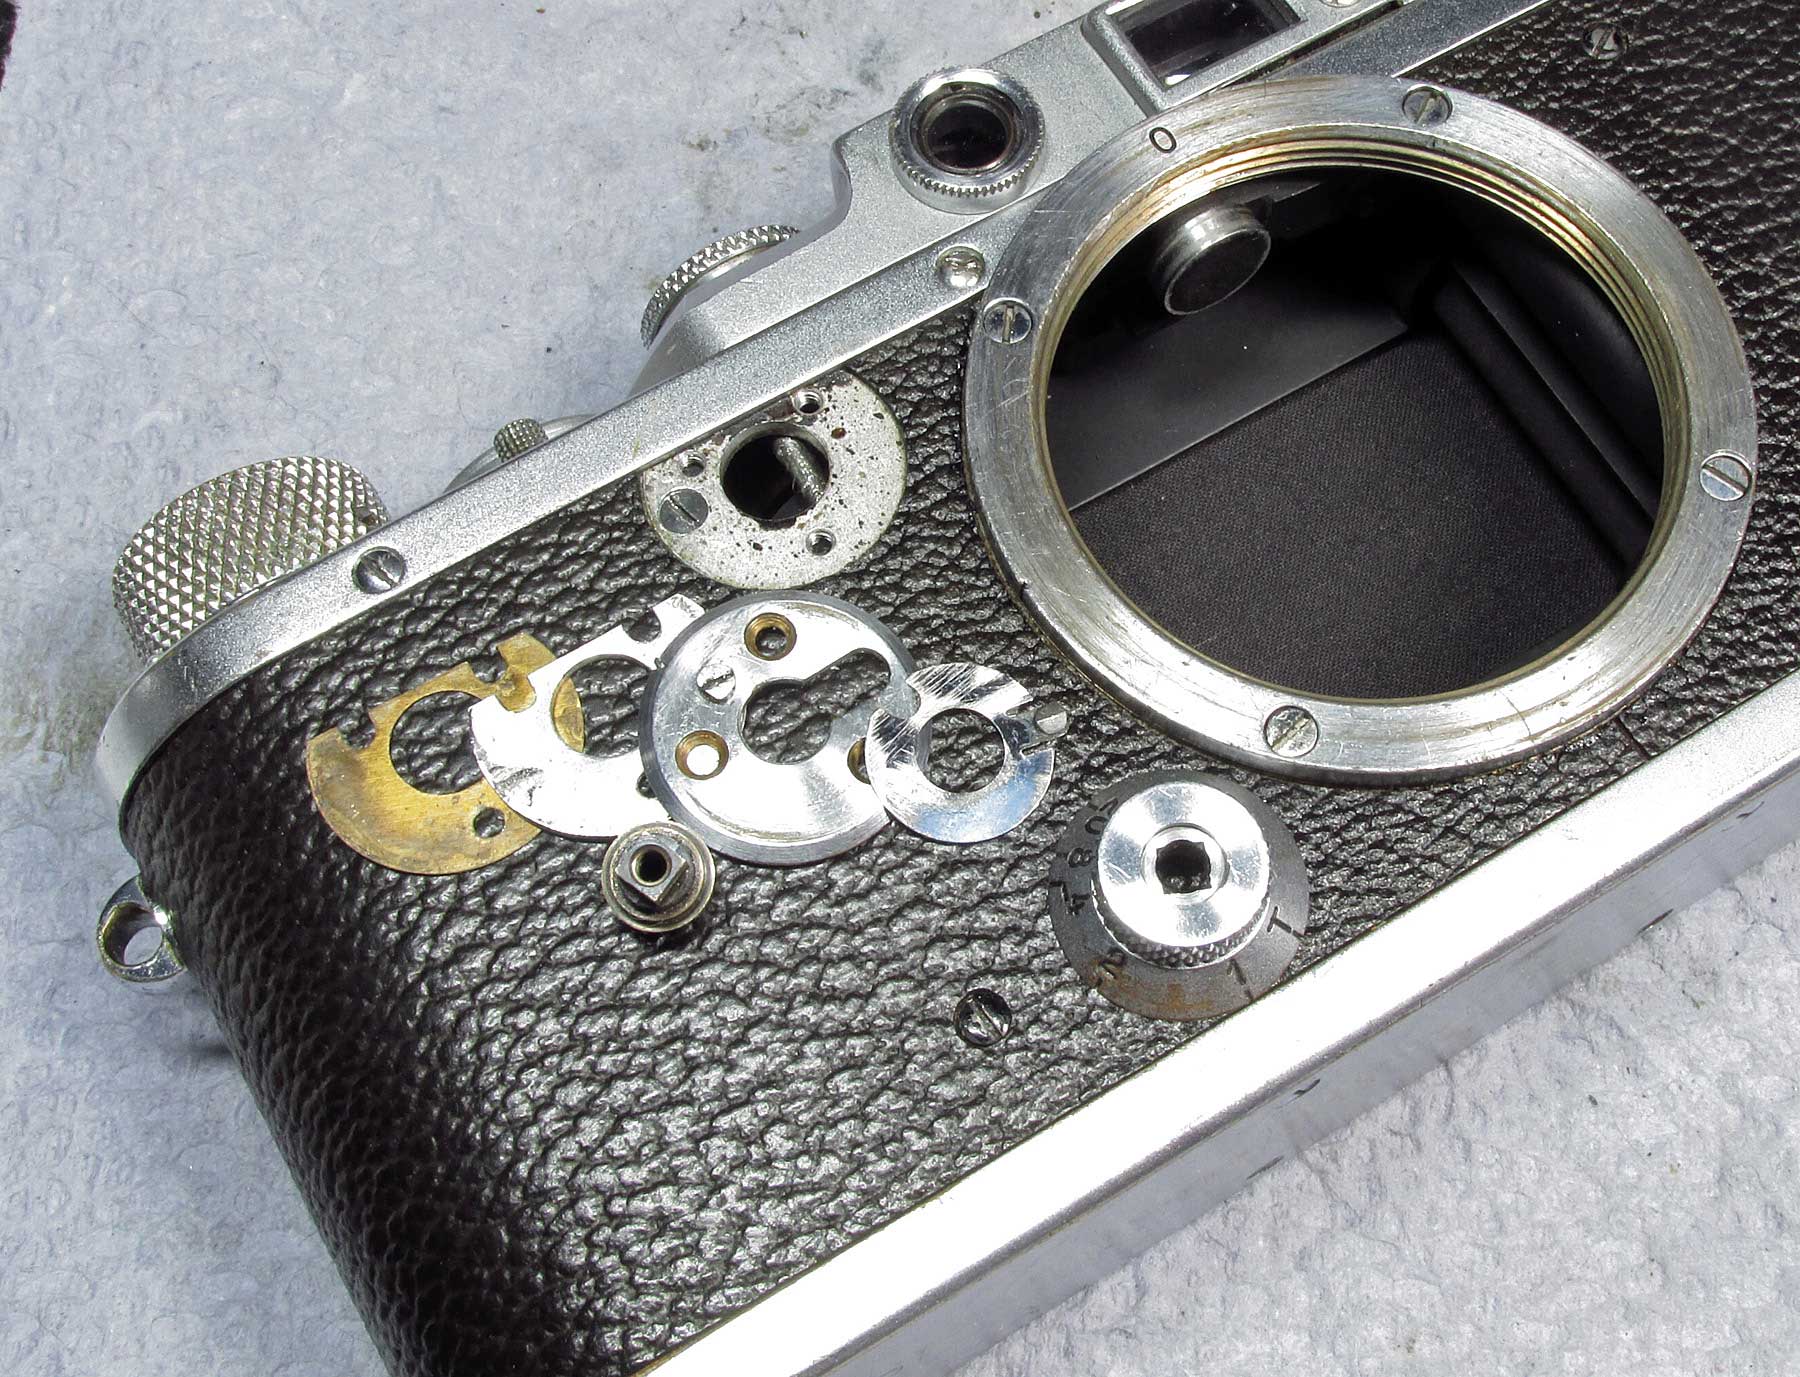
remove these 3 screws (circles) then lift off all the discs, remember their order they came off and the post.
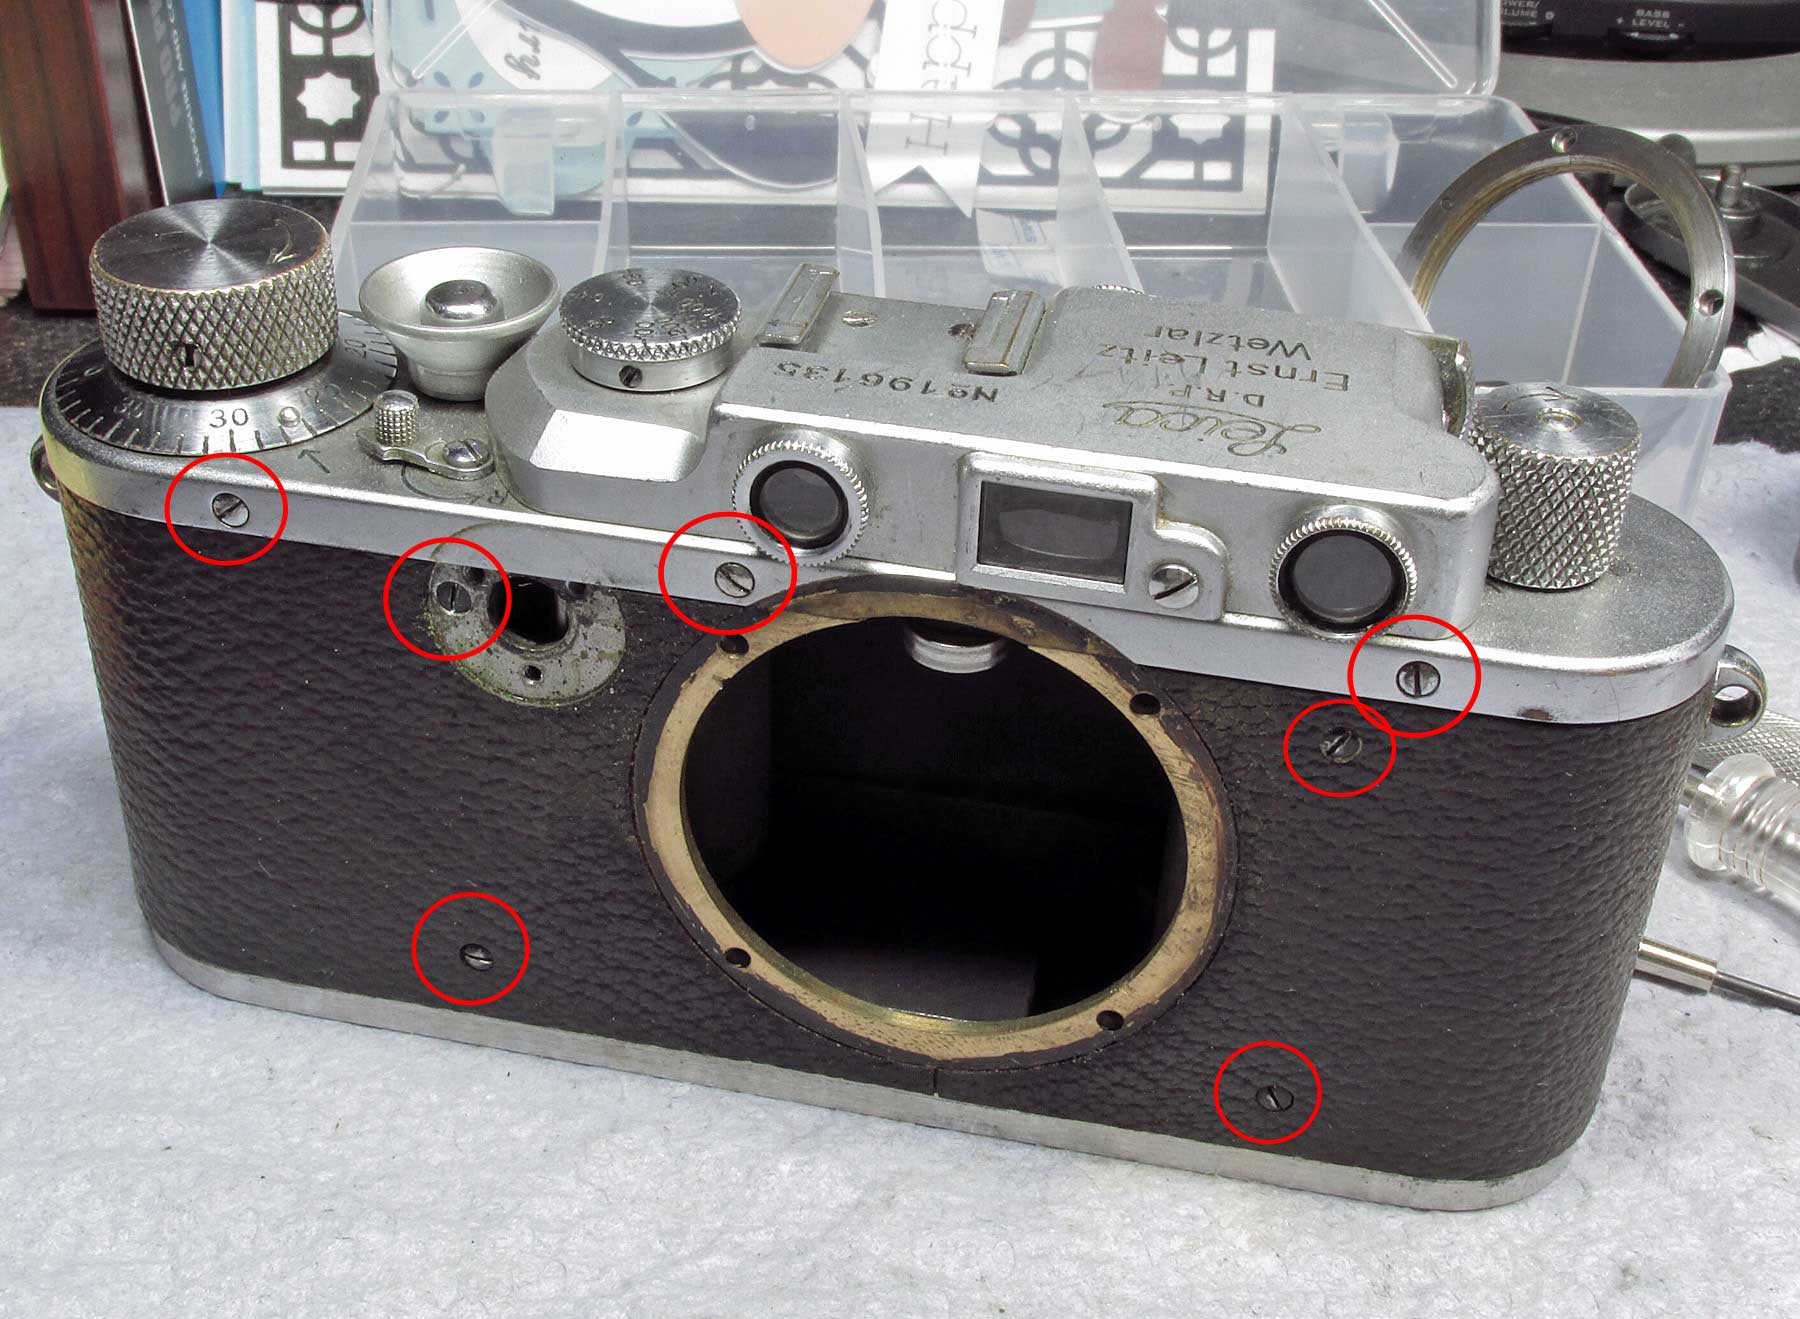
remove all these screws (red circles). the two dark body screws on the right (rewind side) come out and a bracket will fall out the bottom. It’s easy to figure out how it goes back in
remove these screws (circled)
hold down on the RF coupling arm so it clears when you remove the shell
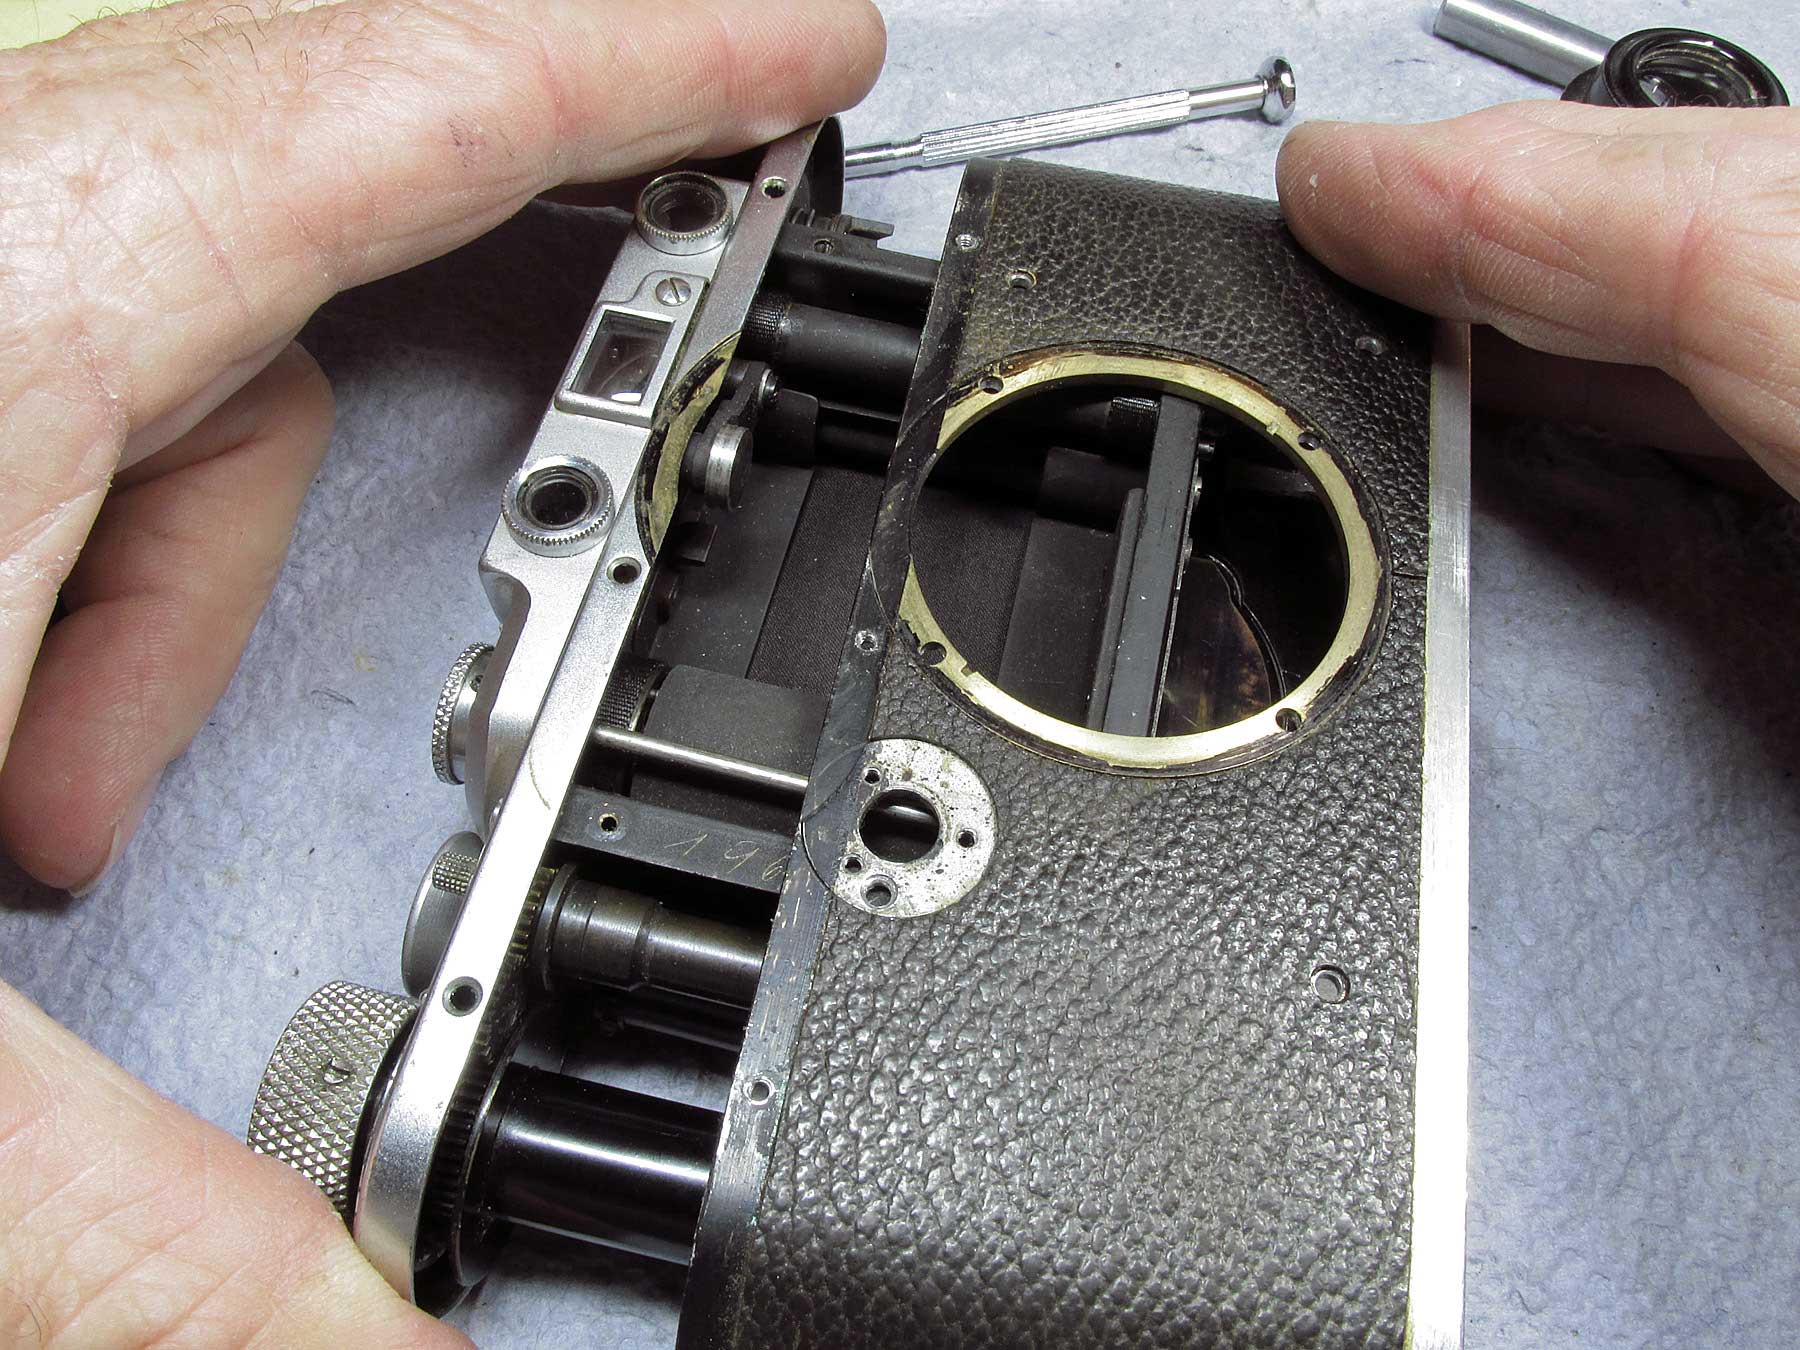
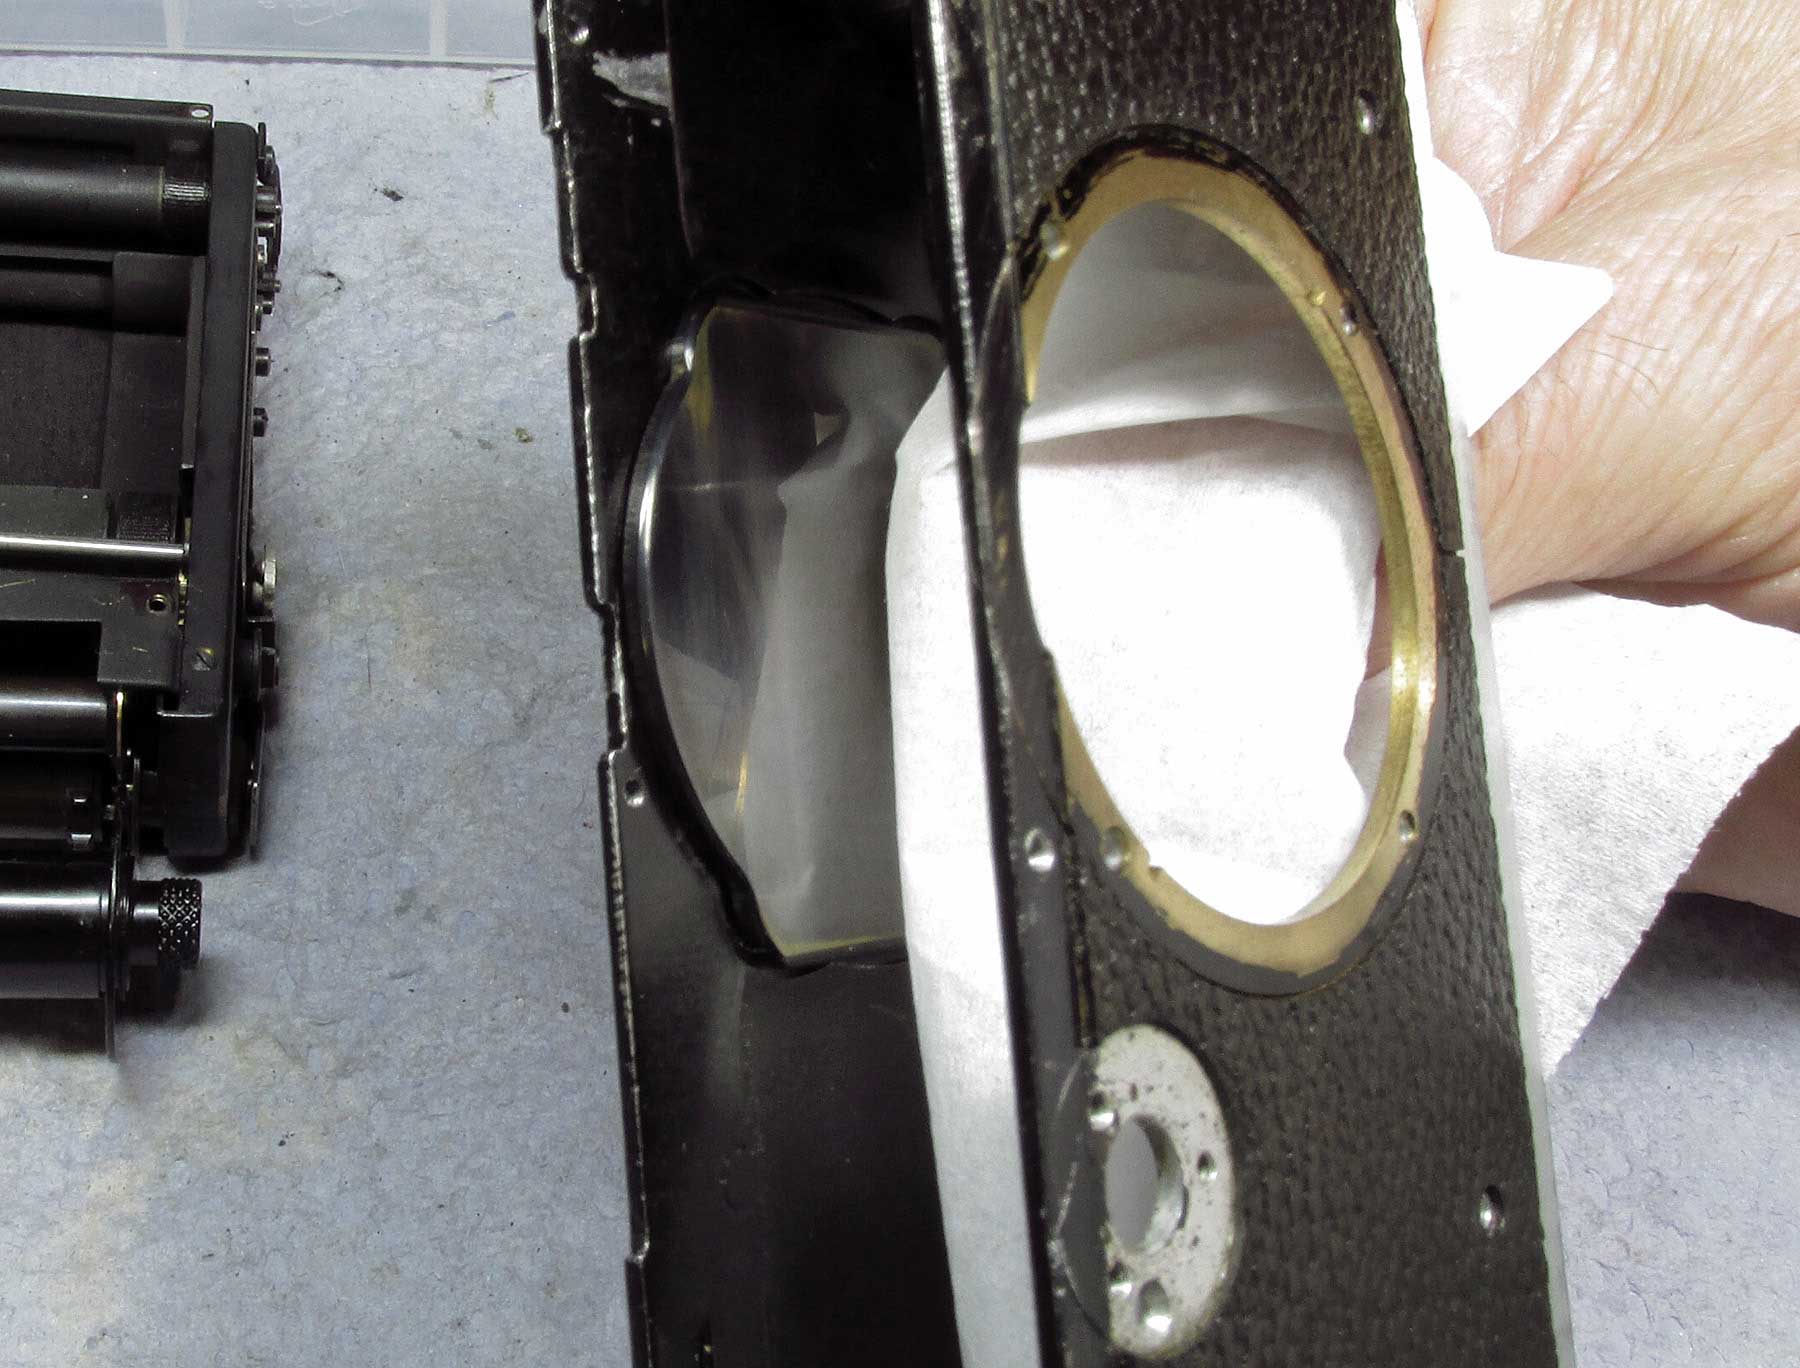
remove the shell simply pull it down, it shouldn’t be hard to remove
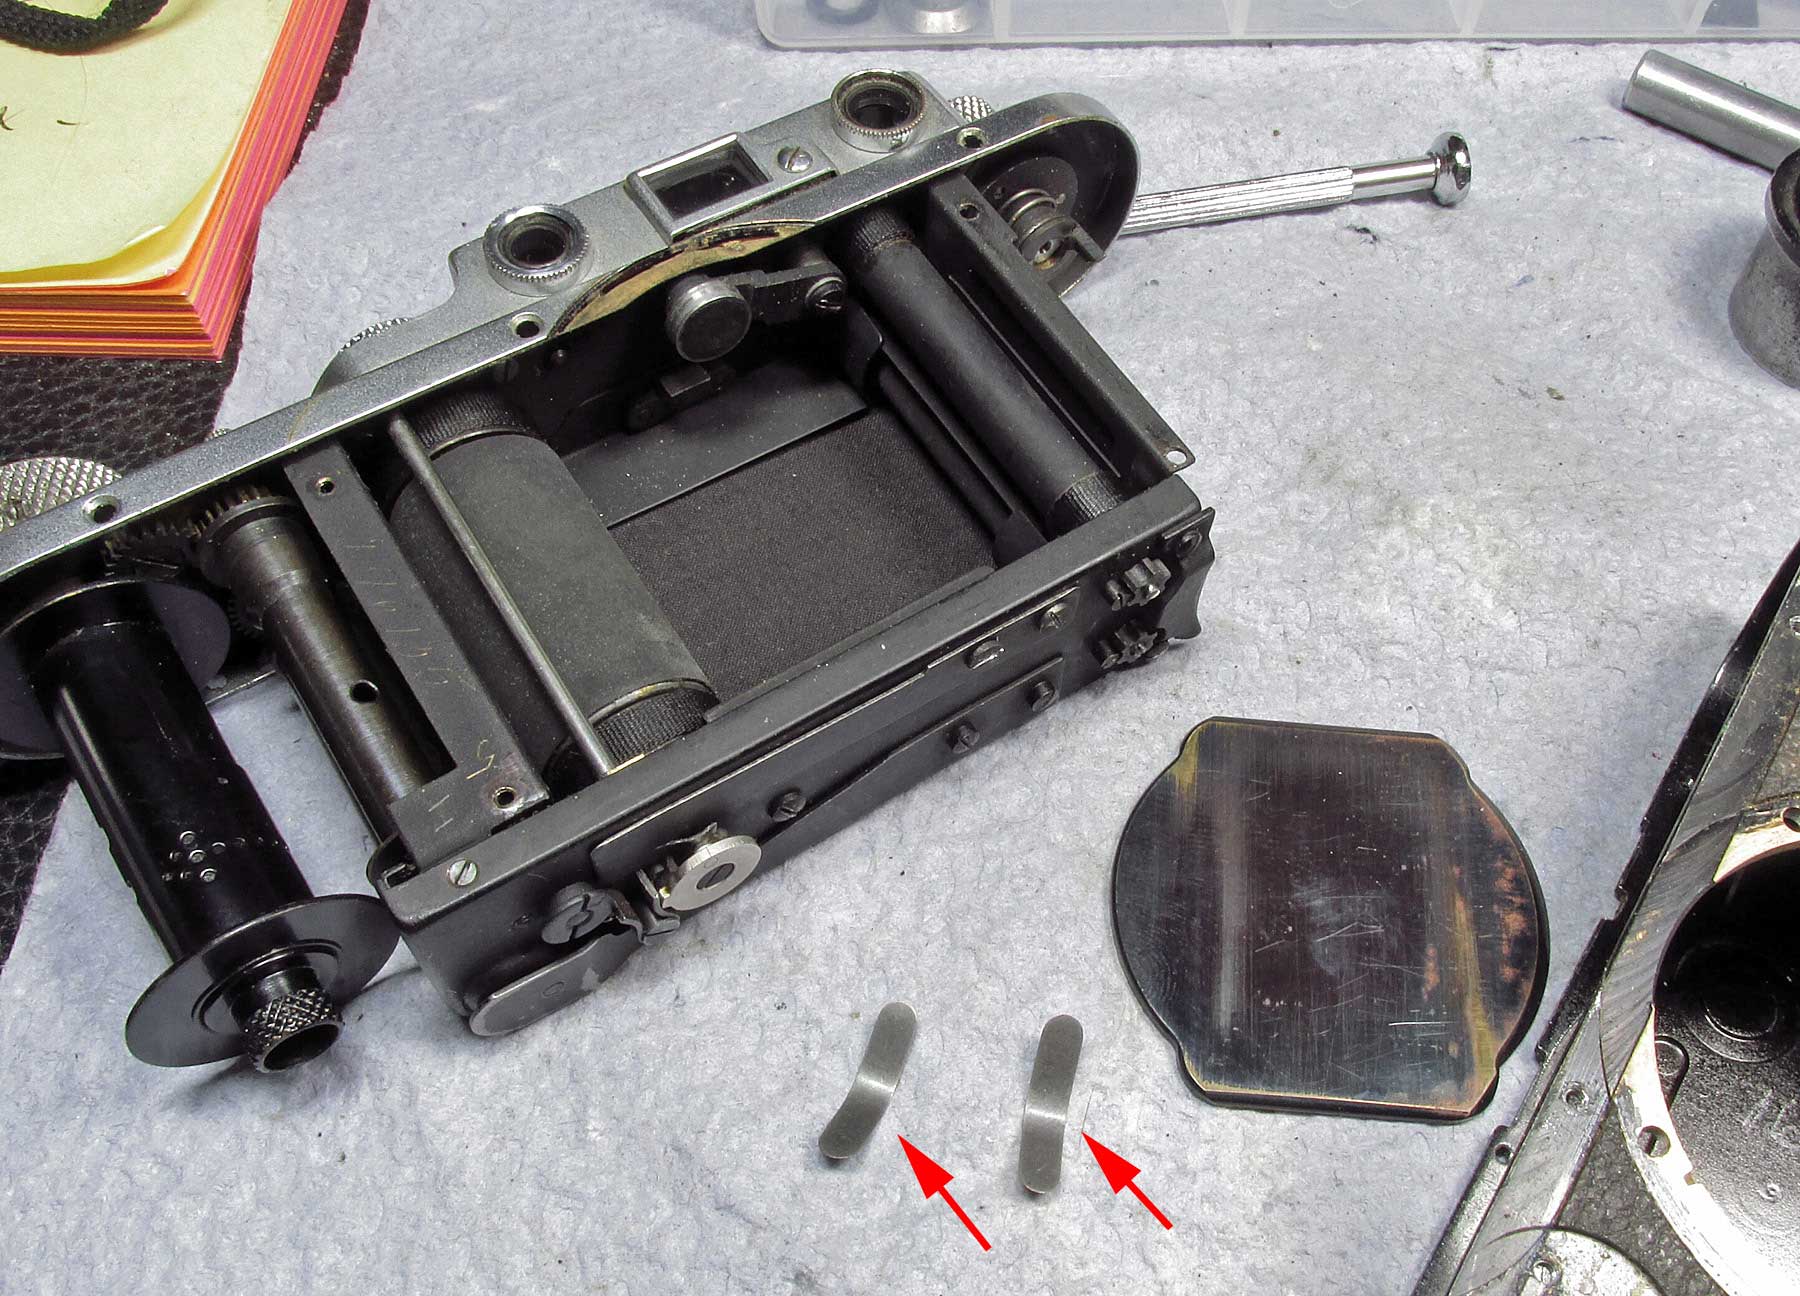
shell removed, the film pressure plate will fall out with it’s leaf springs (arrows)
After getting the shell off, that’s a good time to observe the shutter action. Look through it against a florescent light. When I did mine I discovered the 1/500 speed had just a blip of light and the 1/1000 speed showed no light at all so now it’s a CLA and repair as well.
Lets remove the top plate to see the Timing Mechanism and RF glass. (on the III and IIIa, only the smaller plate over the RF comes off, on the later IIIc, IIIf and IIIg, the entire chrome top plate comes off.
remove the screw between the RF round windows and remove the two round front RF windows. The right one (red arrow) may or may not come off in two pieces. mine came off in one piece. The left window (yellow arrows) should come off in two pieces, the outer ring and the inner window that also adjusts the vertical RF view. Use a spanner to remove it’s outer ring, the inner spanner slots adjust the RF. If your RF vertical view is already correct there should be no need to adjust it later
remove this rear viewfinder window
remove the rear screw (oblong circle) and the Diopter adjust post (circle)
pull out the Diopter / RF window. It will need cleaning and greasing
remove the 3 screws on the cold shoe (circles)
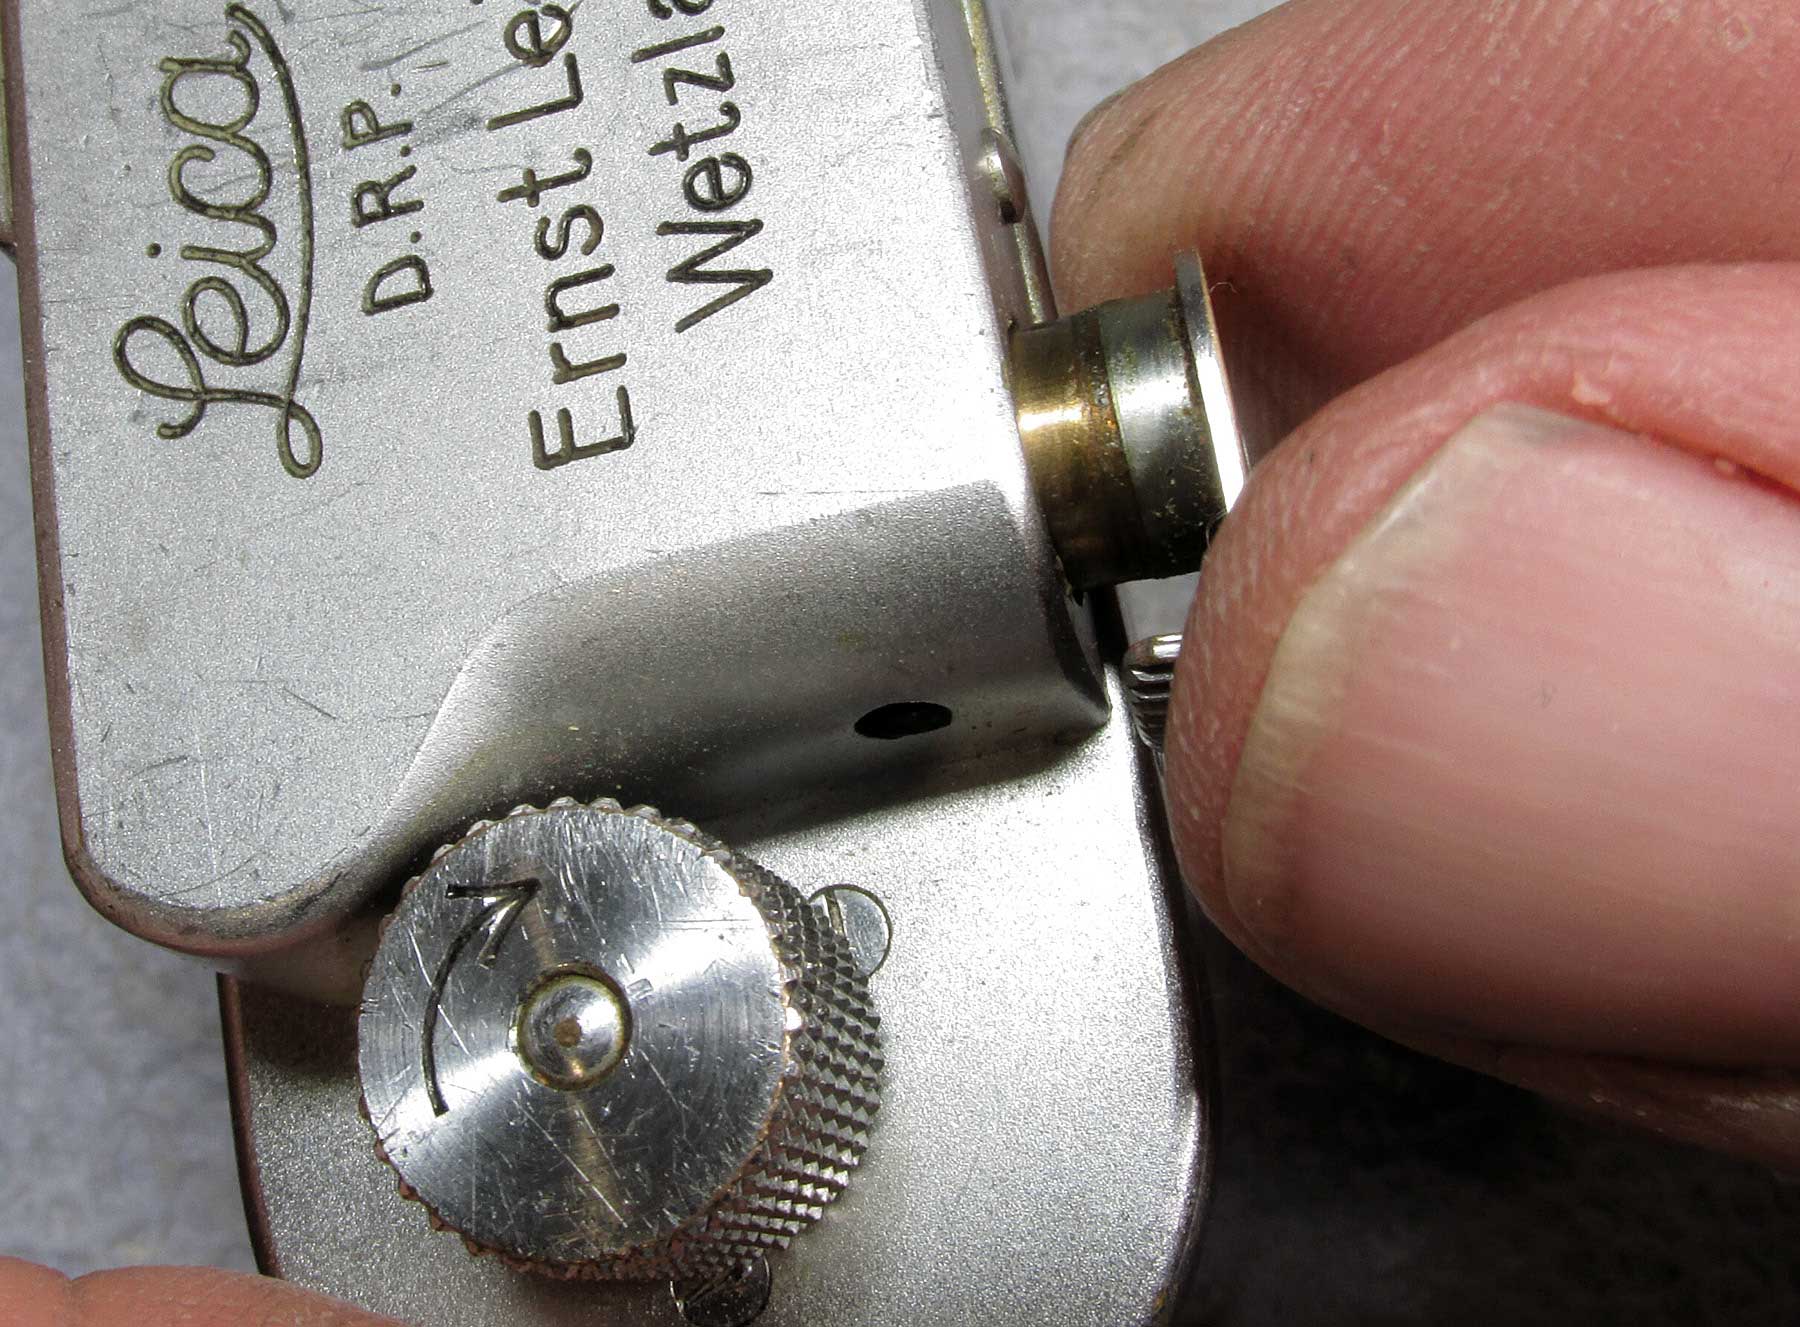
set the shutter dial to whatever speed, it won’t matter, on the IIIa, it screws off and can only go back on one way. Loosen the set screw (circled), turn the shutter dial lefty loosey. it may be helpful to wind the the film advance first (also when reassembling)
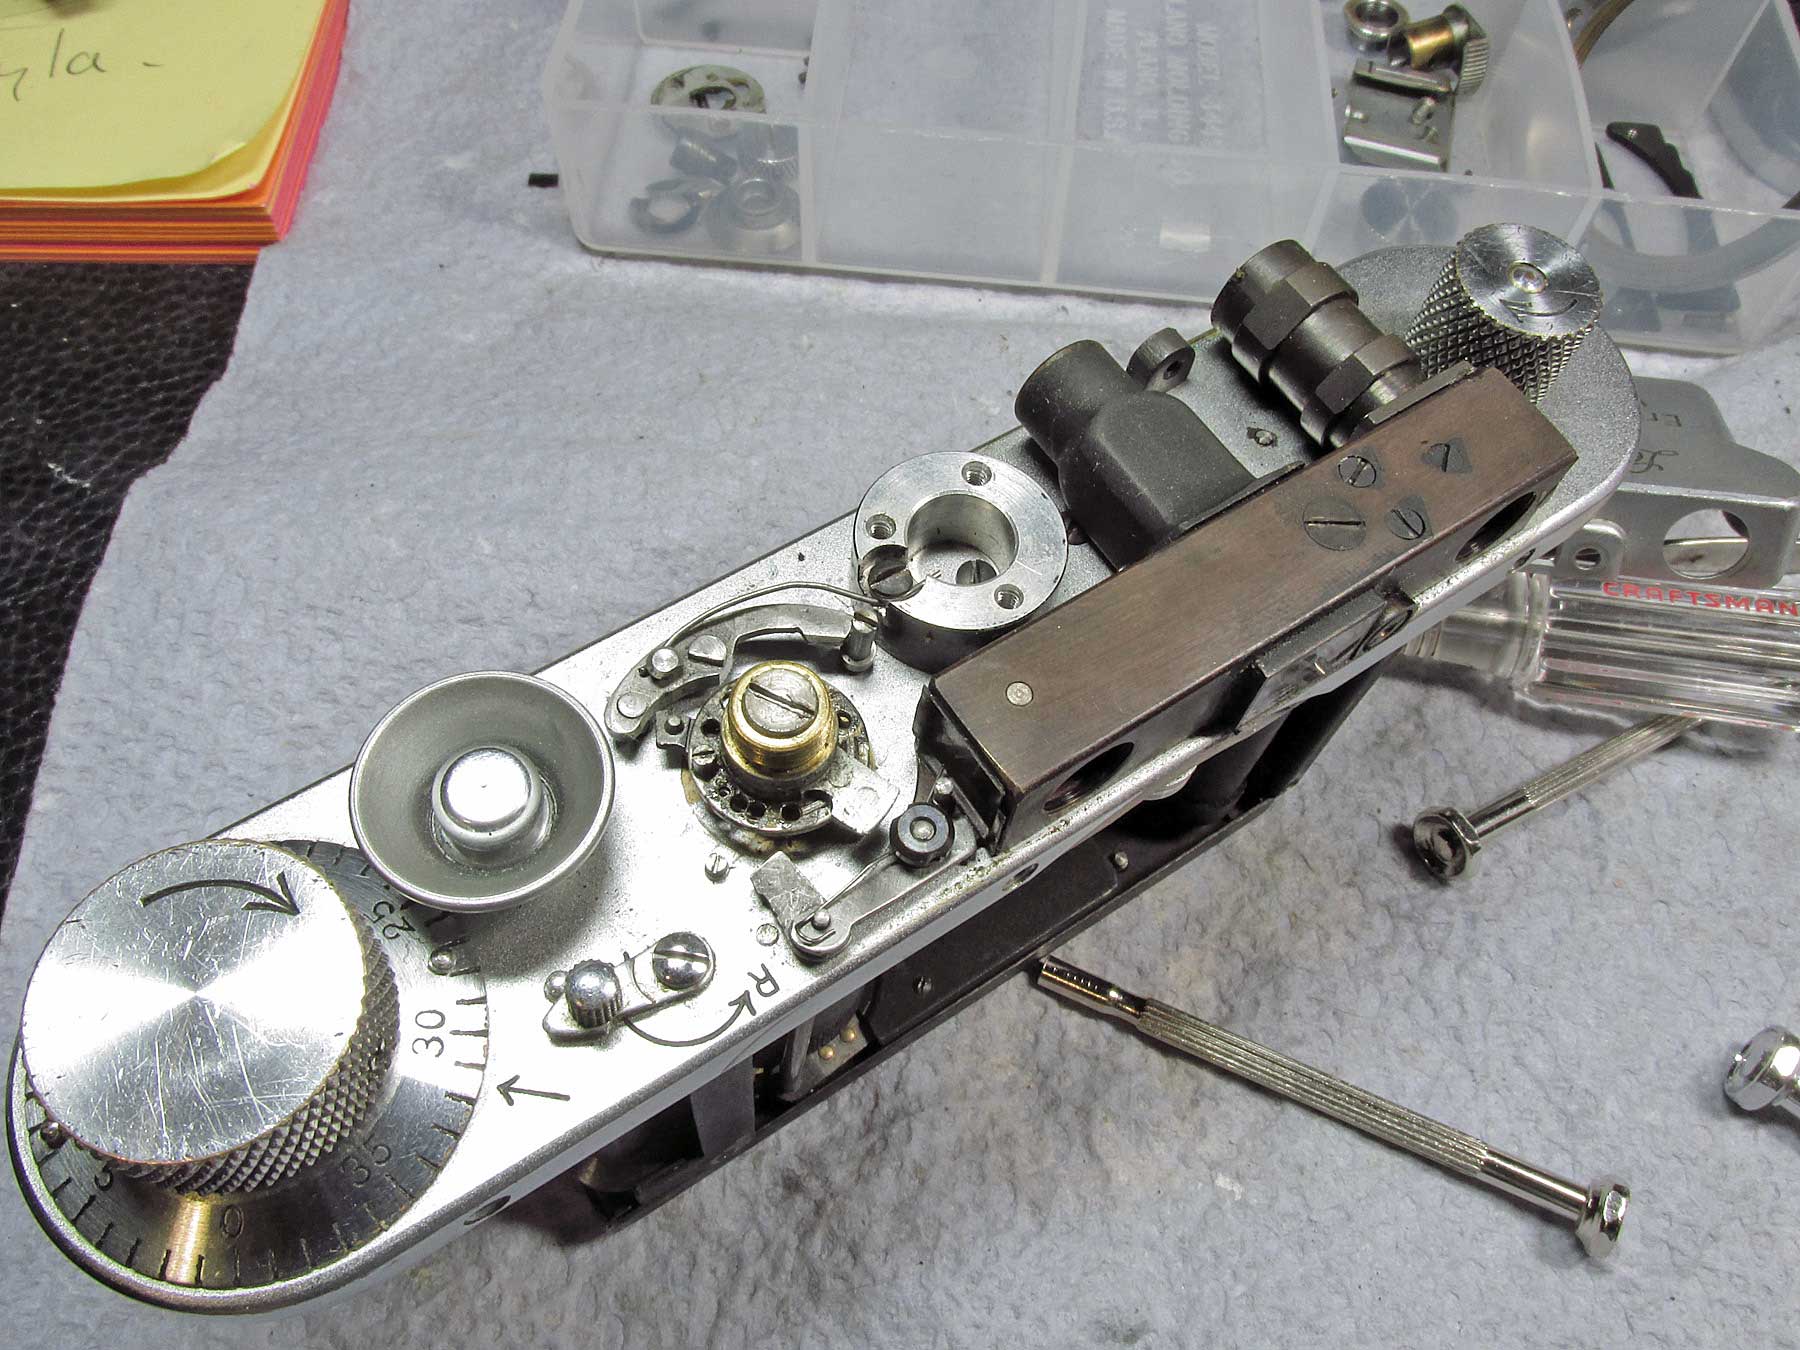
view of the top plate area
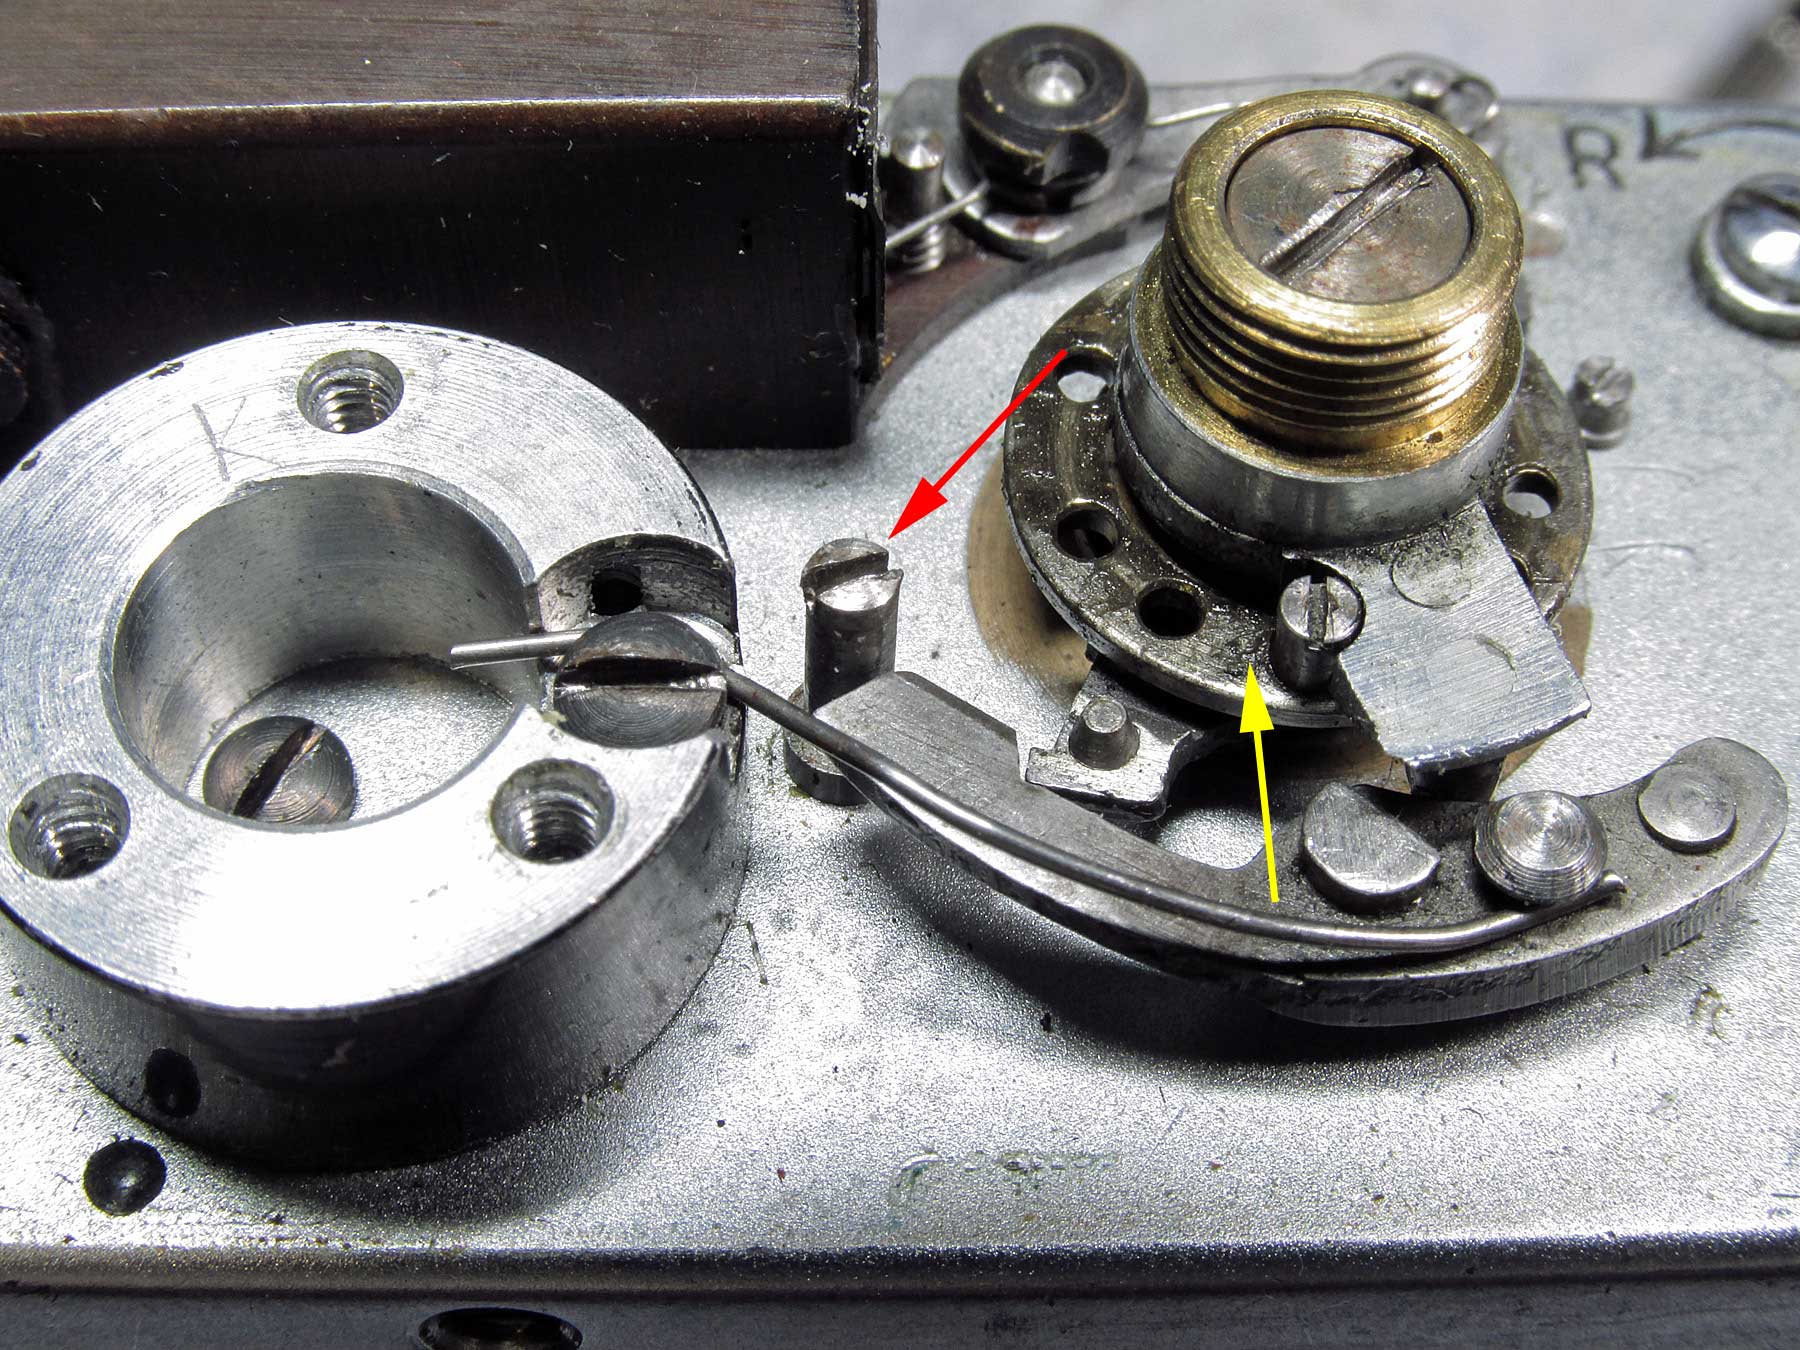
While I was cleaning the old grease I noticed a stop-post on the second shutter release arm was leaning. I poked it and it wiggled. I tightened it and all speeds work now!
red arrow shows the post that was loose, causing the 1/500 and 1/1000 speeds to not work. That’s the closing curtain release lever that rests on it. Note the old dried grease (yellow arrows)
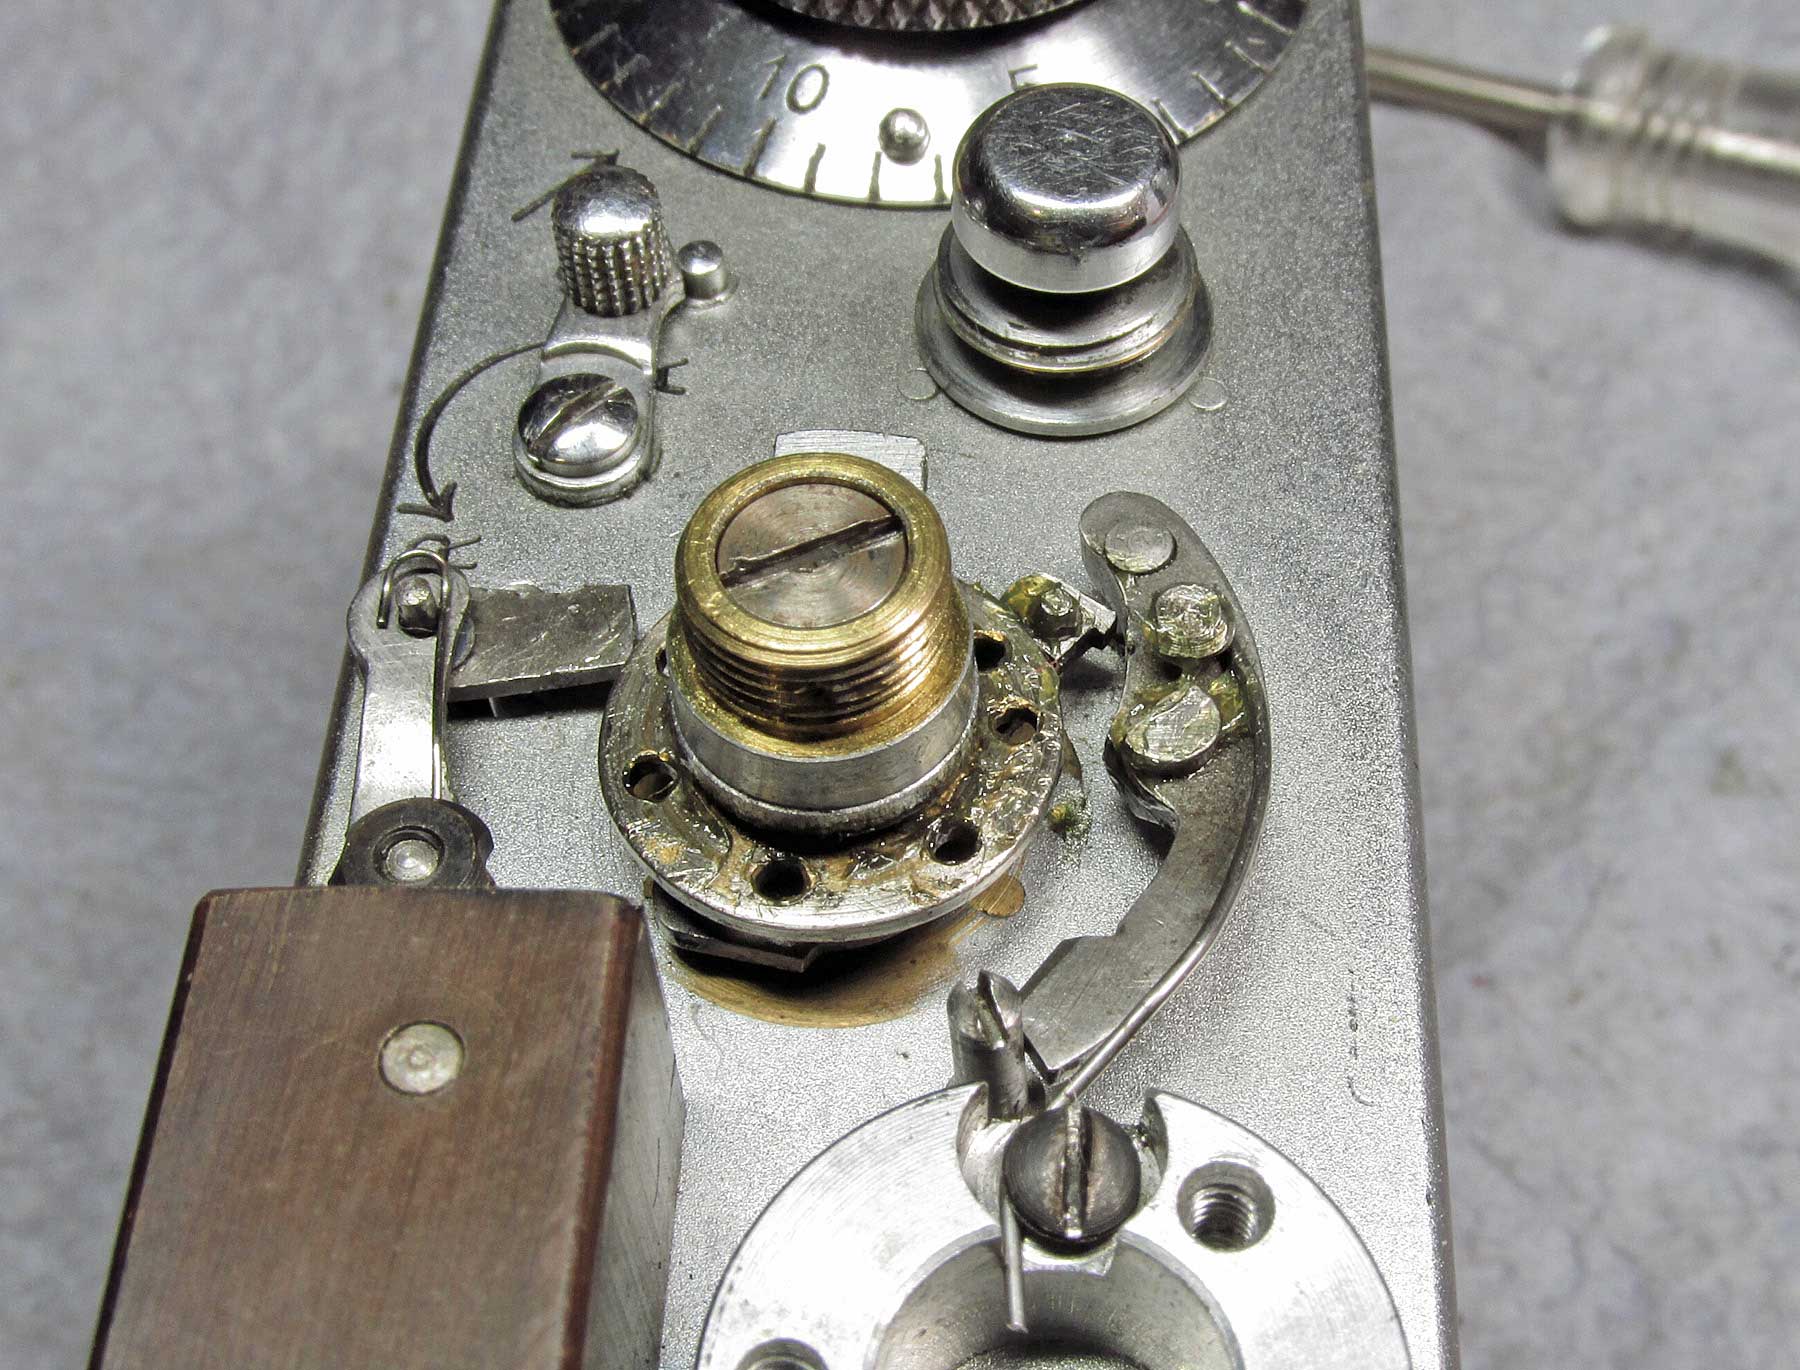
I cleaned old grease and re-greased the Timing Mechanism, winding knob, rewind knob shaft and Diopter adjust. I cleaned the gears at the bottom of the shutter drum.
cleaned top plate and fresh grease on the Timing Mechanism
12/23/14: cleaned the Vulcanite. a 3 step process and it looks great now. Reassembled the camera shell and slow speed dial.
Vulcanite all cleaned. It was a 3 step process, well, a 5 step actually because I had to do step 1 and 2 twice. First I cleaned it with Isopropyl alcohol. That left a whitish dry looking coating, I cleaned that with Windex. It may not take 2 or 3 tries with your vulcanite, mine was pretty bad. I did the first 2 steps at least twice then I finished step 3 with ‘Mothers Back to Black’
Lets put it back together. The film pressure plate rides in it’s own groove milled into the back of the body shell. The two leaf springs have their own slots as well.
the flat leaf springs in their slots (red circles) note the round groove milled into the back around the springs. this is the pressure plate groove.
put the pressure plate back into its groove, I held mine with pressure down with a Kemwipe so I didn’t leave a thumb print. hold it down as you slide the shell back onto the body. Once it clears the framework, you can let it go, it will stay.
be sure to hold down on the RF coupling arm as the shell passes over so it clears.
shell back on. when you put the screws back in leave the center silver screw out until after you get the lens ring back on, that way it won’t interfere with the bracket that goes under the RF coupling arm.
Now put the lens ring and slow speed dials back on. If you had shims under your lens ring, remember where and how they went.
this mark goes to the left side
the slow speed dial parts in order of replacement. First the brass washer, the chrome spacer, the post with it’s mark where ever/however you marked it, the plate with the clicker disc attached (mine shows them still separated), put some fresh grease in the groove on the back of the speed dial and replace it. If you separated the knurled knob from the speed dial, you should notice there is an indentation where the factory set the set screw. if your slow speeds were adjusted before, just put this back as it was and replace the speed dial with the post as marked.
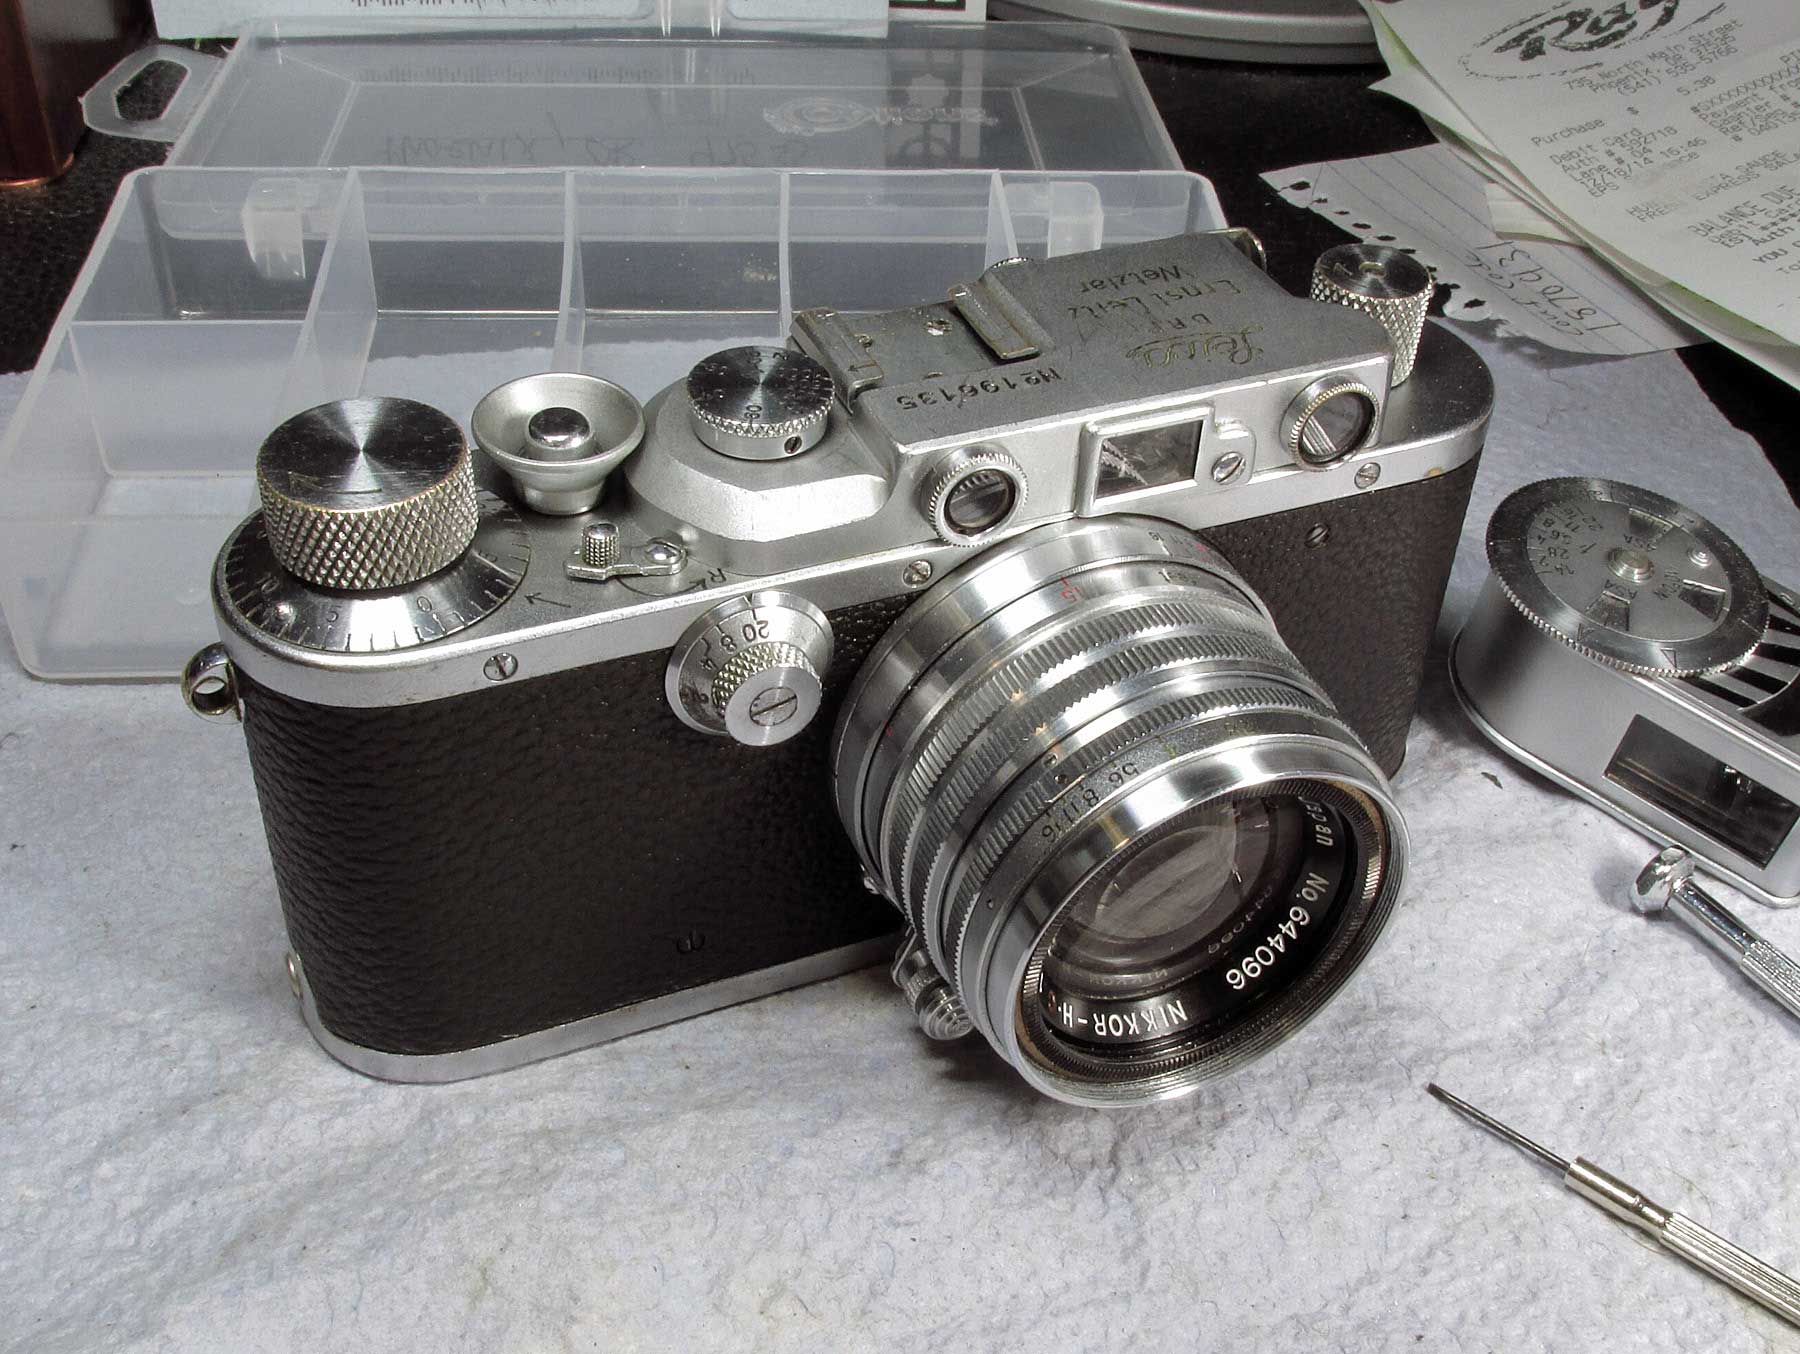
finished
Here it is with my Nikkor-HC 1:2 5cm lens from 1953
This camera was fun to work on. It may seem intimidating but is actually easier to work on than the later Japanese rangefinders where you, a lot of times, must remove the leatherette to get to the lens plate to get to the shutter to get to the …blah blah.
19 thoughts on “1936 Leica IIIa CLA and Repair”
Hello Richard – that’s a very nice IIIa. Your notes on the slow speed mechanism helped me out greatly with my IIIb. It’s got much more wear than yours, from 1939.
Do you by chance have any recommendations of where to do the CLA work on the shutter mechanism? Mine is OK for now, but over time…
if you want to send it off, Youxin Ye is highly recommended in the forums, http://www.yyecamera.com/
check out the RangefinderForum.com for more suggestions.
What tools and grease is need to repair a Leica IIIa camera? Can you supply recommendations and where to buy info? Also do you have any recommendations of where to buy shutter curtains and body cover replacements
Thanks,
Aaron
I used mostly a tiny screw driver, flat tip, of different sizes. I used white lithium grease on the speed mechanism on top and sewing machine oil on the slow speed escapement bearings. the curtain material and coverings are easily found on Google and eBay.
There are many sites on repairing Leica’s. Google and rangefinderforum.com are very helpful too
Hi Richard,
Could anything regarding the CLA of a IIIA also be applied to a IIIC? I’d like to learn how to CLA my own camera, but I don’t know where to start. Mostly, I’m interested in how to take the camera apart and clean the view/rangefinders without causing any damage. When I first bought it, I sent it off to Youxin Ye, who did a fantastic job, though it seemed some light leaks were still occurring that I didn’t know how to fix.
I’m not too sure about the IIIc I’ve read it has a slightly different build with the closer VF/RF eye holes and a solid cast body but the basic disassembly should be about the same. The basic assembly is the same almost on all Barnack type cameras ie. Leica “clones” Nicca, Leotax etc…
I have read text descriptins of LTM disassembly many times, but your step-by-step photographs make it much easier for a visual guy like me. Thanks a lot for posting!!!
An excellent description of the dismantling an cleaning process, thank you. My 1935 IIIa is suffering from irregular shutter blind travel at all speeds but most noticeable from 1/500th to 1/60th. I first noticed this on negatives but demonstrated it subsequently by inserting photographic paper in the film gate and exposing to a light source with no lens. In your description you don’t mention lubricating the shutter blind shaft bearings/bushes, which I was counting on doing. Is there any reason for this? Perhaps because your problem was originally with the slow speeds and you took the attitude of ‘if it ain’t broke, don’t mend it’! Any thoughts on this or my shutter problem in general gratefully received. (I had the camera professionally serviced seven years ago so I’m both surprised and disappointed that it should have developed the problem).
Best wishes,
Steve
Not sure why after only 7 years it is giving you problems although I have had that happen to me, not being a professional… I learned after most do-it-yourselfers through the years will resort to tightening the tension rods and so after cleaning and lubricating the shutter you end up with over-tensioned rods. The IIIa is tricky to do the rods… first clean and ever so lightly lube the shutter gears, etc… then let it sit about a week, testing a few times a day to work the lubrication throughout the gears, Then back off the tension on the rods all the way (basically starting over) then tighten each rod to where it should be,,, follow Rick Olesons page, about half way down (Fig. 12) shows how to tension the rods http://rick_oleson.tripod.com/leicashutter.pdf
Thanks for your thoughts, Richard. Though it’s possible to run into problems as a do-it-yourselfer, I’ve had cameras returned to me by professional repairers with faults that weren’t there before or faults that had been caused by the repair. I would say to anyone reading your page that with care, patience and a decent set of tools a great many repairs can be done as well as if not better than a professional might do them. Obviously there are limits, but if we aren’t having to make a profit we can take as much time as the job needs, not as much as we can reasonably bill a customer for. The experiences of others, such as yourself, are invaluable and much appreciated.
Thanks again, Steve.
Hi,
today I got rid of the vulcanite cover and made a custom cover out of leather. While this I cla’d my IIIa as well a little bit. The slower speeds are not working. As well I replaced the mirror to a better beam split mirror, but now the pictures of the rangefinder are not coming together again and I have to adjust the mirror. Could someone help me and show me, how to adjust the rangefinder? I’ve loosened all screws and looked for solutions in the internet but without any success.
So, could someone help me, getting my IIIa up and running again with a proper rangefinder?
Regards
Philipp
first you need to adjust the Vertical setting.. remove the ring of the small rangefinder window on the front lens nearest the shutter speed dial (left window as looking at it from the front) there is a lens with 2 spanner slots, the outer set removes the lens assembly from the camera,… the inner set, nearest the glass is how to adjust the vertical image (up and down) and must be set before you can do the infinity (horizontal) image. turn it left or right until the image up and down are lined up.
the Infinity adjust (or horizontal adjust) left to right… remove the 1 screw in front next to the large rectangle window, inside is the adjust screw for infinity. with the camera lens set to infinity, adjust the screw until the image lines up left to right.
Thank you Richard for your help, is there a special tool to open the two screws to adjust the vertical setting?
yes but if you don’t have a small spanner wrench (2 slots, one on each side of the lens) sometimes a small screwdriver will work… If you said you replaced the rangefinder mirror, then you would have to have removed the two rings on the front then you would have to have removed the left optics, what ever you used to do that will work for the inner ring…
Thank you Richard, figured it out, I was able to turn it, but the range is too far away. I think, I made a mistake while assembling the mirror although I paid attention to the correct sit of the mirror.
Doesn‘t matter if I turn vertical or horizontal, I don‘t get it in the right position. I screwed the screws also, so I will leave it. Maybe I‘m looking for someone who can overhaul it somewhere in Germany.
I‘m really sad, it pulls me down at the moment.
Thank you anyway for your help.
Philipp
Hello! Thank you very much for these detailed publications. I think your blog helps many people take care of their precious Leica IIIa cameras.
I want to share my experience after having done a CLA of my 1938 Leica III camera.
First: I suggest that a CLA not be done if it is not really necessary. The camera will suffer aesthetically: worn screws when trying to remove them, broken vulcanite, etc. In my case, the CLA is justified by a problem with the slow shutter speeds that I want to correct: slow speeds are very slow (one second has become two seconds, etc.) and many times slow speeds get stuck and just don’t they work correctly (they work like the Z position, keeping the shutter open while the shutter button is pressed).
After carefully disassembling the camera and analyzing it in detail, I discovered that in my case, the problem mentioned with slow speeds was due to a deformed spring (of the two sheet-shaped ones that are located in the lower part of the chamber, in the compartment to load the film). This spring presses the slow speed bar up. When the shutter was loaded the spring rose slightly and did not exert pressure on the slow speed bar, so it was not in the correct position. Once this detail was fixed, my Leica IIIa began to work correctly (without getting stuck) and the slow speeds returned to work precisely (approximately precisely).
I don’t have another Leica IIIa to verify that my discovery is correct, but in my case it solved all my problems.
Regards!
most will agree, don’t do a CLA if it isn’t absolutely necessary… that said, with an 80 year old camera, unless it has been on a recent visit to Youxin Ye, it probably could use somewhat of a CLA. Every Barnack style camera I’ve handled (or most older focal plane shutter cameras for that matter) have had their shutter springs tightened through the years to compensate for the dirt and lack of proper lubrication, and you can hear it, loud ‘snap’ sound. a properly cleaned and lubed camera, especially a Leica should be just a smooth quiet ‘fwoop’…
Like my IIIf red dial, after it’s CLA, it tested fine on the bench but after sitting a week or so and letting the lubrication take better affect, it’s second shutter spring was too tight and caused ‘capping’ and it made the loud snap.. thing you can do after a proper cleaning and lubing is back the springs back completely and start from scratch. the first shutter must be just tight enough but not (much) more tight than to activate the second shutter.. then the second shutter needs to be just enough to ‘follow’ the first.
as for the slow speeds, I had one similar to yours, I also had one where just cleaning and lubing the escapement did the trick
Many thanks for writing up this article. It helped me out tremendously. I purchased a IIIa and it was suffering from stuck 1/1000 speed and slower speeds. I have a late model IIIa, and there are some slight differences to yours but overall the same. After putting back the camera together, now the second shutter following the first shutter is closing a bit slower once it reaches the end of the closing. Is there a way to tighten that second shutter to close smoothly towards the end of travel?
not sure what you’ve already done… did you clean it good? through the years, 70+ years on the IIIa’s, it builds up dirt, people tend to keep tightening the shutter springs to compensate. my IIIa is whisper quiet after I adjusted the curtains after a thorough cleaning…. when you release the shutter is it fairly loud with almost a slap sound?? almost like an SLR camera from the 70’s and 80’s? if so the curtain rods are over tightened but must be cleaned first…
after a good cleaning and very very light oiling (sewing machine oil works good) work the shutter a dozen times or so then let it sit about a week doing the shutter a few times a day to fully distribute the oils.. then we’ll adjust the curtains.. let me know when you’re done or if you’ve done this already


Hello Richard – that’s a very nice IIIa. Your notes on the slow speed mechanism helped me out greatly with my IIIb. It’s got much more wear than yours, from 1939.
Do you by chance have any recommendations of where to do the CLA work on the shutter mechanism? Mine is OK for now, but over time…
Best, Steven
Personally I would try it myself, there are great tutorials out there:
Rick Oleson has a few:
http://rick_oleson.tripod.com/leicashutter.pdf
http://rick_oleson.tripod.com/index-155.html
if you want to send it off, Youxin Ye is highly recommended in the forums,
http://www.yyecamera.com/
check out the RangefinderForum.com for more suggestions.
What tools and grease is need to repair a Leica IIIa camera? Can you supply recommendations and where to buy info? Also do you have any recommendations of where to buy shutter curtains and body cover replacements
Thanks,
Aaron
I used mostly a tiny screw driver, flat tip, of different sizes. I used white lithium grease on the speed mechanism on top and sewing machine oil on the slow speed escapement bearings. the curtain material and coverings are easily found on Google and eBay.
Rick Oleson’s site is helpful
http://rick_oleson.tripod.com/index-155.html
http://members.tripod.com/rick_oleson/index-90.html
There are many sites on repairing Leica’s. Google and rangefinderforum.com are very helpful too
Hi Richard,
Could anything regarding the CLA of a IIIA also be applied to a IIIC? I’d like to learn how to CLA my own camera, but I don’t know where to start. Mostly, I’m interested in how to take the camera apart and clean the view/rangefinders without causing any damage. When I first bought it, I sent it off to Youxin Ye, who did a fantastic job, though it seemed some light leaks were still occurring that I didn’t know how to fix.
I’m not too sure about the IIIc I’ve read it has a slightly different build with the closer VF/RF eye holes and a solid cast body but the basic disassembly should be about the same. The basic assembly is the same almost on all Barnack type cameras ie. Leica “clones” Nicca, Leotax etc…
I have read text descriptins of LTM disassembly many times, but your step-by-step photographs make it much easier for a visual guy like me. Thanks a lot for posting!!!
An excellent description of the dismantling an cleaning process, thank you. My 1935 IIIa is suffering from irregular shutter blind travel at all speeds but most noticeable from 1/500th to 1/60th. I first noticed this on negatives but demonstrated it subsequently by inserting photographic paper in the film gate and exposing to a light source with no lens. In your description you don’t mention lubricating the shutter blind shaft bearings/bushes, which I was counting on doing. Is there any reason for this? Perhaps because your problem was originally with the slow speeds and you took the attitude of ‘if it ain’t broke, don’t mend it’! Any thoughts on this or my shutter problem in general gratefully received. (I had the camera professionally serviced seven years ago so I’m both surprised and disappointed that it should have developed the problem).
Best wishes,
Steve
Not sure why after only 7 years it is giving you problems although I have had that happen to me, not being a professional… I learned after most do-it-yourselfers through the years will resort to tightening the tension rods and so after cleaning and lubricating the shutter you end up with over-tensioned rods. The IIIa is tricky to do the rods… first clean and ever so lightly lube the shutter gears, etc… then let it sit about a week, testing a few times a day to work the lubrication throughout the gears, Then back off the tension on the rods all the way (basically starting over) then tighten each rod to where it should be,,, follow Rick Olesons page, about half way down (Fig. 12) shows how to tension the rods http://rick_oleson.tripod.com/leicashutter.pdf
Thanks for your thoughts, Richard. Though it’s possible to run into problems as a do-it-yourselfer, I’ve had cameras returned to me by professional repairers with faults that weren’t there before or faults that had been caused by the repair. I would say to anyone reading your page that with care, patience and a decent set of tools a great many repairs can be done as well as if not better than a professional might do them. Obviously there are limits, but if we aren’t having to make a profit we can take as much time as the job needs, not as much as we can reasonably bill a customer for. The experiences of others, such as yourself, are invaluable and much appreciated.
Thanks again, Steve.
Hi,
today I got rid of the vulcanite cover and made a custom cover out of leather. While this I cla’d my IIIa as well a little bit. The slower speeds are not working. As well I replaced the mirror to a better beam split mirror, but now the pictures of the rangefinder are not coming together again and I have to adjust the mirror. Could someone help me and show me, how to adjust the rangefinder? I’ve loosened all screws and looked for solutions in the internet but without any success.
So, could someone help me, getting my IIIa up and running again with a proper rangefinder?
Regards
Philipp
first you need to adjust the Vertical setting.. remove the ring of the small rangefinder window on the front lens nearest the shutter speed dial (left window as looking at it from the front) there is a lens with 2 spanner slots, the outer set removes the lens assembly from the camera,… the inner set, nearest the glass is how to adjust the vertical image (up and down) and must be set before you can do the infinity (horizontal) image. turn it left or right until the image up and down are lined up.
the Infinity adjust (or horizontal adjust) left to right… remove the 1 screw in front next to the large rectangle window, inside is the adjust screw for infinity. with the camera lens set to infinity, adjust the screw until the image lines up left to right.
for the slow speeds try looking at my page on cleaning the slow speed escapement http://tunnel13.com/blog/leica-iiia-cla-clean-the-slow-speed-escapement/
Thank you Richard for your help, is there a special tool to open the two screws to adjust the vertical setting?
yes but if you don’t have a small spanner wrench (2 slots, one on each side of the lens) sometimes a small screwdriver will work… If you said you replaced the rangefinder mirror, then you would have to have removed the two rings on the front then you would have to have removed the left optics, what ever you used to do that will work for the inner ring…
Thank you Richard, figured it out, I was able to turn it, but the range is too far away. I think, I made a mistake while assembling the mirror although I paid attention to the correct sit of the mirror.
Doesn‘t matter if I turn vertical or horizontal, I don‘t get it in the right position. I screwed the screws also, so I will leave it. Maybe I‘m looking for someone who can overhaul it somewhere in Germany.
I‘m really sad, it pulls me down at the moment.
Thank you anyway for your help.
Philipp
Hello! Thank you very much for these detailed publications. I think your blog helps many people take care of their precious Leica IIIa cameras.
I want to share my experience after having done a CLA of my 1938 Leica III camera.
First: I suggest that a CLA not be done if it is not really necessary. The camera will suffer aesthetically: worn screws when trying to remove them, broken vulcanite, etc. In my case, the CLA is justified by a problem with the slow shutter speeds that I want to correct: slow speeds are very slow (one second has become two seconds, etc.) and many times slow speeds get stuck and just don’t they work correctly (they work like the Z position, keeping the shutter open while the shutter button is pressed).
After carefully disassembling the camera and analyzing it in detail, I discovered that in my case, the problem mentioned with slow speeds was due to a deformed spring (of the two sheet-shaped ones that are located in the lower part of the chamber, in the compartment to load the film). This spring presses the slow speed bar up. When the shutter was loaded the spring rose slightly and did not exert pressure on the slow speed bar, so it was not in the correct position. Once this detail was fixed, my Leica IIIa began to work correctly (without getting stuck) and the slow speeds returned to work precisely (approximately precisely).
I don’t have another Leica IIIa to verify that my discovery is correct, but in my case it solved all my problems.
Regards!
most will agree, don’t do a CLA if it isn’t absolutely necessary… that said, with an 80 year old camera, unless it has been on a recent visit to Youxin Ye, it probably could use somewhat of a CLA. Every Barnack style camera I’ve handled (or most older focal plane shutter cameras for that matter) have had their shutter springs tightened through the years to compensate for the dirt and lack of proper lubrication, and you can hear it, loud ‘snap’ sound. a properly cleaned and lubed camera, especially a Leica should be just a smooth quiet ‘fwoop’…
Like my IIIf red dial, after it’s CLA, it tested fine on the bench but after sitting a week or so and letting the lubrication take better affect, it’s second shutter spring was too tight and caused ‘capping’ and it made the loud snap.. thing you can do after a proper cleaning and lubing is back the springs back completely and start from scratch. the first shutter must be just tight enough but not (much) more tight than to activate the second shutter.. then the second shutter needs to be just enough to ‘follow’ the first.
as for the slow speeds, I had one similar to yours, I also had one where just cleaning and lubing the escapement did the trick
Many thanks for writing up this article. It helped me out tremendously. I purchased a IIIa and it was suffering from stuck 1/1000 speed and slower speeds. I have a late model IIIa, and there are some slight differences to yours but overall the same. After putting back the camera together, now the second shutter following the first shutter is closing a bit slower once it reaches the end of the closing. Is there a way to tighten that second shutter to close smoothly towards the end of travel?
not sure what you’ve already done… did you clean it good? through the years, 70+ years on the IIIa’s, it builds up dirt, people tend to keep tightening the shutter springs to compensate. my IIIa is whisper quiet after I adjusted the curtains after a thorough cleaning…. when you release the shutter is it fairly loud with almost a slap sound?? almost like an SLR camera from the 70’s and 80’s? if so the curtain rods are over tightened but must be cleaned first…
I don’t have a cleaning post for the IIIa but I do on a IIIf, the gears and such are the same
https://www.flickr.com/photos/rwrede/albums/72157663120857245
and here’s a photo and read my comment below it on a tip to clean:
https://www.flickr.com/photos/rwrede/24115006076/in/album-72157663120857245/
after a good cleaning and very very light oiling (sewing machine oil works good) work the shutter a dozen times or so then let it sit about a week doing the shutter a few times a day to fully distribute the oils.. then we’ll adjust the curtains.. let me know when you’re done or if you’ve done this already