Exterior mystery crust
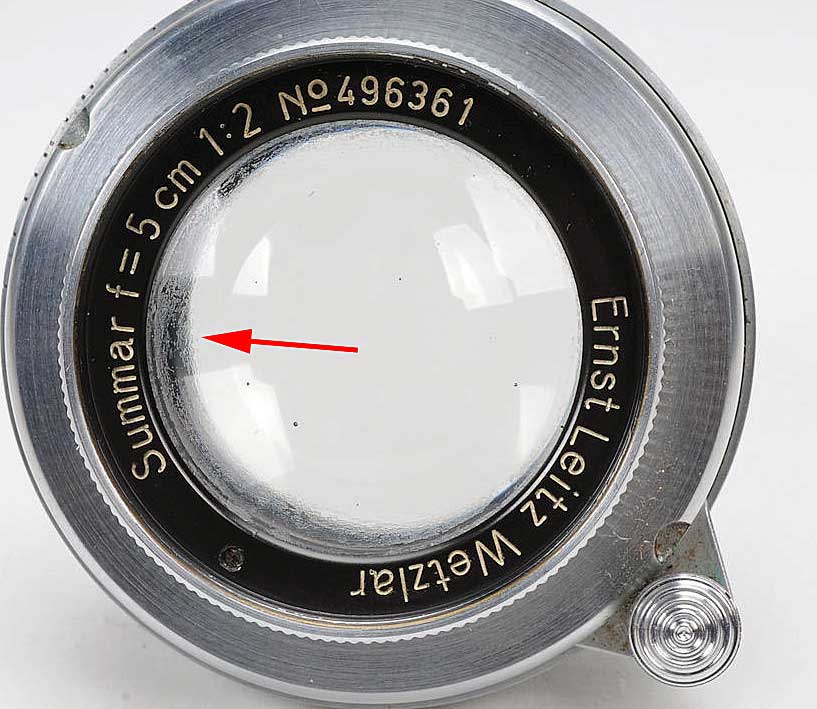
The Leica lens, E. Leitz Wetzlar “Summar” 50mm (5cm) f/2 is notorious for having internal haze, clouding images sometimes giving a desired warmth called “Leica Glow”. Some desire it for using as a portrait lens or other such use as the effect is warranted.
Before I show you how I got my 1939 Leica Summar lens apart to clean the haze, I first cleaned some kind of dried gunk on the front element that resembled very bad cleaning marks.
I had seen it before on my former 1936 Summar and other people complaining about their’s calling it cleaning marks, so it must be a somewhat common thing. This time it was more crusty, uneven looking that led me to believe it wasn’t just the glass itself.
I looked at it with a loupe and could see it was raised, some kind of crust or crystallization. I scratched at it with my fingernail and sure enough it flaked slightly. Perhaps a buildup of years of cleaning fluid?
I knew conventional cleaning wouldn’t work so I tried the method for removing Fungus on a lens. A 50/50 mix of household Ammonia and Hydrogen Peroxide then rinse with tap water. It immediately started working, almost foaming around the edge where it was thickest.
I had to repeat twice, as is usual, but a nice clean outer lens now with just a few true cleaning marks.
Clean the interior haze
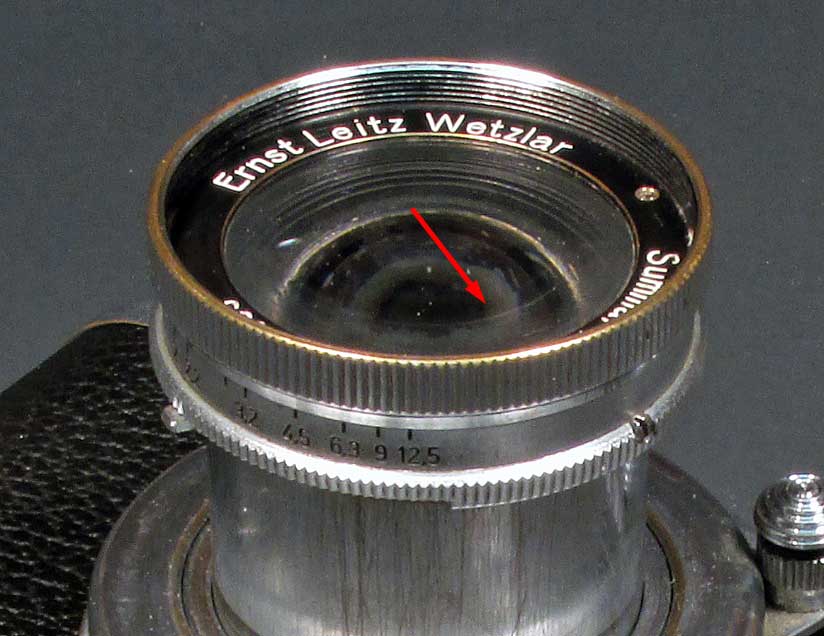
Now I must say, while searching for tutorials and methods of cleaning the haze, it was kind of confusing because it was rarely stated that, in fact, the front name plate is attached to the front ring and the element itself.
It was also stated several times to unscrew the front element right from the lens base and people were having trouble because it would just unscrew the front group. I came up with a way to easily remove the front element.
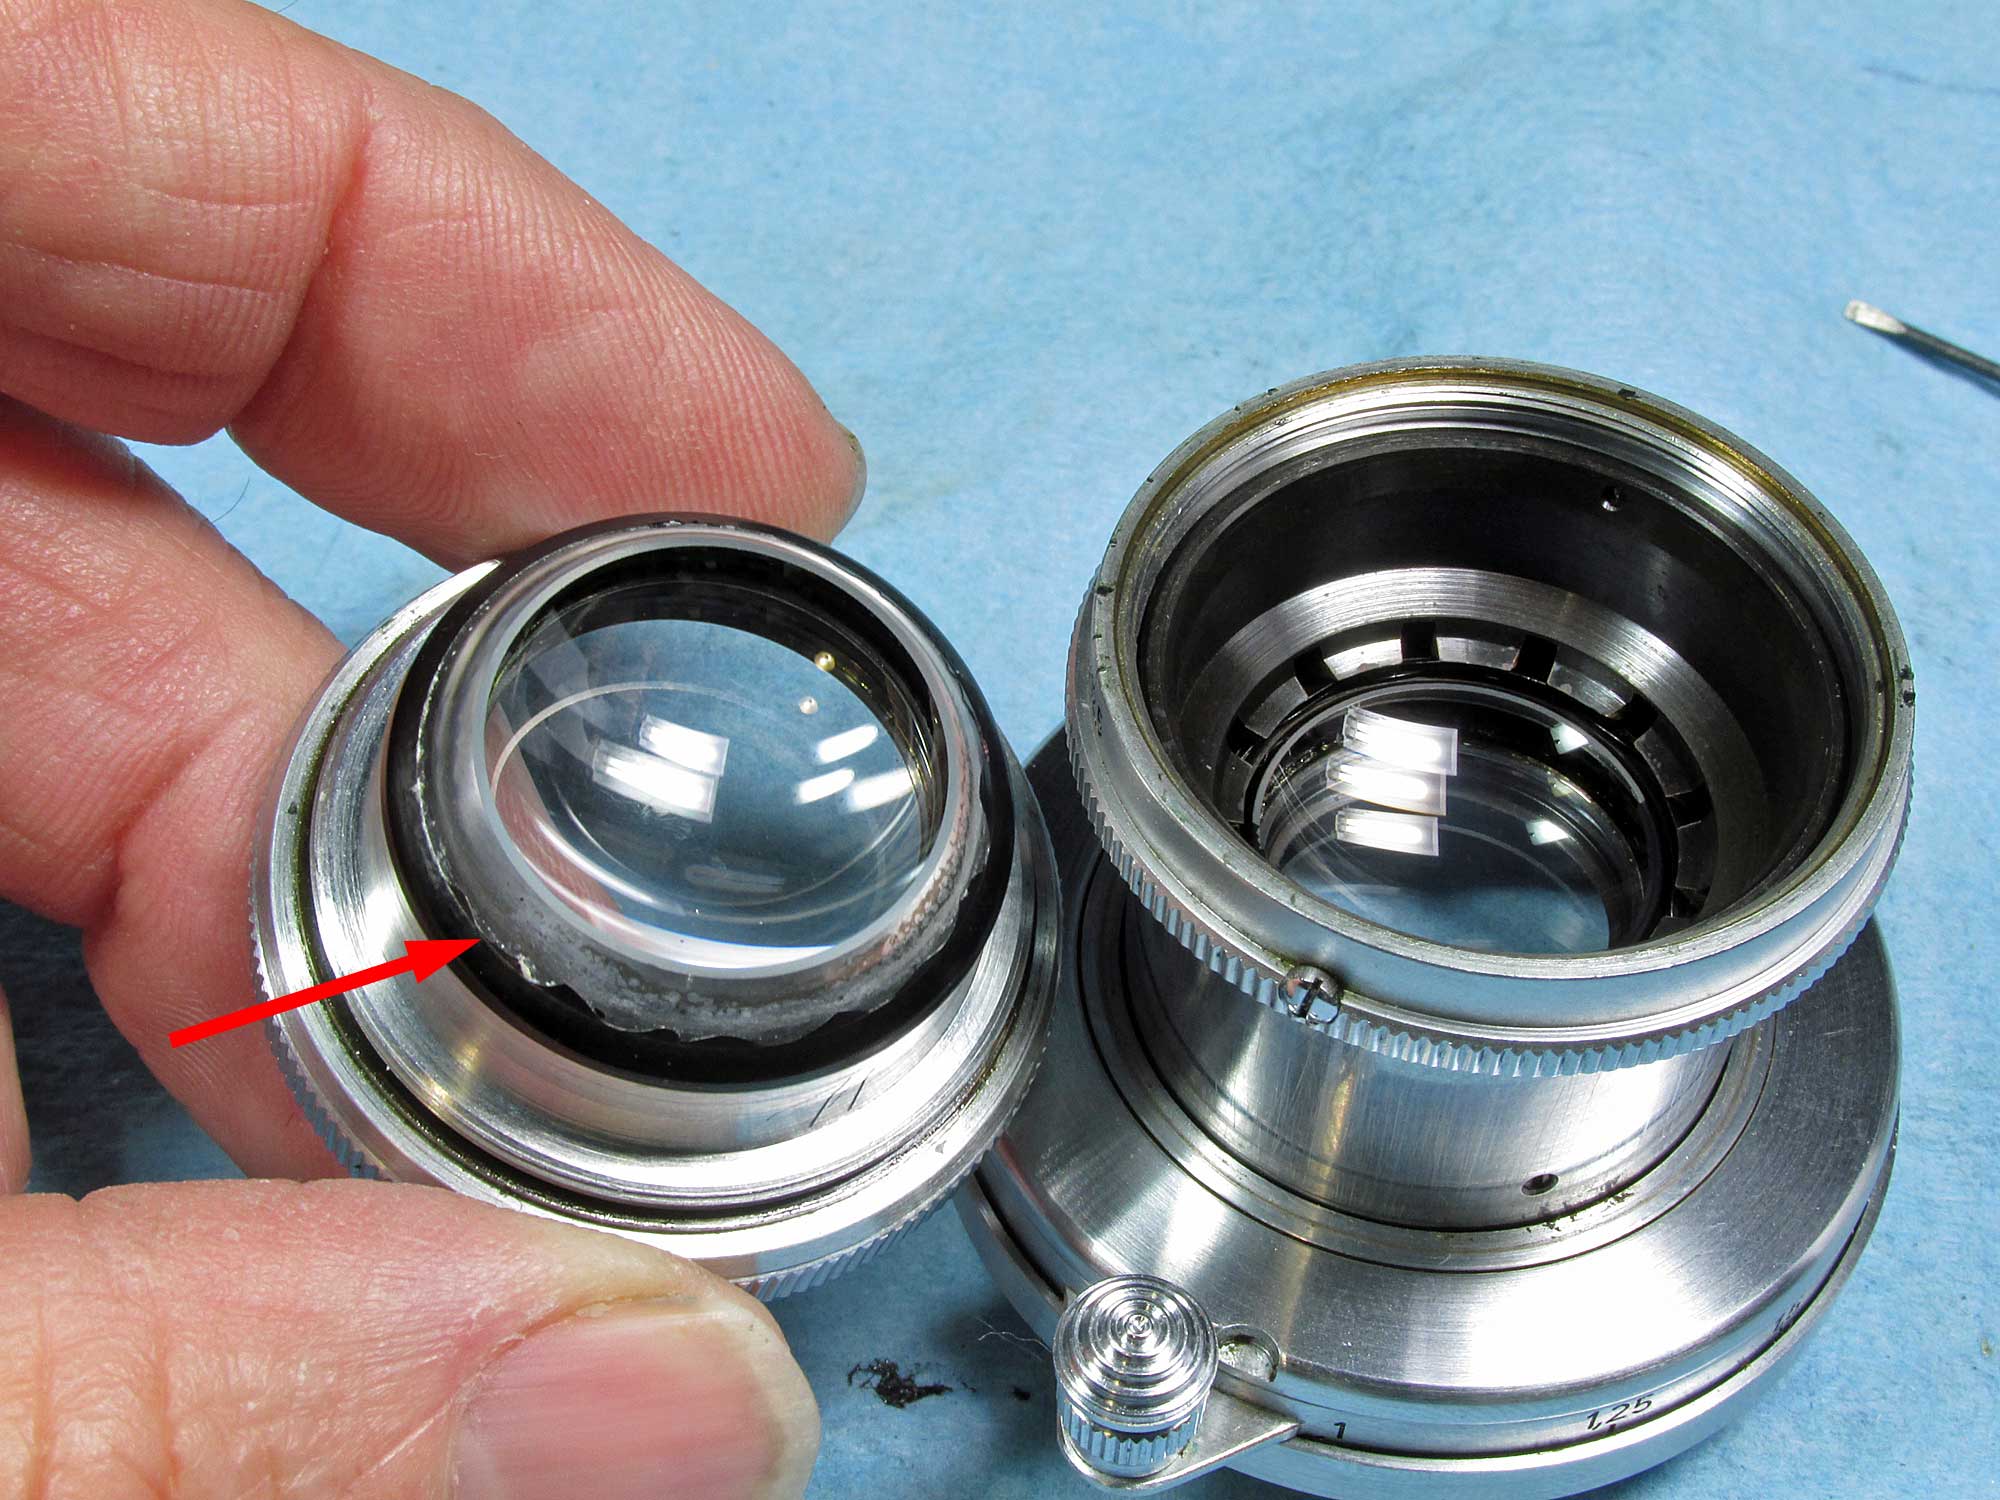
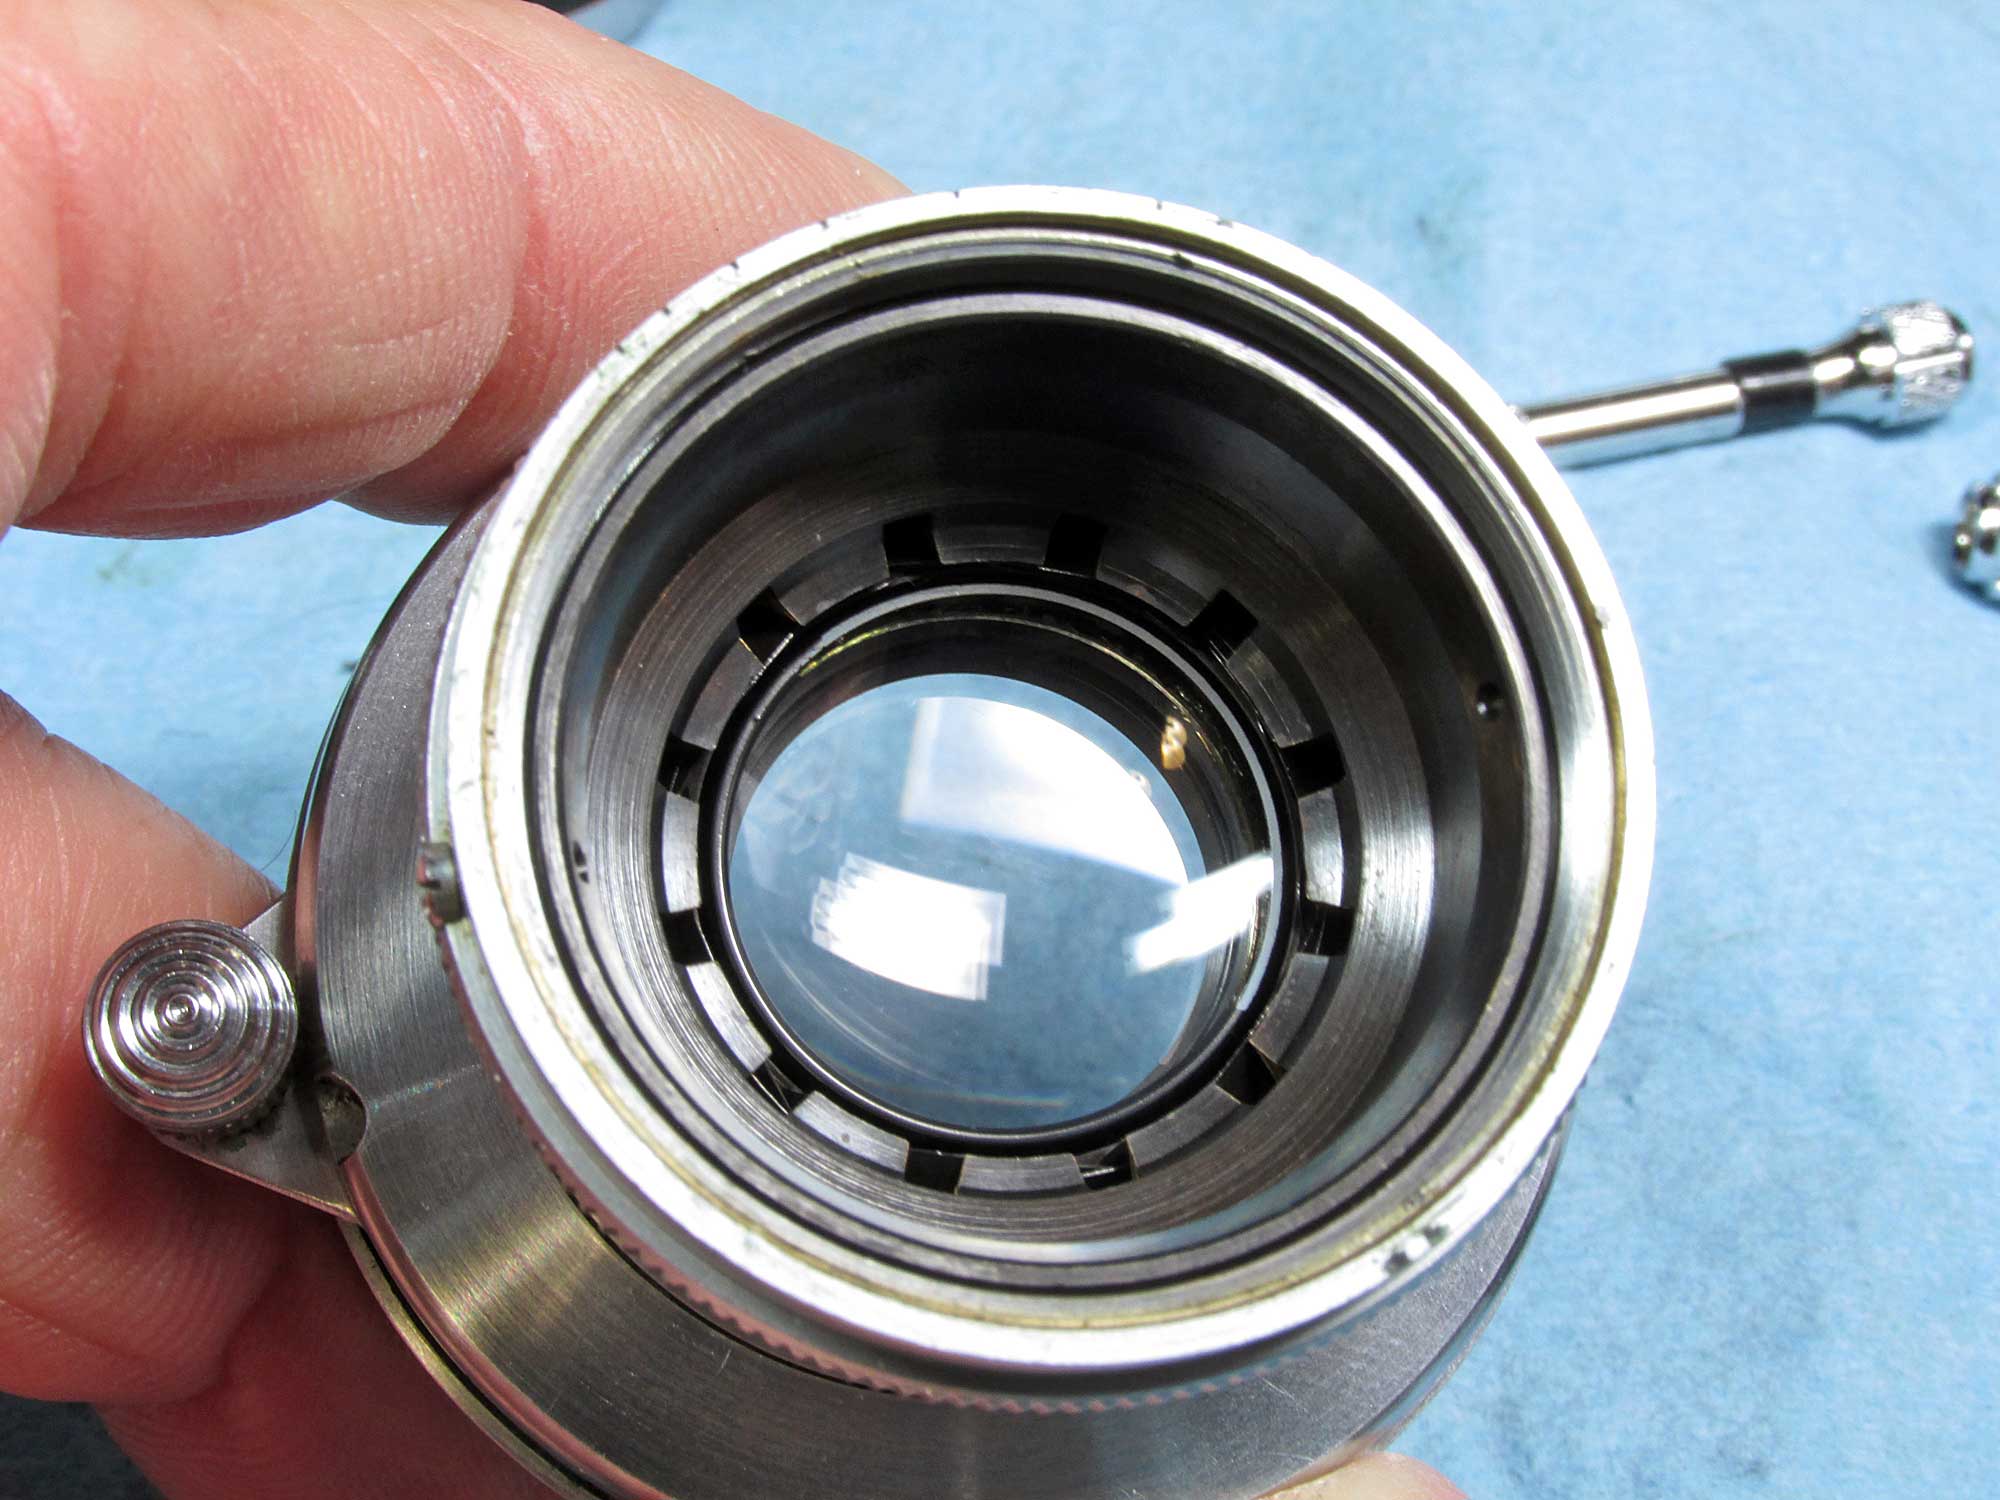
First unscrew the front lens group from the base, just above the aperture ring. Extent the lens tube fully so it won’t spin in the base and grasp the outer knurled ring and turn it counter-clockwise ‘ccw’ it should unscrew fairly easy.
Unscrew fully and remove from lens base.
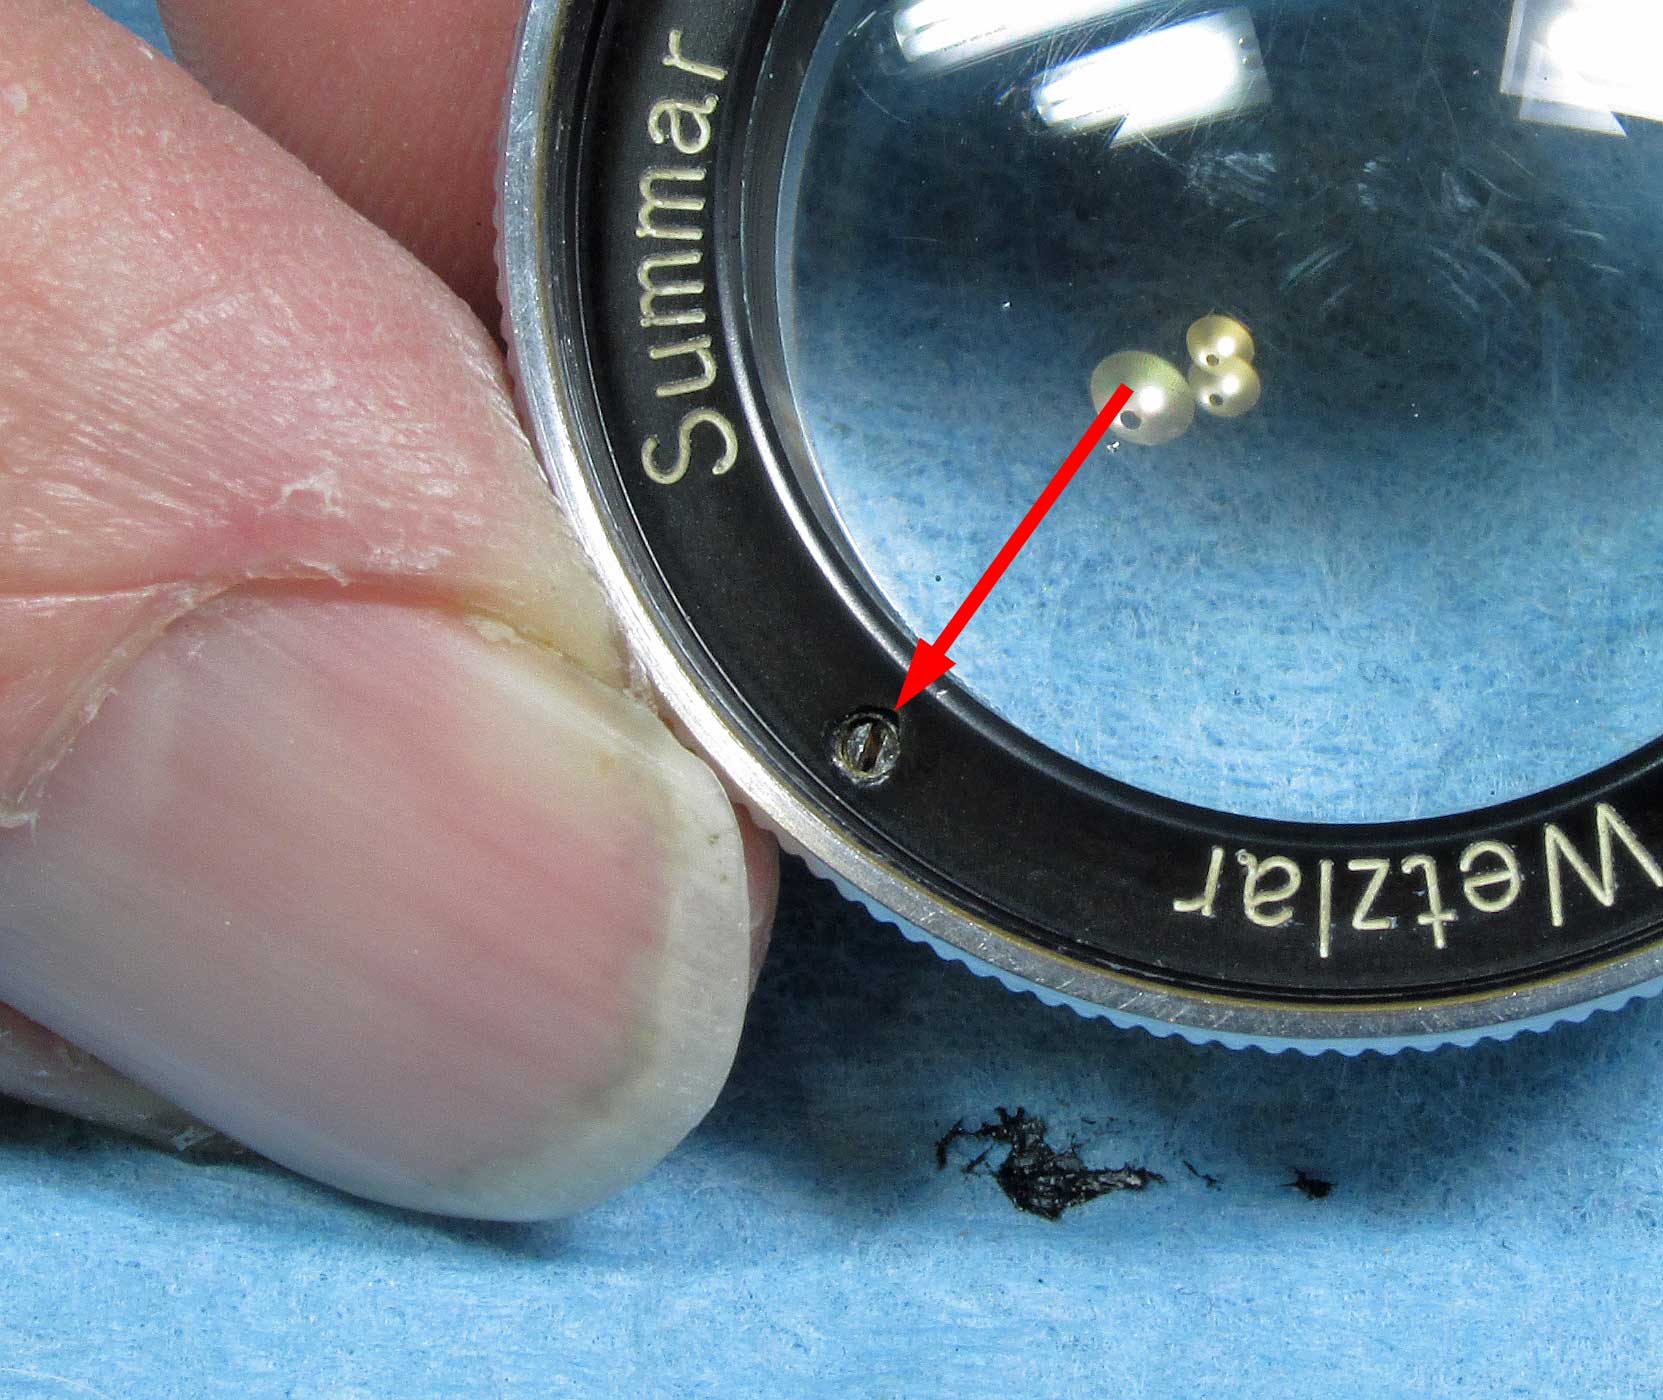
NOW is the time to unscrew the set screw ‘ccw’ in the nameplate (red arrow) so it will separate from the front lens group. It’s tiny don’t loose it.
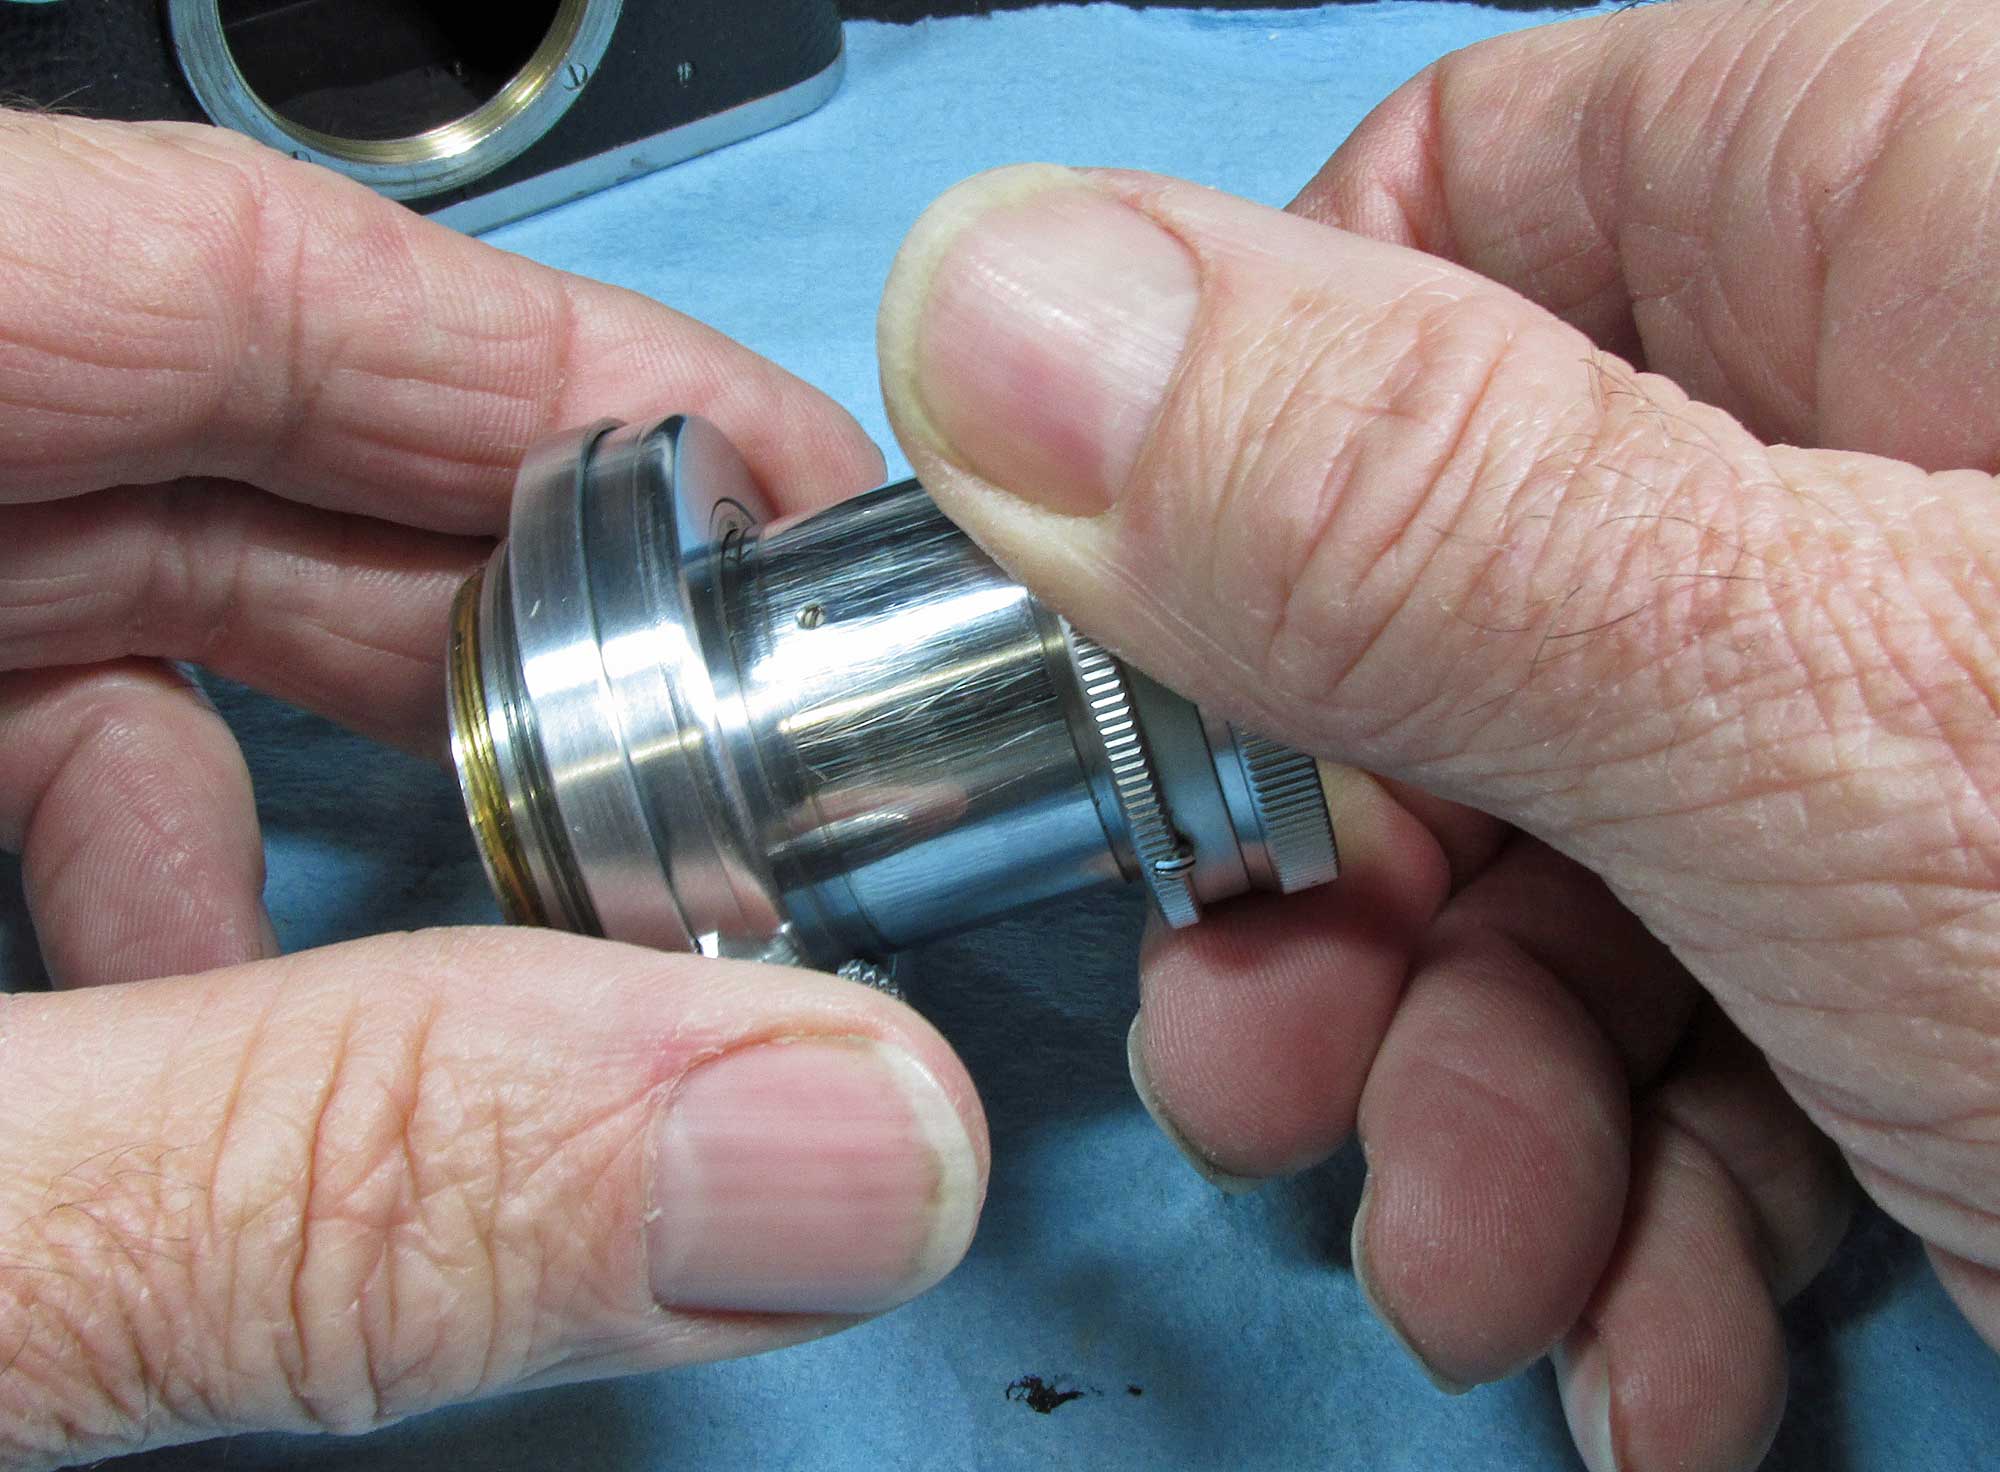
Now you need some kind of grip tool to aid in holding the front group housing while removing the front element. I used an electrical cable, about the same diameter as a pencil or slightly smaller but not too small.
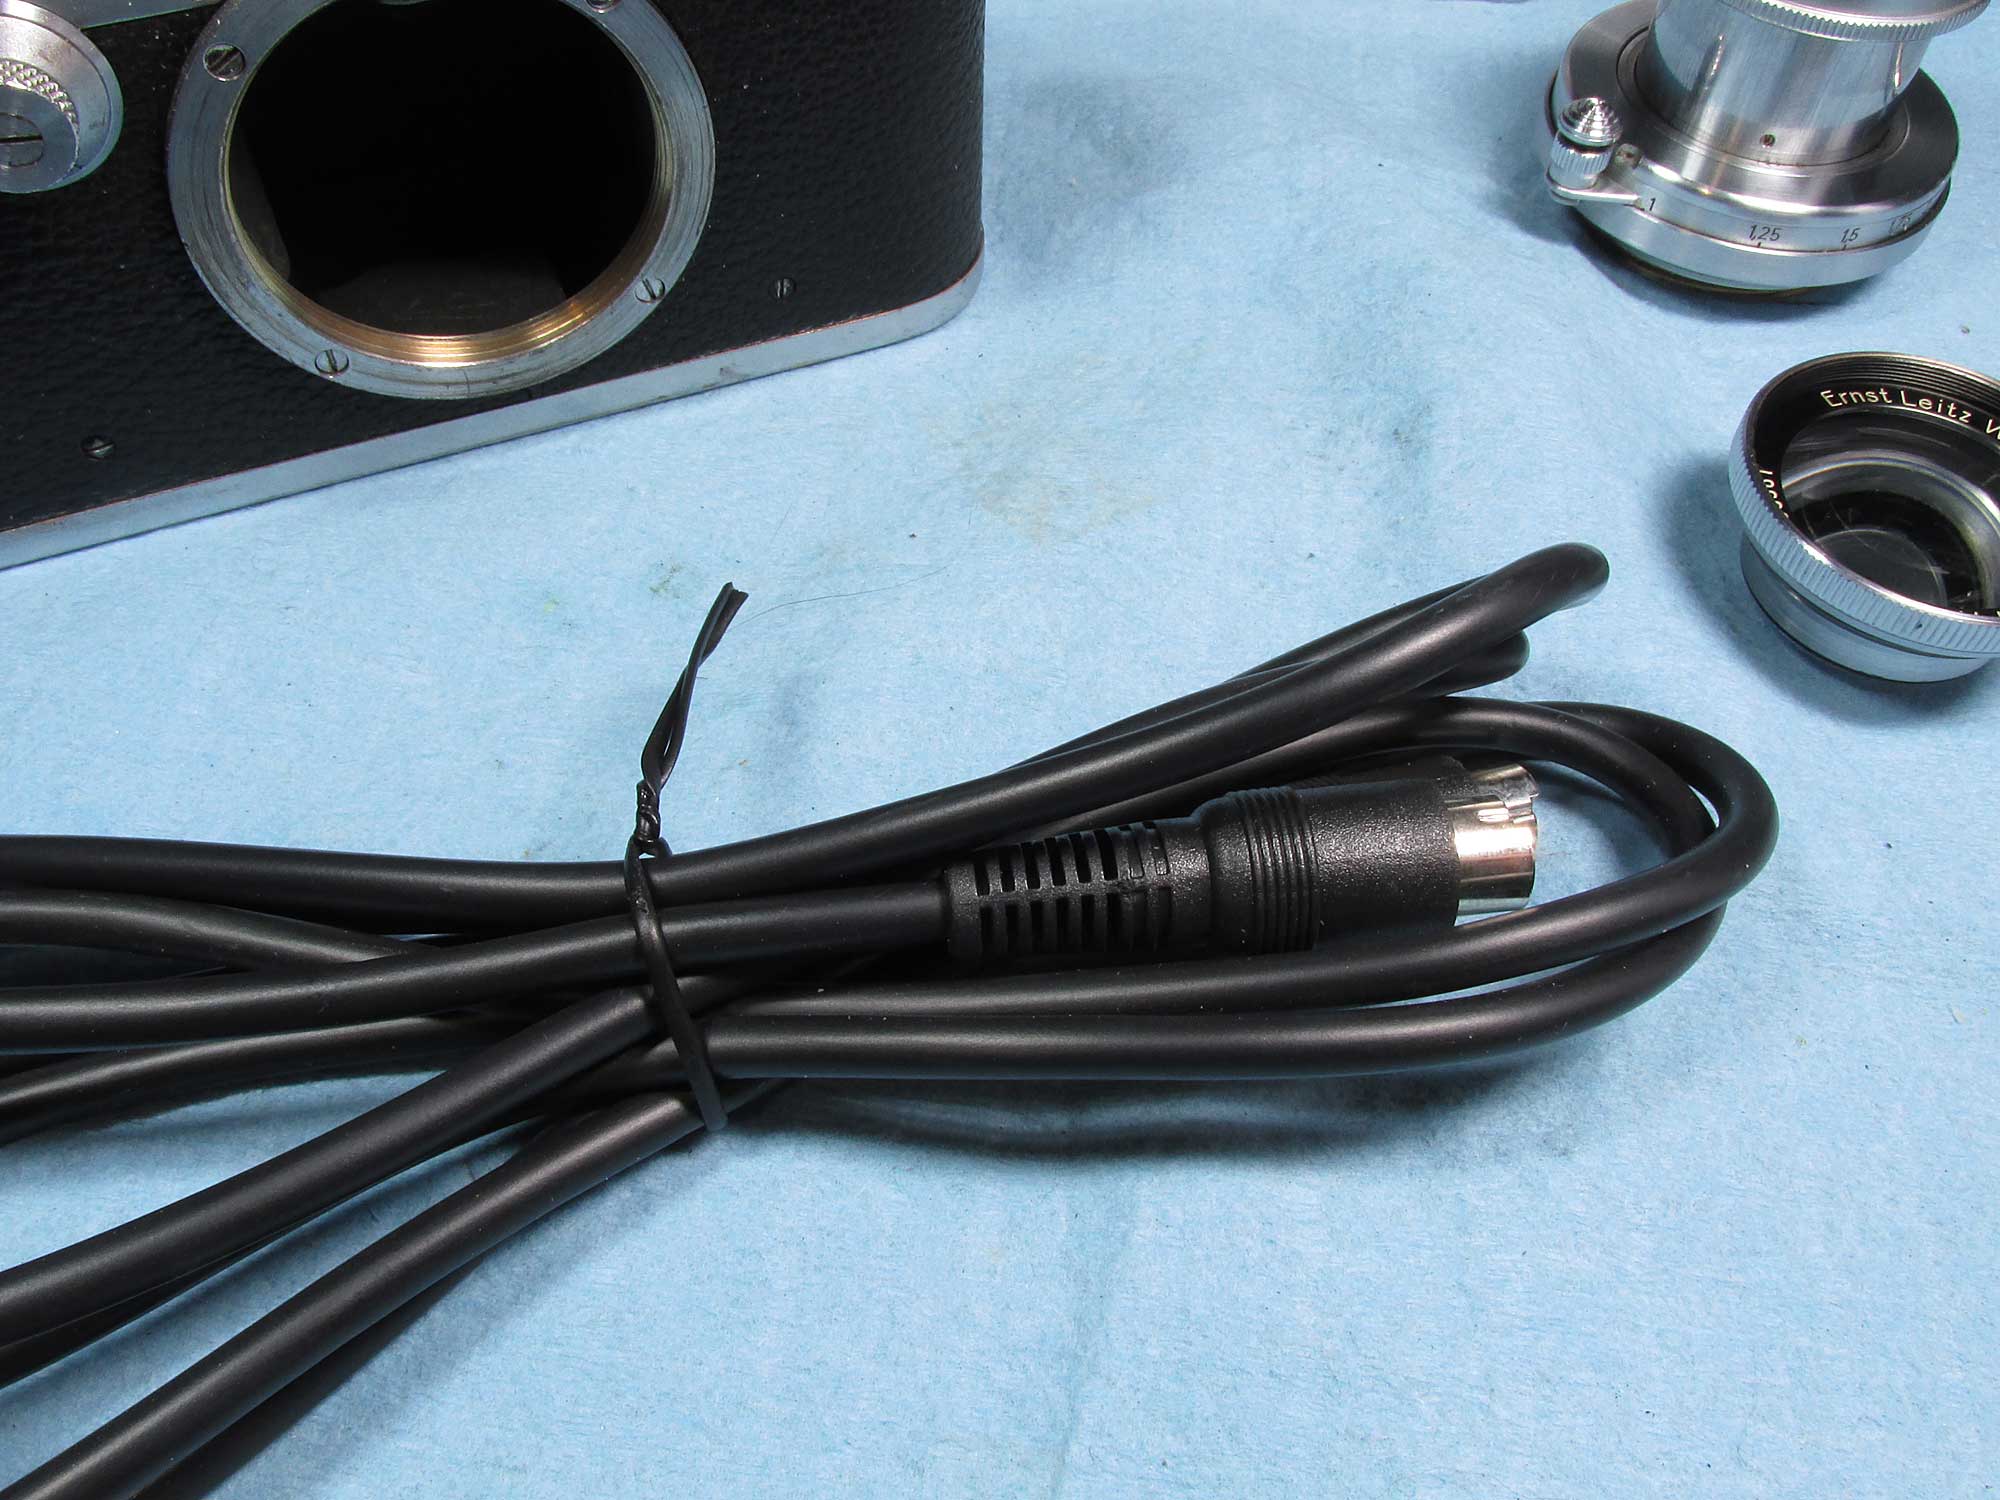
not clear here but, the front lens group housing extends backwards with a nice metal tube to grab onto with your tool just behind the front element ring. Firmly grip your tool around the group housing and firmly grip the front ring and unscrew ‘ccw’.

The entire front knurled ring, nameplate and front element are attached together. Mine came right off, I’ve read it could be difficult and a good soaking of the front element in isopropyl alcohol might help.
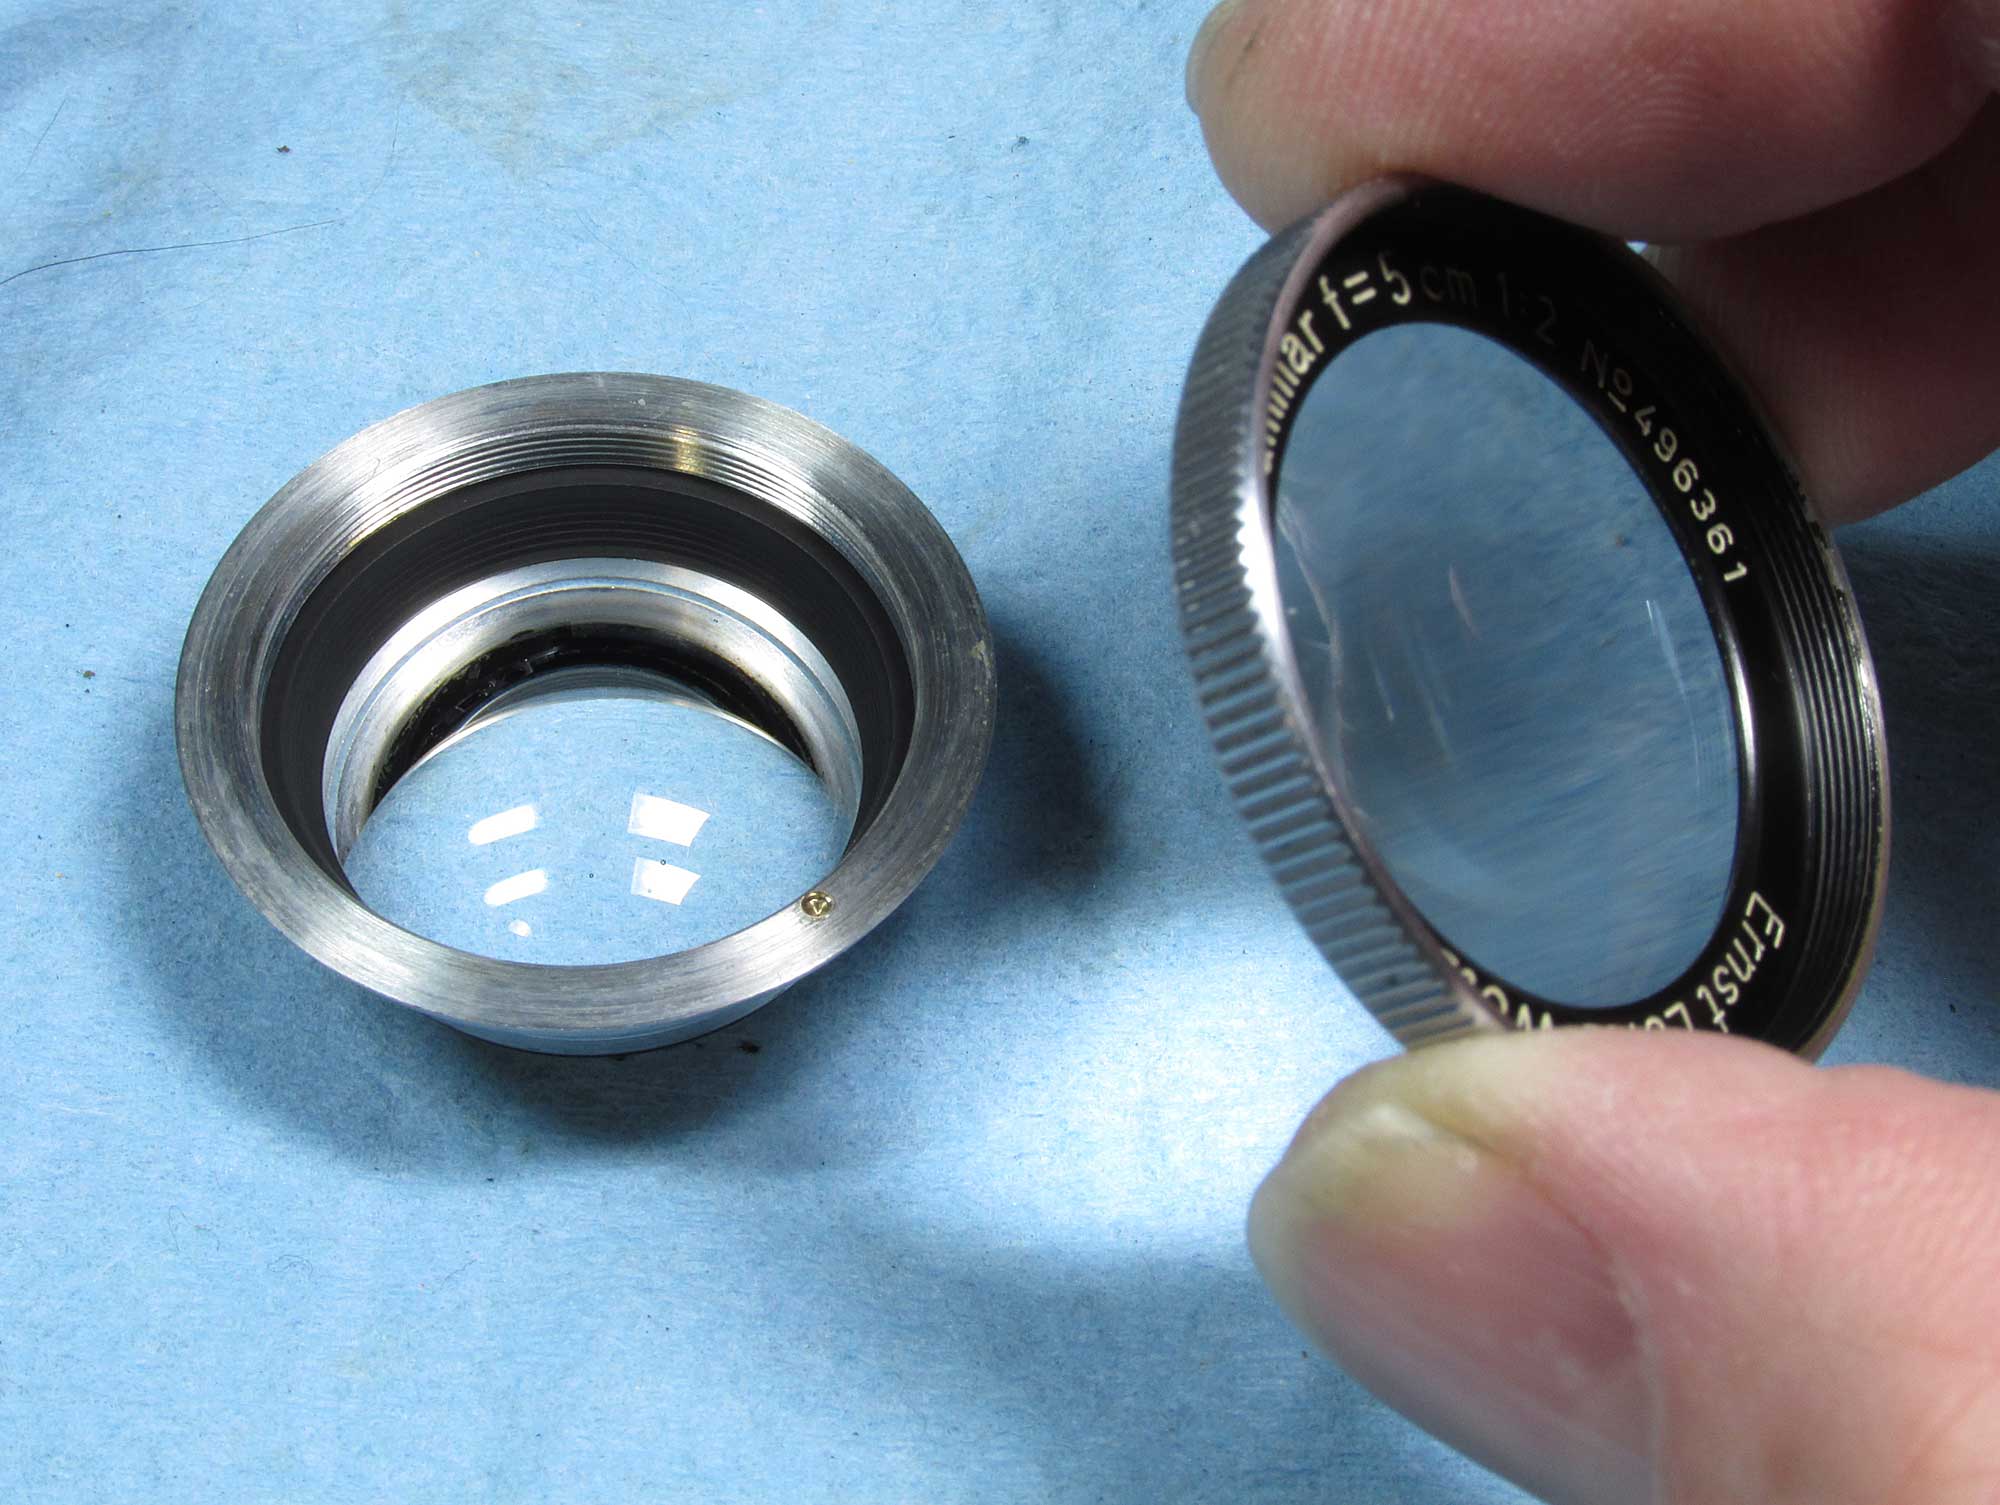
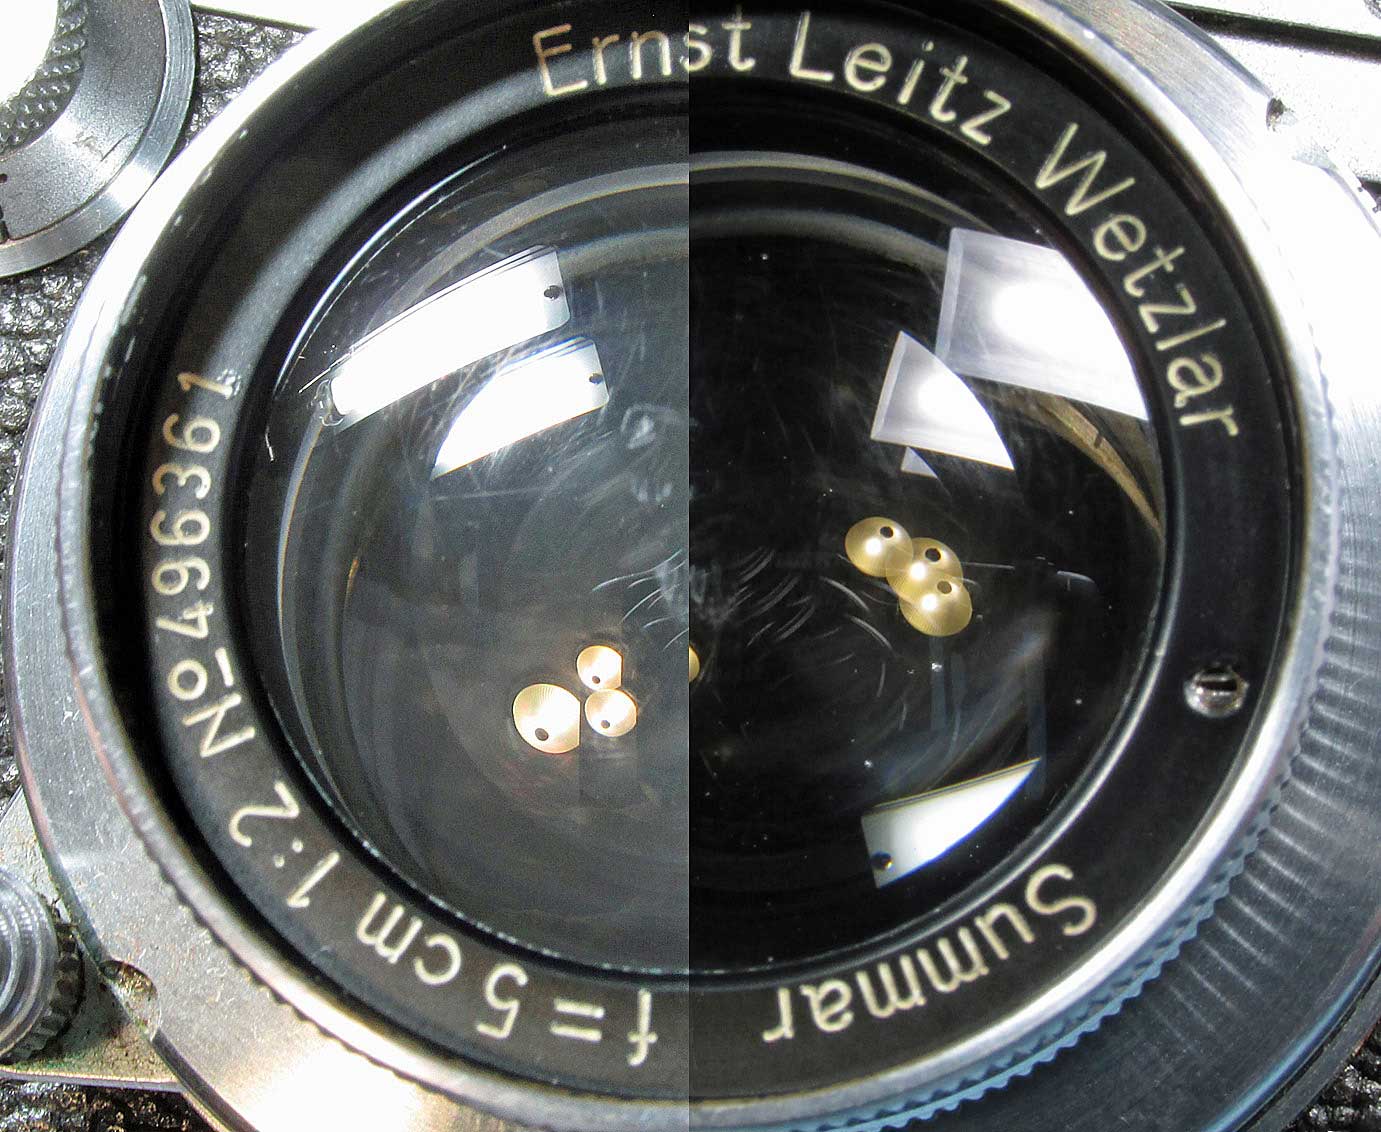
Again, I used the 50/50 mix ammonia / hydrogen peroxide to clean the haze from all inner elements except the lens behind the aperture blades as I didn’t want to risk damaging the aperture unit/blades.
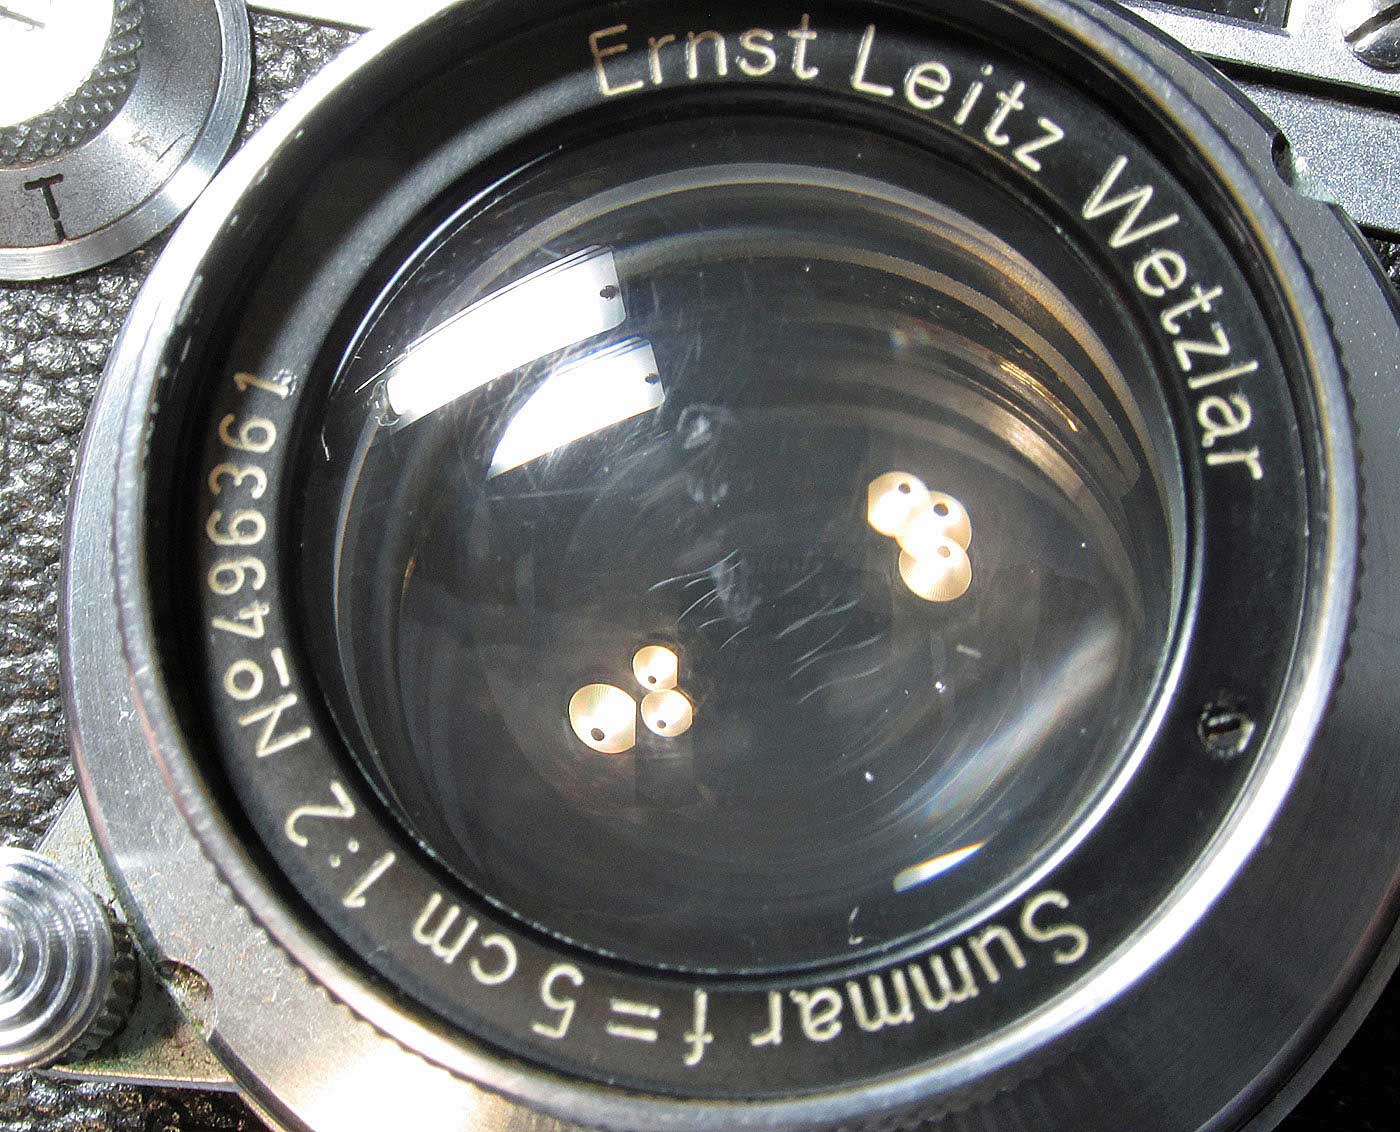
Blow out any dust and fuzzies from cleaning before reassembly. I found what looked like dust in mine that turned out to be bubbles in the lens glass. I’ve read this is normal. Here’s a before and after the cleaning shot.
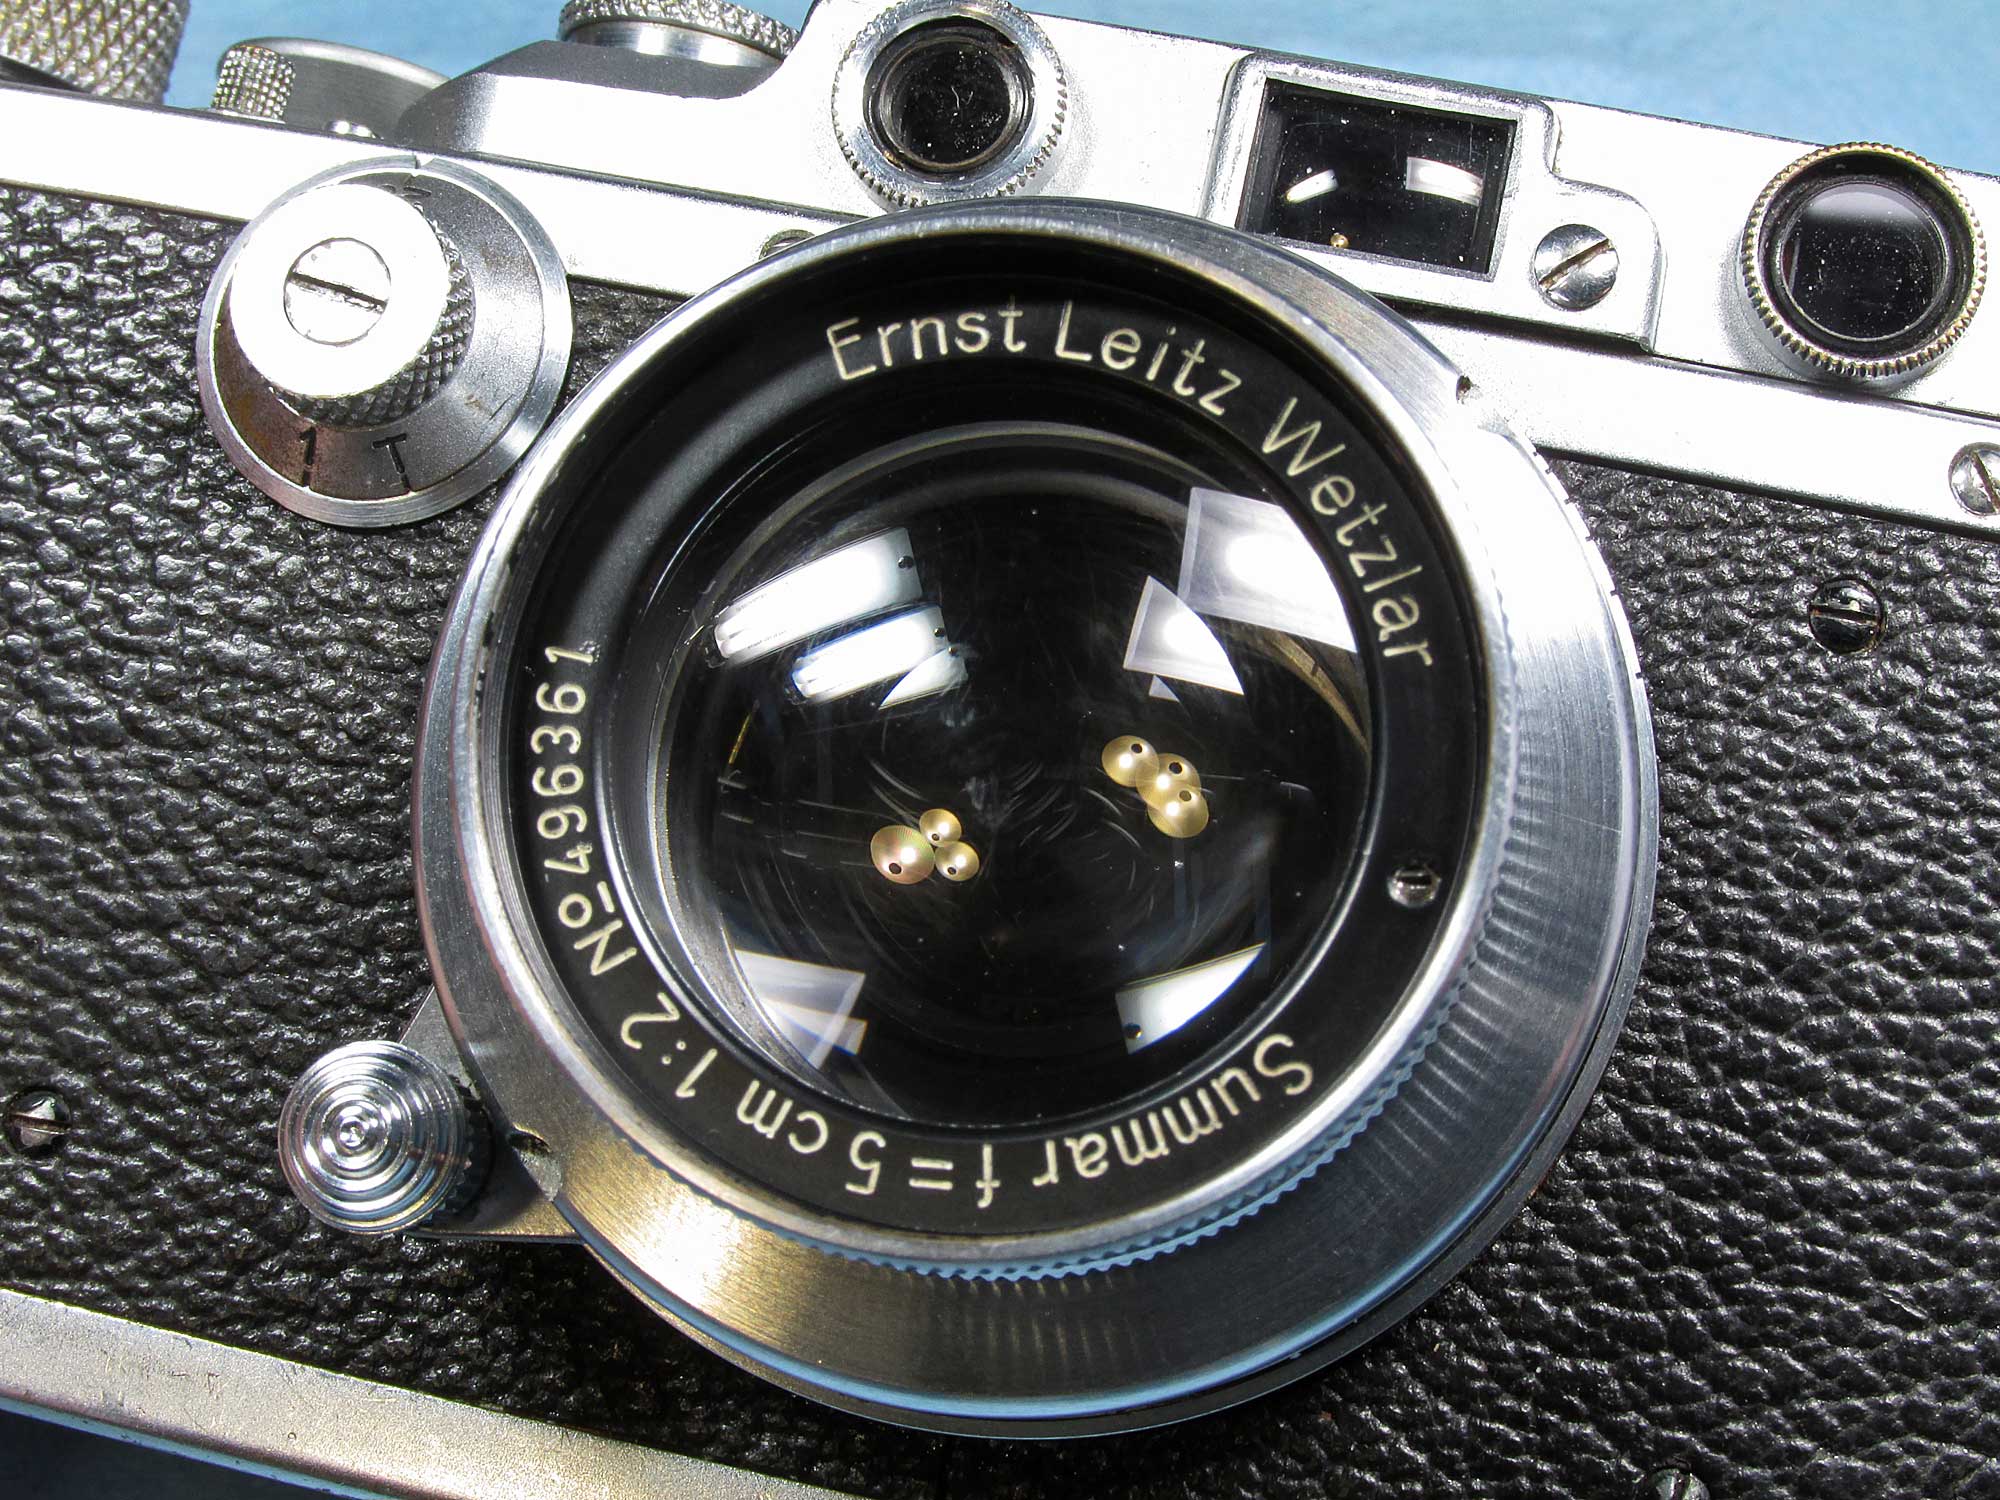
It looks great mounted on my 1936 Leica IIIa It does have a few cleaning marks and some mishandled scratches in the middle but it was cheap and it’s mine.
Hi there, great blog. I have a hazy summar too, cleaned it up to this point but struggling to get into the rear element that has fungus..i’ve unscrewed the retaining screw but the bayonet wont move. Have you managed to access it?
Thanks!
Giulio
I’ve never been back there. Try this forum post, the response by John sounds like it might be what you’re looking for http://photo.net/leica-rangefinders-forum/00SU4j
Dear Richart
Phantastic work and job in order to help people for repairing and caring their vintage cameras.
I was following your recommendations for cleaning and adjusting the telemeter of my old Leica IIIf I have bought.
¡¡Great help and great job!!
Thank you very much for your generosity
Dear Richard.
Excellent article!
Just a question: I mixed Ammonia (2% concentration) and Hydrogen Peroxide (10 vol), 50% each, and immersed the glass inside, but fungus remains on place…
Maybe Ammonia was not enough concentrate?
not sure what you mean by 2% concentration. I’ve never looked at the bottles, I just use household ammonia and hydrogen peroxide. it might be fungus between layers of lenses (in a group) it can’t clean that. I usually just get it wet, let it sit a few minutes and gently scrub with the Q-Tip then rinse
Can I ask how you mix the chemicals? As I have rad those two are dangerous, possible explosive together….plus it must smell awful?
not dangerous at all… it’s the Hydrogen Peroxide you get to clean cuts and wounds. Household Ammonia like for cleaning and sanitizing. just a teaspoon of each (50/50 mix) is all you need, or you can make a batch and keep it handy in an old plastic bottle.
What did you do with the aperture? Removed and then …. how get the twelve tiny blades back into position?
I tried that earlier but proved impossible for me.
Help me please
Vincent
I didn’t have to deal with the aperture blades at all, just the lenses leave the aperture open to clean the element behind them.
Great job, Well I agree; I tested the Summar 5cm & Hector 73mm in 2009 on a MFT lumix G-1. Both examples I serviced inside the lenses , reassembled and tested. I was amazed what results, I got! I used sunshades of course! If you dont use a proper sunshade, your crazy. I always us modified Rubber collapsible types. Uncoated lenses suffer from lens flare. with sunshades the results have a slightly softer contrast and amazing bokeh in the background. The image is very sharp in the center and falls off to the edges. Since 2009, I have both lenses modified for FF Sony A7r mirrorless body and they are even better. Lets be honest, why do I get modern results from 1930’s lenses? Direct light path to digital chip, manual focus assist at 7x on the Sony A7r. Conclusion is Rangefinder coupling in 1930’s and 1940’s gave the collimation a large error! Only DOF at f;8 could over come it. Used at F:2 in the 1930’s was a disappointment; and Summar 5cm and Hektor 73mm was given an unjustified bad reputation! by the 1950’s advanced lens coatings and better rangefinder collimation on the M3 gave the illusion that 1950’s lenses from leica were superior. Actually I have proven this is false data!
Every 25 years a lens MUST be cleaned inside! A Sunshade is a MUST! The sun on your back is a golden rule! Old lenses have a treasured Bokeh that modern lenses designed out! Ultra sharp, ultra corrected is often; ultra contrast is ultra boring. The Summar 5cm and the Hektor 73mm are great lens!
eastwestphoto, I love the Bokeh of old lenses. another great lens is the Schneider-Kreuznach Xenon lenses on the earlier German made Kodak Retinas. I also am fond of my Zeiss Sonars
Mixing hydrogen peroxide and ammonia is perfectly safe. The mixture smells like ammonia, which is mildly unpleasant but won’t hurt you at all.
What people are probably thinking of is mixing ammonia with chlorine bleach, which DOES release a toxic gas. Don’t do it. That mixture isn’t good for anything anyway.
Informative and useful blog for us Summar owners, thank you!
Thank you. My new summar is now fully cleaned.
Great!
I had no problem separating the front lens group from the lens body. However, getting the front element unscrewed is the problem. After soaking the front lens element in alcohol overnight the front element is still not budging. Any suggestions on how to get it loose?
I went back and looked at my tutorial.. all I can say is did you remember to remove the set screw in the front nameplate? getting a good grip on both the base and the front element ring is all that’s needed, might have to invest in the proper size ring wrench, not sure what size…
Yes I did remove tiny front screw! I will try to find the proper wrench to do the job. Thanks much
Hello! I cleaned both the rear elements and the front elements of my Lica Summar 5cm f2 lens. Here I comment how to disassemble the rear group:
First, it is very difficult to access this group. Special tools will be required to unscrew the fixing rings. These are very tight and in my case I needed to wet with Zippo lighter fluid to loosen them. The lighter fluid did the magic when he had already lost hope of disarming this elements.
1. The first thing will be to remove the rear ballonet. It has a small screw that must be removed. Once the fixing screw is removed, it must be unscrewed from the main cylinder. It is difficult to remove, but it is not impossible.
2. Once the ballonet is removed, with a special key to open lenses, the rear group must be unscrewed. Here I added lighter fluid because the adjustment was very tight. The liquid made it easier.
3. Then you must separate the elements into two parts to access the interior. They are curled up. Again I added some liquid to be able to unscrew the elements.
Then follow the cleaning procedure and finally reassemble as it was.
My lens was very clean after this.
Regards!
Hello, I am having some trouble with the very first step. I can’t seem to get my front group off. Are there any screws I need to loosen before I do this?
the front “group” should have no screws, don’t undo the front nameplate screw until after getting the group off. What kind of tool are you using to grip the lens group?
I have a 1936 Summar and had a go at stripping it last night. After reading this I’ll have another go as I only took the front lens off and couldn’t work out how to take the convex one behind. Now I know. I’m also going to have to look for the tool for the back one. My lens has haze/fog in it. Also household amonia? I have hydrogen peroxide (mouth wash), but was thinking those digital sensor swabs might work?
Cheers for the info. Because of the fog I also ended up buying an f2.8 Elmar. It’s a bit characterless but quite sharp. Would be nice to get my Summar into a decent condition.
Hi, same problem here.
I can’t get the front group off at all by following the steps. It is incredibly hard and stiff.
Hello
Thank you very much for your useful article.
1) Do you clean the lens elements by rubbing or by soaking?
2) In case of soaking what do you do with the 2 collated elements behind the front one?
I thank you very much if you will be so kind to answer.
Paolo Messeca
Sort of both, soak and rub. I dab it on with the Q-Tip and let it sit on the surface for a while, then gently rub with the wet Q-Tip
Very nice photo-supported tutorial. Helped me with my 1933 black rim Summar.
BTW, the last photo does not show a 1953 IIIf, but rather a pre-1939 III or IIIa. A nice camera….I have one myself: a 1939 IIIa complete with dogleg window surround just like yours.
Please consider making more old Leica lens cleaning tutorials. You’re good at clear photo supported descriptions.
Thank you for posting this. I took your advice on removing the front element and used a cable, but it was really stuck on there. I ended up using the cable in a small vise and a little heat and it finally came free.
I have a Summar in very rough condition (it was cheap). The aperture, focusing and rear elements are good now, but the inside of the front group is dusty. The setscrew in the front ring is completely rusted, it’s just gone. There is no slot left for a screwdriver, only a rusty piece of metal. I think I have to drill the setscrew out in order to get inside the front group. Could you measure how deep the hole is from the name ring to the bottom of the screw hole? Or at least the thickness of the name ring. So I know how deep I need to drill in order to open it. Thanks!
You’re right, it’s my 1936 IIIa! don’t know how I made that mistake, my ’53 IIIf doesn’t have a screw in the slow speed knob
sorry, I no longer have this lens
‘it should unscrew fairly easily’
nope, not with all the torque in the world 🙁
update – i managed to unscrew the front element by first very tightly attaching a leica FIGRO filter, then with the extra leverage from the FIGROs tightening knob and wearing a pair of gloves, the element came free
It’s a much better lens than its reputation, but only if it’s “water clear” inside. I had to clean the rear group on mine.